RM -RF IS THE ROOT OF ALL EVIL
Several months ago, I had the unfortunate experience of wiping 2 years of my work. This blogpost explains why this tragedy happened and what I did to recover some critical data from the ashes of my SSD.
Vous souhaitez améliorer vos compétences ? Découvrez nos sessions de formation ! En savoir plus
On the afternoon of 29 September of 2020, I launched the following command on my host:
159858 MESSAGE= lucasg : TTY=pts/23 ; PWD=/media/lucasg/5E08-D3D0/rootfs_extract ; USER=root ; COMMAND=/usr/bin/rm -rf ./usr/share/www/resources/css/
And this was the aftermath:

2 Millions files being deleted using a single command 😱 .... so what went wrong?
The context
I had to audit a black-box embedded device for a client. Like most IOT thingies, this device was hardened against physical attacks. However I did found a way to get a reverse shell on it and reactivate a dropbear SSH service used for remote troubleshooting.
I wanted then to use this root shell to extract the rootfs in order to analyze on my host laptop.
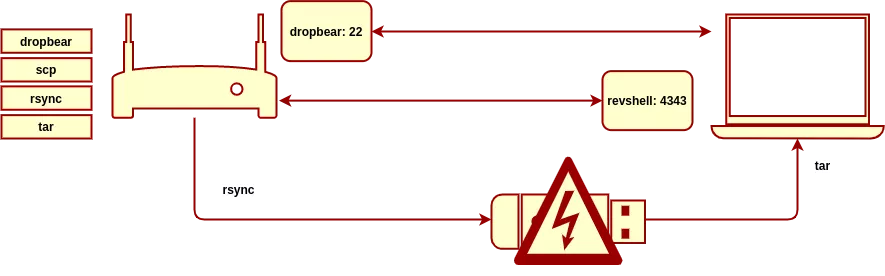
I must mention that I clearly am not a Linux specialist, and my knowledge of basic Linux commands is pretty poor. If only I knew that rsync can work over ssh using the -e flag, it would have saved me a whole lot of headaches.
Frustrated by stripped down versions of executables available on the device (it was a pretty bare-bone busybox) and my lack of productivity using Linux tools, I ended up rsync'ing the whole system on a USB stick, and copy the rootfs on my host.
Unfortunately the rsync tragically tripped the USB controller, which then corrupted a FAT entry in the rootfs! At that point my pendrive became a natural fuzzer for FAT filesystem parsers, exposing thousands and thousands of broken subdirectories with cyclic trees and cthulhuesque filenames everywhere.
And when I mounted this rootfs and wanted to rm -rf as root the faulty directory which was the "source" of the corruption, my whole system was deleted instead!
Reproducing the bug 1
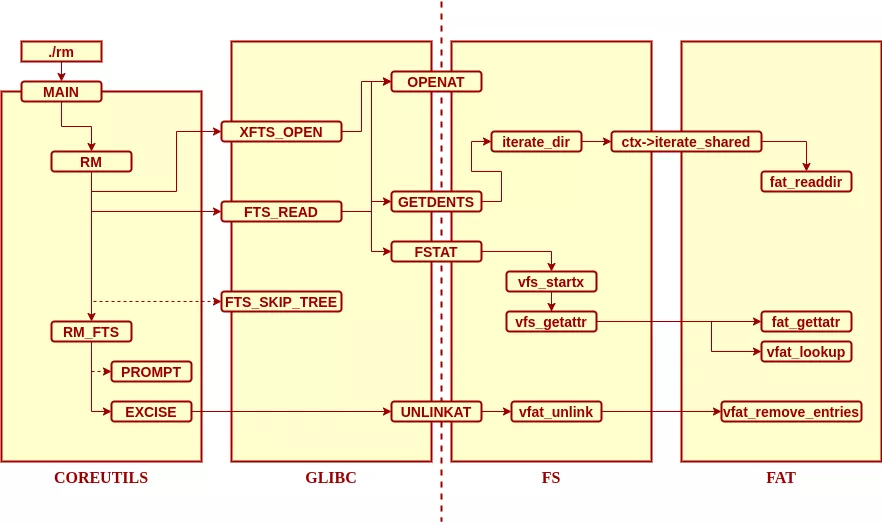
First hurdle: we need to constrain the version of the software impacted. After the fact, I found that rm rely on three codebase : coreutils that implement rm, glic that implement fts functions ("file tree search"), and kernel for the fs subsystem and the vfat kernel module.
The design architecture is pretty simple since rm only rely on 4 syscalls to work : openat, getdents, fstat and unlinkat.
Here's my matrix of bug reproduction:
| ⠀⠀⠀⠀⠀⠀⠀⠀Description⠀⠀⠀⠀⠀⠀⠀⠀ | ⠀⠀⠀⠀coreutils⠀⠀⠀⠀ | ⠀⠀⠀⠀glibc⠀⠀⠀⠀ | ⠀⠀⠀⠀kernel⠀⠀⠀⠀ | ⠀⠀⠀⠀BUG ?⠀⠀⠀⠀ |
|---|---|---|---|---|
| Victim (debian unstable) | ???? | ???? | ~ 5.2 | YES |
| Debian Jessie 4.9.0-14 | 8.26 | 2.24 | 4.9.240-2 | NO |
| Debian Stretch 4.19.0-11 | 8.30 | 2.28 | 4.19.146-1 | NO |
| Debian Unstable 5.4.0-0.bpo.2 | 8.30 | 2.28 | 5.4.8-1~bpo10+1 | NO |
| Ubuntu 18.04-3 | 8.28 | 2.27 | 4.18.0-25 | YES |
| Ubuntu 18.04-3 | 8.28 | 2.27 | 5.0.0-23 | YES |
| Ubuntu 18.04-5 | 8.28 | 2.27 | 5.4.0-51 | NO |
| Ubuntu 20.04-1 | 8.30 | 2.31 | 5.4.0-53 | NO |
The result is that it is not obvious which minor/major version of which dependency broke my system (Linux fragmentation yay!). I thought initially it was probably a disastrous combination of bugs that happened to me.
But anyway I found a way to reproduce the bug on Ubuntu 18.04-3 so I created a VM, dd'ed the usb key onto a vmdk disk and reproduced the bug ad nauseam.
Finding the root cause 2
First thing first, I added some logging to rm in order to have a better understanding on what went wrong :
$ sudo ~/coreutils/src/rm -riv /media/arma/5E08-D3D0/rootfs_extract/usr/share/www/resources/images/
... [one eternity later ] ...
/home/arma/coreutils/src/rm: descend into directory '/media/arma/5E08-D3D0/rootfs_extract/usr/share/www/resources/images/╛'$'\005''≤mÿ'$'\037\020''º.æ_ï/ñ╧₧╛3`cl.┌πv/-num %u.
nf/°╪'$'\031''íA'$'\022''@V.≈≡ï/'$'\034'' ¥σ.┐/'$'\a\020''áß'$'\001''0â'$'\022''.╕2─/Ü'$'\002''╥¿4:╜9.=.3/╣τ╔÷f'$'\021''ª'$'
\020''.√,╧/jgö6√τ╛Ω.ƒ5@/<&'$'\036''\æzìc.u)B/w/'$'\001''└üΓ'$'\017''0'$'\034''Γ.'$'\001''0á/'$'\016\034''░'$'\f''╜∩'$'
\036''5.∩z├/ent.t/getpwnam.("%/N'\''·δ/├o'$'\033''╝┌o┴╟.ûs√/'$'\004''0ôσ.'$'\002''`á/¼e▄ìg'$'\032''₧{.çτè/4
¥σ.'$'\001''0á/'$'\001''0á'$'\023\021''/coalesci.ng_/_is_vali.d_u/[REDACTED]/ssential. pa/hared.wa.n_p
/;⌠■δ/Ü'$'\002''╥¿4:╜9.=.3/╣τ╔÷f'$'\021''ª'$'\020''.√,╧/jgö6√τ╛Ω.ƒ5@/ñ╧₧╛3`cl.┌πv/-num %u. nf/°╪'$'\031''íA'$'
\022''@V.≈≡ï/'$'\034'' ¥σ.┐/'$'\a\020''áß'$'\001''0â'$'\022''.╕2─/╒'$'\022''7ùwò╖ô.7æ≈/=╥'$'\n''âexå$.╝¿▓/Ç'$'\020''ëTÇ'$'
\020''ëd.Ç'$'\020''ë/jª¿ò'$'\004''å▐p.\╨α/7`béD┴≤n.t'$'\025''ô/'$'\001''ñ.Ç'$'\002''²/Γ'$'\025''├a±ærå.∙0a/¼$xë2²'$'
\024\034''.█╫┴/P'$'\034''¡L.>ƒⁿ.)Xi/i'$'\023''╜Φ┬r▄Θ.'\''╪o/5Rg'$'\n''╚pà'$'\b''.äïü/_locatio.n/urce Add.res/:b ad'$'\034''s'$'
\023''.≡╩╢/ü║:'\''Mæ4'$'\021''.}╘╚/«▌ε≤ⁿƒ▌!.ù√²/'$'\a''\'$'\024''3&ªü<.╘z┐/IJKLMNOP.qrs/a.t/i'$'\022''v7@Q¢│.>╔«/⌐nä'$'
\033\036''n.u.⌡≤@/a.t/'$'\024''a∩úe;)╝.'$'\177''┬)/7öåaJB-».V%î/'$'\002''.'$'\002''/<&'$'\036''\æzìc.u)B/s/╣¢╙≈'$'\024''*
(∩.τ«0/'$'\n''å╨'$'\023''öaφ%.'$'\002''≈i/'$'\004''`₧σ'$'\006''.'$'\006''aÜ/cription.=SC/cted con.nec/nitor
=.fal/S'$'\024''D'$'\002''@│@└.b%'$'\036''/'$'\004''0¥ò■Oáâ.ºsâ/δ'$'\030''j'$'\001\035\023''Nû.fnë/┐┬3bd'$'\021''╡║.lìm
/zB#┴▓#Åé.#└┬/'$'\b''2ä┌p╥^s.3ìσ/tl.cko/¢░▒dc'$'\021\b''f.i%▄/∙¡äµ'$'\b''¬ÿƒ.╜≈ü/'$'\031''fjhÿcåè.=¡m/s.ato/LΣ9WU##
<.'$'\003''v₧/⌐{'$'\003''█╛σ|σ.'$'\021''²╛/±≡r«ä√W÷.)╖┌/'$'\001''0.'$'\002''0â/ vidΘos.dan/  <name>.New/ready
ac.qui/b7adfefb.cd0/'$'\026''≥5÷╧■}τ.ò'$'\032''√/'$'\f''└âα'$'\b\020''äΘ.'$'\001'' â/allow'$'\n\n\t''.get/▀V²δ.'$'\001''
/∙ⁿ¿g.─7╒.┤∩v/Ä'$'\v''°░∞U╥╪.½¼·/unable t.o c/¿ƒ╗║ôñ╡σ.äσ'$'\035''/[REDACTED]/GIF89a'$'\036''.h'$'\001''≈/'$'\t''.TΣ'$'
\v''//'? y
/home/arma/coreutils/src/rm: descend into directory [same really long path]/run' ? y
...
The interesting bit here is we end up recursively traversing /, /run and so on. This is confirmed via strace :
write(2, "/home/arma/coreutils/src/rm: des"..., 1263) = 1263
read(0, "y\n", 1024)                    = 2
openat(17, "\3K\302\240\316\264.\1p\303\241",
// [... snipped ...]
newfstatat(20, "\20\342\224\224\303\271\317\203", 0x564364ba9288, AT_SYMLINK_NOFOLLOW) = -1 EIO (Input/output error)
newfstatat(20, "\0010\303\241\23\21", 0x564364baa268, AT_SYMLINK_NOFOLLOW) = -1 ELOOP (Too many levels of symbolic links)
newfstatat(20, "/", {st_mode=S_IFDIR|0755, st_size=4096, ...}, AT_SYMLINK_NOFOLLOW) = 0
openat(20, "/", O_RDONLY|O_NOCTTY|O_NONBLOCK|O_NOFOLLOW|O_DIRECTORY) = 15
fstat(15, {st_mode=S_IFDIR|0755, st_size=4096, ...}) = 0
fcntl(15, F_GETFL)                      = 0x38800 (flags O_RDONLY|O_NONBLOCK|O_LARGEFILE|O_NOFOLLOW|O_DIRECTORY)
fcntl(15, F_SETFD, FD_CLOEXEC)          = 0
getdents(15, /* 28 entries */, 32768)   = 744
close(15)                               = 0
write(2, "/home/arma/coreutils/src/rm: des"..., 1265) = 1265
read(0, "y\n", 1024)                    = 2
write(2, "skipping '/media/arma/5E08-D3D0/"..., 1254) = 1254
What's unusual here is that rm traverse directory in a "physical" way by default : it does not follow symlinks for example, as seen on the strace output with the AT_SYMLINK_NOFOLLOW flag being set. And I'm pretty sure I didn't create a mount point on the pendrive pointing to my root folder, so the issue must reside in how the kernel handle my corrupted pendrive.
Your bug is in another castle
The way the Linux kernel handle filesystem is farily straightforward: the fs subsystem catches every fs-related syscalls - like getdents or open - and redirect them to the correct fs module (vfat for FAT, ntfs-3g for NTFS, ext for ext3/4, etc.).
In order to register a new fs module, you need to expose the following callbacks:
// FS operations
static struct file_system_type vfat_fs_type = {
	.owner		= THIS_MODULE,
	.name       = "vfat",
	.mount		= vfat_mount,
	.kill_sb	= kill_block_super,
	.fs_flags	= FS_REQUIRES_DEV,
};

// inode operations
static const struct inode_operations vfat_dir_inode_operations = {
	.create		= vfat_create,
	.lookup		= vfat_lookup,
	.unlink		= vfat_unlink,
	.mkdir		= vfat_mkdir,
	.rmdir		= vfat_rmdir,
	.rename		= vfat_rename,
	.setattr	= fat_setattr,
	.getattr	= fat_getattr,
	.update_time	= fat_update_time,
};

// FILE operations
const struct file_operations fat_dir_operations = {
	.llseek		= generic_file_llseek,
	.read		= generic_read_dir,
	.iterate_shared	= fat_readdir,
	.unlocked_ioctl	= fat_dir_ioctl,
#ifdef CONFIG_COMPAT
	.compat_ioctl	= fat_compat_dir_ioctl,
#endif
	.fsync		= fat_file_fsync,
};
The most interesting callback here is iterate_shared since it will be called during a getdents syscall handler:
SYSCALL_DEFINE3(getdents, unsigned int, fd,
		struct linux_dirent __user *, dirent, unsigned int, count)
{
	struct fd f;
	struct getdents_callback buf = {
		.ctx.actor = filldir,
		.count = count,
		.current_dir = dirent
	};
	int error;

	if (!access_ok(dirent, count))
		return -EFAULT;

	f = fdget_pos(fd);
	if (!f.file)
		return -EBADF;

        //  call iterate_dir to find the next file/directory
 	error = iterate_dir(f.file, &buf.ctx);
	if (error >= 0)
		error = buf.error;

        //  send result back to userland
	if (buf.prev_reclen) {
		struct linux_dirent __user * lastdirent;
		lastdirent = (void __user *)buf.current_dir - buf.prev_reclen;

		if (put_user(buf.ctx.pos, &lastdirent->d_off))
			error = -EFAULT;
		else
			error = count - buf.count;
	}

        // update fd this getdents is a "stateful" call
	fdput_pos(f);
	return error;
}

int iterate_dir(struct file *file, struct dir_context *ctx)
{
	struct inode *inode = file_inode(file);
	bool shared = false;
	int res = -ENOTDIR;
	if (file->f_op->iterate_shared)
		shared = true;
	else if (!file->f_op->iterate)
		goto out;

	res = security_file_permission(file, MAY_READ);
	if (res)
		goto out;

	if (shared)
		res = down_read_killable(&inode->i_rwsem);
	else
		res = down_write_killable(&inode->i_rwsem);
	if (res)
		goto out;

	res = -ENOENT;
	if (!IS_DEADDIR(inode)) {
		ctx->pos = file->f_pos;
		if (shared)
			res = file->f_op->iterate_shared(file, ctx);            // call our fs callback here
		else
			res = file->f_op->iterate(file, ctx);
		file->f_pos = ctx->pos;
		fsnotify_access(file);
		file_accessed(file);
	}
	if (shared)
		inode_unlock_shared(inode);
	else
		inode_unlock(inode);
out:
	return res;
}
In our case, iterate_shared points towards __fat_readdir:
static int __fat_readdir(struct inode *inode, struct file *file,
			 struct dir_context *ctx, int short_only,
			 struct fat_ioctl_filldir_callback *both)
{
	// [lot of FAT entry parsing ]

start_filldir:
	ctx->pos = cpos - (nr_slots + 1) * sizeof(struct msdos_dir_entry);
	if (fake_offset && ctx->pos < 2)
		ctx->pos = 2;

        // emit '.' folder
	if (!memcmp(de->name, MSDOS_DOT, MSDOS_NAME)) {
		if (!dir_emit_dot(file, ctx))
			goto fill_failed;

        // emit '..' folder
	} else if (!memcmp(de->name, MSDOS_DOTDOT, MSDOS_NAME)) {
		if (!dir_emit_dotdot(file, ctx))
			goto fill_failed;
	} else {
		unsigned long inum;
		loff_t i_pos = fat_make_i_pos(sb, bh, de);
		struct inode *tmp = fat_iget(sb, i_pos);
		if (tmp) {
			inum = tmp->i_ino;
			iput(tmp);
		} else
			inum = iunique(sb, MSDOS_ROOT_INO);

                // emit any subdirectory found
		if (!dir_emit(ctx, fill_name, fill_len, inum,
			    (de->attr & ATTR_DIR) ? DT_DIR : DT_REG))
			goto fill_failed;
	}

	// [...]

	return ret;
}
__fat_readir is "emiting" any directory found in a particular folder, starting with the pseudo ones '.' and '..'. Let's add some logging code in order to trace dir_emit calls:
[  +0.000000] __fat_readdir
// [....]
[  +0.000109] dir_emit folder : 07 10 c3 a1 c3 9f 01 30 c3 a2 12 2e e2 95 95 32  .......0.......2
[  +0.000001] dir_emit folder : e2 94 80                                         ...
[  +0.000017] dir_emit folder : 2c 20 c3 bc cf 83 44 20 c2 a5 15 2e 02 20 c3 a9  , ....D ..... ..
[  +0.000072] dir_emit folder : c3 a4 20 c2 a5 cf 83 2e c3 87 30 c2 a5           .. .......0..
[  +0.000072] dir_emit folder : 60 30 c2 a5 cf 83 01                             `0.....
[  +0.000071] dir_emit folder : 03 21 c3 a6 cf 84 2e 01 40 c3 a2                 .!......@..
[  +0.000083] dir_emit folder : 10                                               .
[  +0.000015] dir_emit folder : 14 e2 94 94 c3 b6 cf 83 2e 10                    ..........
[  +0.000041] dir_emit folder : 01 10 ce b1 c3 9f 2e 01 21 c3 a2                 ........!..
[  +0.000181] dir_emit folder : 04 10 c3 89 cf 83 01 2e 24 10 c2 a5              ........$...
[  +0.000040] dir_emit folder : e2 96 84 20 c2 a5 cf 83 63 2e e2 96 84 20 c2 a5  ... ....c.... ..
[  +0.000093] dir_emit folder : 24 30 c2 a5 e2 95 92 30 30 c3 ac e2 95 92 2e 2c  $0.....00......,
[  +0.000001] dir_emit folder : 30 c3 ac                                         0..
[  +0.000164] dir_emit folder : 10 e2 94 94 c3 b9 cf 83                          ........
[  +0.000024] dir_emit folder : 01 30 c3 a1 13 11                                .0....
[  +0.000092] dir_emit folder : 2f                                               /
[  +0.000091] dir_emit folder : 01 60 c3 a1 c3 9f 2e 4c 30 c3 a6                 .`.....L0..
[  +0.003489] __fat_readdir
[  +0.000009] CPU: 3 PID: 5987
We actually have __fat_readir emiting a / folder! This should not happen, as stated in POSIX-2008:
A pathname consisting of a single slash shall resolve to the root directory of the process. A null pathname shall not be successfully resolved. A pathname that begins with two successive slashes may be interpreted in an implementation-defined manner, although more than two leading slashes shall be treated as a single slash.
Source: https://pubs.opengroup.org/onlinepubs/009696699/basedefs/xbd_chap04.html#tag_04_11
When Steve Bourne was writing his Unix shell (which came to be known as the Bourne shell), he made a directory of 254 files with one-character names, one for each byte value except '\0' and slash, the two characters that cannot appear in Unix file names.
Source : "The Practice of Programming" by Brian W. Kernighan and Rob Pike, Ch. 6, pg. 158
But well, a corrupted pendrive cares little about being POSIX compliant.
Fixing the bug
Both Ubuntu 18.04-3 and 18.04-5 vfat module emit this fraudulous "/" directory, but only Ubuntu 18.04-3 is vulnerable. So what part of the kernel did change in the meantime?
To answer this question, we need to take a look at filldir's implementation :
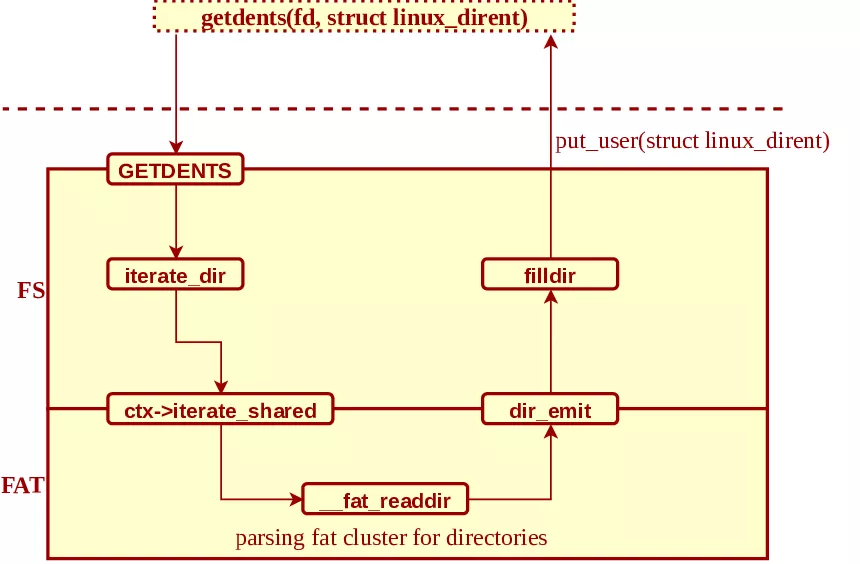
When an userspace process calls getdents(int fd, struct linux_dirent *buf), this is what happens:
- the syscall is routed to the fs subsystem, and more especially
iterate_dirwhich store a context linked to the fd in order to "advance" in the enumeration iterate_dircalls the underlying kernel module for directory enumeration viaiterate_shared. In our case,__fat_readdiris the function called.-
__fat_readdiris returning our bad/path viadir_emit -
dir_emitcallsfilldirin order to fill out thelinux_direntstructure with our faulty path and returns to userland viaput_user
So what has changed in this control flow between Ubuntu 18.04-3 and 18.04-5 ? This part right there:
diff --git a/18.04-3/fs/readdir.c b/18.04-5/fs/readdir.c
index 7967b1e..9a29bc4 100644
--- a/18.04-3/fs/readdir.c
+++ b/18.04-5/fs/readdir.c
@@ -8,6 +8,9 @@ static int filldir(struct dir_context *ctx, const char *name, int namlen,
        int reclen = ALIGN(offsetof(struct linux_dirent, d_name) + namlen + 2,
                sizeof(long));

+       buf->error = verify_dirent_name(name, namlen);
+       if (unlikely(buf->error))
+               return buf->error;
        buf->error = -EINVAL;   /* only used if we fail.. */
        if (reclen > buf->count)
                return -EINVAL;
@@ -17,28 +20,31 @@ static int filldir(struct dir_context *ctx, const char *name, int namlen,
                return -EOVERFLOW;
        }
        dirent = buf->previous;

// [snipped]

        buf->previous = dirent;
        dirent = (void __user *)dirent + reclen;
        buf->current_dir = dirent;
        buf->count -= reclen;
        return 0;
+efault_end:
+       user_access_end();
 efault:
        buf->error = -EFAULT;
        return -EFAULT;
We have a new call to a function called verify_dirent_name added right at the start of filldir. verify_dirent_name does exactly what you think it does:
/*
 * POSIX says that a dirent name cannot contain NULL or a '/'.
 *
 * It's not 100% clear what we should really do in this case.
 * The filesystem is clearly corrupted, but returning a hard
 * error means that you now don't see any of the other names
 * either, so that isn't a perfect alternative.
 *
 * And if you return an error, what error do you use? Several
 * filesystems seem to have decided on EUCLEAN being the error
 * code for EFSCORRUPTED, and that may be the error to use. Or
 * just EIO, which is perhaps more obvious to users.
 *
 * In order to see the other file names in the directory, the
 * caller might want to make this a "soft" error: skip the
 * entry, and return the error at the end instead.
 *
 * Note that this should likely do a "memchr(name, 0, len)"
 * check too, since that would be filesystem corruption as
 * well. However, that case can't actually confuse user space,
 * which has to do a strlen() on the name anyway to find the
 * filename length, and the above "soft error" worry means
 * that it's probably better left alone until we have that
 * issue clarified.
 *
 * Note the PATH_MAX check - it's arbitrary but the real
 * kernel limit on a possible path component, not NAME_MAX,
 * which is the technical standard limit.
 */
static int verify_dirent_name(const char *name, int len)
{
	if (len <= 0 || len >= PATH_MAX)
		return -EIO;
	if (memchr(name, '/', len))
		return -EIO;
	return 0;
}
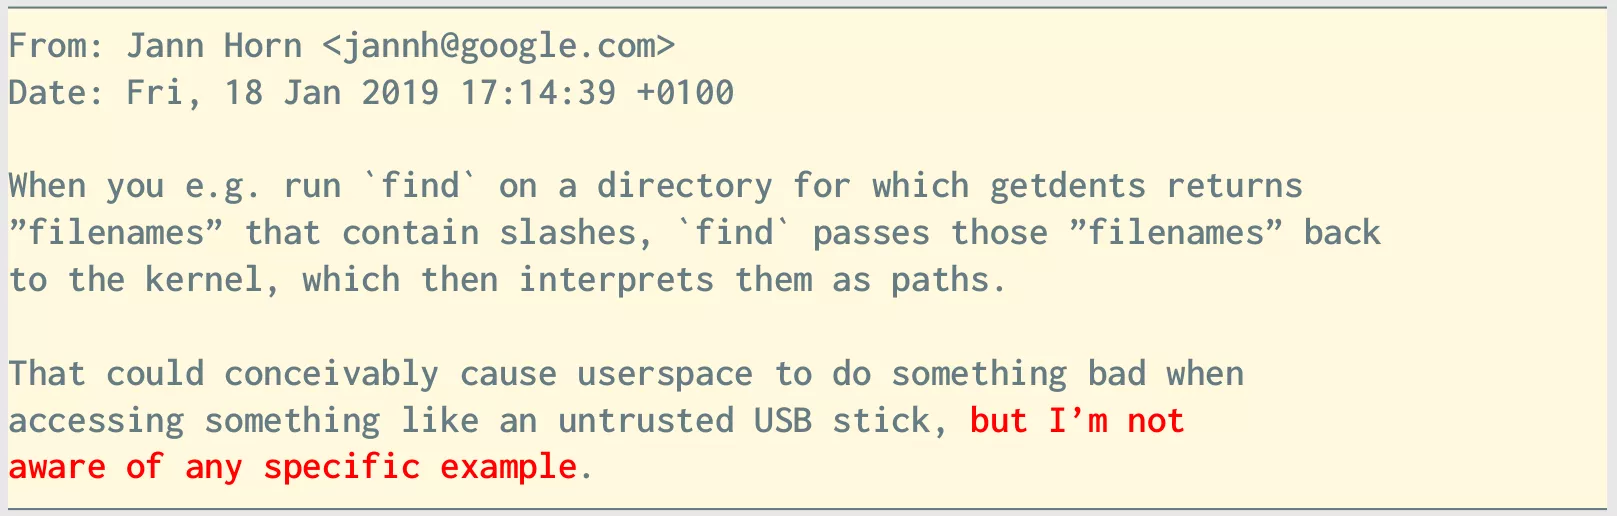
This function was introduced in a commit that landed in the maintree around early 2020, following a patch submitted by Jann Horn of Google Project Zero's fame as a "defense in depth" countermeasure, with this very apt remark in hindsight:
Basically this function fixed the bug that wreck my system. The patch landed in the kernel mainline tree around Jan 2020 and my rm -rf happened around Oct 2020 so why I was still vulnerable?
Well, at that time I was on debian sid (aka unstable) and I had some CPU soft lockup when running VMware on Linux 5.6/5.7 so I had to fall back on a older kernel image which was around 5.2.
Unfortunately this bugfix wasn't backported to 5.2 since it wasn't a version tracked by either debian stable or testing :(
So what now ?
When you reach a low point in your life, you have no other choice than to climb back up 😁. First step to do that is to create a read-only backup of your hard drive in order to not destroy the deleted data that remained on your SSD:
$ dd if=/dev/nvme0n1p3 of=/media/ubuntu/backup_ssd/nvme0n1p3.bak bs=1G status=progress
My laptop's SSD was encrypted using LUKS+LVM, so you can easily mount the imaged drive back up using crypsetup (otherwise losetup can also mount imaged drives as readonly devices):
$ sudo cryptsetup open --type luks ./nvme0n1p3 backup_ssd
$ ls -als /dev/mapper/
total 0
0 drwxr-xr-x  2 root root     140 Sep 30 08:29 .
0 drwxr-xr-x 23 root root    4900 Oct  1 14:26 ..
0 crw-------  1 root root 10, 236 Sep 29 16:30 control
0 lrwxrwxrwx  1 root root       7 Sep 30 09:30 lucasg--vg-root -> ../dm-1
0 lrwxrwxrwx  1 root root       7 Sep 30 08:29 lucasg--vg-swap_1 -> ../dm-2
0 lrwxrwxrwx  1 root root       7 Sep 30 08:28 backup_ssd -> ../dm-0
$ sudo mount -o ro  /dev/mapper/backup_ssd /mnt/backup
From this point you can use the mount point or directly use the device interface.
First tool I tried using to recover some data was ext4magic, which can automagically resurrect files and folders using ext4 journalization:
$ sudo ext4magic /dev/mapper/backup_ssd -M -d /mnt/backup/ext4magic

Using  internal Journal at Inode 8
Activ Time after  : Tue Sep 29 13:03:24 2020
Activ Time before : Thu Oct  1 16:16:45 2020
Inode 2 is allocated
--------	/media/ubuntu/backup_dd_lucasg/ext4magic/boot
--------	/media/ubuntu/backup_dd_lucasg/ext4magic/home/lucasg/.cache/mozilla/firefox/adu3n5h2.default/cache2/doomed
--------	/media/ubuntu/backup_dd_lucasg/ext4magic/home/lucasg/.cache/mozilla/firefox/adu3n5h2.default/cache2
[...]
--------	/media/ubuntu/backup_dd_lucasg/ext4magic/var/lib/docker
--------	/media/ubuntu/backup_dd_lucasg//ext4magic/var/lib
--------	/media/ubuntu/backup_dd_lucasg/var/.#tmp08a84266c37720fb
[...]
Segmentation fault
Basically ext4magic recreates a bunch of empty directories and files and finally ended up segfaulting since they don't check that magic_buffer do not return NULL before using it:
/*520*/ //magic scanner
/*521*/ //FIXME
/*522*/ static int magic_check_block(unsigned char* buf,magic_t cookie , magic_t cookie_f, char *magic_buf, __u32 size, blk_t blk, int deep){
/*523*/ int	count = current_fs->blocksize -1 ;
/*524*/ int	len;
/*525*/ char	text[100] = "";
/*526*/ char 	*p_search;
/*527*/ __u32	retval = 0;
/*528*/ char	token[20];
/*529*/
/*530*/	memset(magic_buf,0,100); //FIXME

/*(...)*/

/*550*/	else{
/*551*/		strncpy(text,magic_buffer(cookie_f,buf , size),60);
/*552*/		strncpy(magic_buf, magic_buffer(cookie , buf , size),60);
/*553*/	}
source : https://fossies.org/linux/ext4magic/src/magic_block_scan.c
The bug is already known, but ext4magic is abandonware : https://www.mail-archive.com/debian-bugs-dist@lists.debian.org/msg1789510.html. I also tried fls from the sleuthkit, but it didn't pan out : fls did not managed to link back filenames and direct ext4 blocks. 😓
The only forensic tool that will always work
When everything fail, strings will always be there to help you:
ubuntu@ubuntu:/mnt/backup$ sudo strings -f -a -tx /dev/mapper/backup_ssd > /mnt/backup/strings.txt
# (wait for the night)
ubuntu@ubuntu:/mnt/backup$ ls -alsh ./strings*
620G -rw-rw-r-- 1 ubuntu ubuntu 620G Sep 30 18:48 ./strings.txt
Now that we've extracted every string in the SSD, we need to actually construct our search heuristics. Unlike ext4magic/sleuthkit/Photorec/etc, strings is not automagical which is why it's the only tool that will always work reliably. However, we now have an unstructured "heap of strings" so we need to know beforehand which ASCII marker/pattern to look for in the file you want to retrieve (good luck trying to carve back generic json files for example). By chance, every file I wanted to recovered (credentials, keys, etc.) possess some kind of "magic" strings in it, which makes it easier to carve.
My personal Disaster Recovery Plan
Before aggressively grepping our strings.txt file (which is painfully slow since it's a not a proper database) I need to find out which files to carve back.
Fortunately, I have some kind of a backup strategy before the disaster :
- We have an internal server where we can
scpour professional keepass and non sensitive documents like dotfiles, so I had an almost up-to-date keepass backed up. No need to carve back my keepass, and I had the passphrase for every protected key file (GPG key, SSH keys, etc.) - No client data lost was last since its not stored on work laptops.
- However it is not the case for every scripts and internal traces/logs/notes related to an ongoing mission. Theses files were backed up and encrypted by my professional GPG key on an external hard drive but my GPG key itself was not backed up.
- Slides and TP for a training I give were not backed up at all, only two person had a copy : myself and someone ... who recently left the company and who has wiped his ssd :(
- Fortunately, I found a backup I did a year ago, which prevented me from writing it off as a total loss.
- Personal notes, slides, documents and projects were not backed up at all
So, in my misfortune I was somewhat lucky since I did not really lost anything of value (at least for my employer), even though at that time I was entirely mentally drained by what just happened to me. So what I need to look for among my heap of strings?
- private GPG key, that one was capital for my sanity
- SSH keys were always welcomed, but not actually really necessary : new SSH keys can always be generated and pushed to the servers I have the right to access.
- finally, any non backed up personal stuff would be appreciated.
How to carve a GPG key back ?
Weirdly enough, this is a problem pretty much undocumented on the Internet. I'm fairly sure I'm not the first person to accidentally wipe his GPG keys :)
I combed some public mailing lists and managed to find an answer:
> i have really big problem because i accydently deleted /.gnupg, but still i have backuped
 /.gnupg/private-keys-v1.d so i have 4 “hashfile" name files with suffix .key

That good.  Run gpg once to create a new .gnupg directory (or create it
manually).  Then copy the four files to the new private-keys-v1.d
directory and you have restored the secret key material.  Now you need
to get a copy of your two (I guess) public keys.  They should be on the
keyservers or you have send them to other places, get a copy and gpg
--import them.  Better restart the gpg-agent (gpgconf --kill gpg-agent).
That's it.

Private key files in gnupg/private-keys-v1.d have filenames of the pattern
  [0-9A-F]{40}.key
Source : https://lists.gnupg.org/pipermail/gnupg-users/2016-December/057246.html
There's two information to reconstruct:
- The GPG key's content, stored as files under
~/.gnupg/private-keys-v1.d/*.keyfolder - The filename of the private GPG key which is a 40 hexadecimal string, also known as
"keygrip"
First thing first, let's carve the gpg private key content back. The file format of a v1 gpg key is the following one:
(private-key
 (rsa
  (n #00e0ce9..[some bytes not shown]..51#)
  (e #010001#)
  (d #046129F..[some bytes not shown]..81#)
  (p #00e861b..[some bytes not shown]..f1#)
  (q #00f7a7c..[some bytes not shown]..61#)
  (u #304559a..[some bytes not shown]..9b#)
 )
 (created-at timestamp)
 (uri http://foo.bar x-foo:whatever_you_want)
 (comment whatever)
)
keyword strings like "private-key" are prefixed with their length, which means private gpg keys always start with the pattern "(21:protected-private-key(3:rsa(1:n":
ubuntu@ubuntu:~/Desktop/$ grep -F "protected-private-key" /mnt/backup/strings.txt | awk '{print $3}' | sort | uniq -c
      2 (21:protected-private-key(3:rsa(1:n513:
      1 -F
      1 https://stackoverflow.com/questions/25869207/unprotected-private-key-file
      3 https://stackoverflow.com/questions/25869207/unprotected-private-key-fileheroku
    179 protected-private-key
      1 (protected-private-key(d
      1 (protected-private-key(dmplac
     44 (protected-private-key(dsa(p%m)(q%m)(g%m)(y%m)(protected
    138 (protected-private-key(ecc(curve
     46 (protected-private-key(elg(p%m)(g%m)(y%m)(protected
     46 (protected-private-key(rsa(n%m)(e%m)(protecte
ubuntu@ubuntu:~/Desktop/$ cat ./backup/gpg/grep_results.txt | grep -F "(21:protected-private-key(3:rsa(1:n513:"
/dev/mapper/backup_ssd: c6978d2000 (21:protected-private-key(3:rsa(1:n513:
/dev/mapper/backup_ssd: c6978d3000 (21:protected-private-key(3:rsa(1:n513:
# (... etc ...)
I have exactly two hits on my SSD, which is good since when you create a GPG key you actually create two : one for encryption (the E key) and one for signing (the SC key).
Here's an excerpt of one of the two recovered key (they are also protected by a passphrase, don't bother trying to do some crypto stuff to recover it 😁 ):
$ hd ./backup/gpg/recovered_gpg_key_c6978d2000.key
00000000  28 32 31 3a 70 72 6f 74  65 63 74 65 64 2d 70 72  |(21:protected-pr|
00000010  69 76 61 74 65 2d 6b 65  79 28 33 3a 72 73 61 28  |ivate-key(3:rsa(|
00000020  31 3a 6e 35 31 33 3a 00  d8 70 5a b9 2e 00 83 9b  |1:n513:..pZ.....|
00000030  e3 d1 fd 41 79 75 28 a3  dd a9 43 0e b7 37 61 cd  |...Ayu(...C..7a.|
(snipped)
00000220  7e f8 55 10 5b b1 82 b1  29 28 31 3a 65 33 3a 01  |~.U.[...)(1:e3:.|
00000230  00 01 29 28 39 3a 70 72  6f 74 65 63 74 65 64 32  |..)(9:protected2|
00000240  35 3a 6f 70 65 6e 70 67  70 2d 73 32 6b 33 2d 73  |5:openpgp-s2k3-s|
00000250  68 61 31 2d 61 65 73 2d  63 62 63 28 28 34 3a 73  |ha1-aes-cbc((4:s|
00000260  68 61 31 38 3a d3 1e 66  e2 87 90 37 ad 39 3a 31  |ha18:..f...7.9:1|
(snipped)
000007e0  69 9e 29 28 31 32 3a 70  72 6f 74 65 63 74 65 64  |i.)(12:protected|
000007f0  2d 61 74 31 35 3a 32 30  31 38 31 31 30 38 54 31  |-at15:20181108T1|
00000800  37 34 36 30 38 29 29 29
It really looks like a valid private GPG key. Moreover, the "protected-at" field holds a timestamp indicating the eighth of November, 2018. Knowing that I'm a Synacktiv employee since the 1st of November 2018, I'm almost certain that's the GPG key I generated during my onboarding.
Now that I have the content of my private GPG key, I have to know their keygrip. Fortunately, gpgsm is a tool that can return it from the GPG key itself, meaning the keygrip is probably some kind of a digest:
$ gpgsm --call-protect-tool --show-keygrip '/mnt/backup/gpg/recovered_gpg_key_c6978d2000.key'
gpgsm: Note: '--show-keygrip' is not considered an option
DA39A3EE5E6B4B0D3255BFEF95601890AFD80709
$ gpgsm --call-protect-tool --show-keygrip '/mnt/backup/gpg/recovered_gpg_key_c6978d3000.key'
gpgsm: Note: '--show-keygrip' is not considered an option
20EABE5D64B0E216796E834F52D61FD0B70332FC
(Yes, the tool is complaining that '--show-keygrip' is not a valid option, but it actually do its job afterwards.)
With the GPG key and regenerated their keygrips in hand, let's stitch everything back in ~/.gnupg:
$ mkdir -p ~/.gnupg/private-keys-v1.d && rm ~/.gnupg/pubring.kbx
$ cp recovered_gpg_key_c6978d2000.key ~/.gnupg/private-keys-v1.d/DA39A3EE5E6B4B0D3255BFEF95601890AFD80709.key
$ cp recovered_gpg_key_c6978d3000.key ~/.gnupg/private-keys-v1.d/20EABE5D64B0E216796E834F52D61FD0B70332FC.key

$ gpg --import lg.asc
gpg: keybox '~/.gnupg/pubring.kbx' created
gpg: key 0CB1775E1FC8AF64: public key "Lucas Georges <lucas.georges@synacktiv.com>" imported
gpg: Total number processed: 1
gpg:                imported: 1

$ gpg -d /mnt/backup/p2o_miami/p2o_archive_21_07_2020.7z.gpg  | tail -n 10 | hd
gpg: encrypted with 4096-bit RSA key, ID DC613035AC6B5FD5, created 2018-11-08
      "Lucas Georges <lucas.georges@synacktiv.com>"
00000000  a4 99 12 e5 48 3c 8a 02  37 b1 16 b0 16 84 5d 27  |....H<..7.....]'|
00000010  c8 bd af 43 33 fa b6 b7  af 6d e3 b7 aa 25 2f ee  |...C3....m...%/.|
...
Success ! \o/
I managed to decrypt every "personal" archives of my past missions. From that point, every thing I would manage to carve back was considered as "bonus", the critical work was already done.
Carving private SSH keys
Carving SSH keys is a bit more straightforward : extract every data that is enclosed between "-----BEGIN OPENSSH PRIVATE KEY-----" and "-----END OPENSSH PRIVATE KEY-----":
$ cat_mem() {sudo dd if=/dev/mapper/backup_ssd bs=1 skip=$(("$1")) count=$(("$2")) 2>/dev/null;}
$ truncate_using_marker() { sed -e '/'"$1"'/,${//i '"$1"'' -e 'd}';}

$ recover_ssh_key() {
	cat_mem 0x"$1" 0x8000 | truncate_using_marker '-----END OPENSSH PRIVATE KEY-----' > ./backup/ssh/recovered_ssh_key_"$1".key;
	ls -als ./backup/ssh/recovered_ssh_key_"$1".key;
}
ubuntu@ubuntu:~/$ grep -F "BEGIN OPENSSH PRIVATE KEY" /mnt/backup/strings.txt >
  /mnt/backup/ssh/other_grep_results.txt
ubuntu@ubuntu:~/$ cat ./backup/ssh/other_grep_results.txt  |  awk '{print $2}' | while read offset; do recover_ssh_key "$offset"; done
However this method also carve back "false positives" aka fake SSH keys such as placeholders, .data segments from executable manipulating ssh keys, etc.
To filter out the good SSH keys from the bad ones, you can rely on fingerprints, key size or even just by bruteforcing passwords:
- Fingerprints
-
# fingerprint of the public SSH keys
$ sudo ssh-keygen -B -f /mnt/backup/clés_lucasg.pub
4096 xuheg-bilud-bunoz-zocyz-codaz-dikic-zydel-herib-bipiz-turar-dixix lucasg@lucasg (RSA)
4096 xivin-buzih-decol-cyguz-vahec-dugut-repyv-hyzab-zygen-tudub-nexax lucasg@lucasg (RSA)
4096 xubep-pyvus-meren-doryd-bobiz-bomib-zidom-ravat-ducyt-manas-doxux lucasg@lucasg (RSA)
256  xecap-vyset-gusor-rukyr-ryhuh-kyvev-vidir-zudyd-givyf-mepel-zaxax lucasg@lucasg (ED25519)
256  xicif-pevok-caluc-putut-tanaf-lezaz-syzad-mubuz-dacov-kysyd-tyxax lucasg@lucasg (ED25519-SK)

# fingerprint of recovered SSH keys
$ find /mnt/backup/ssh/recovered_ssh_key_* | while read filepath ; do sudo ssh-keygen -B -f "$filepath" 2>/dev/null; done | sort -n | uniq
256  xebal-zogez-litep-bamaz-lagud-pubyt-reluz-vazoh-sagaz-gecuf-cuxox root@500a2f1385e9 (ED25519)
256  xecaz-vipec-coseg-pusik-bumyn-kerom-benem-gynyv-homuv-mebyl-fyxex nt authority\system@WinDev1811Eval (ED25519)
256  xupir-hosyk-moniz-hamab-damal-fakit-luhas-lihes-bebeg-syhav-gyxex root@photon-machine (ECDSA)
521  xupim-fuloz-lyzom-disez-tutan-hanag-vyvov-pynyz-filuk-fihit-kexox ettore@localhost.localdomain (ECDSA)
2048 xelom-higyp-zovuk-zuzoz-dazip-hilun-lyvol-rerah-cimeh-lopud-syxix kami@kami-dell-latitude (RSA)
2048 xerig-nudik-tezob-nuzoz-tovog-dezyc-bihim-guvov-pycez-zohap-dyxux lucasg (RSA)
2048 xutor-zykik-zured-rekut-mesat-gunod-makoc-sydum-teget-zybap-lixax root@debian (RSA)
3072 xovez-sapev-furud-robop-synin-dirid-tasyr-rolaz-pepyh-hakuv-zyxix root@ee23c13d64e9 (RSA)
...
-
- Key file size
-
$ sudo ssh-keygen -B -f /home/ubuntu/.ssh/test_4096_rsa
4096 xogob-nipar-hetiz-zibir-lozym-gogeh-dibib-cusom-zumin-cibyn-gixyx root@ubuntu (RSA)
$ ls -als /home/ubuntu/.ssh/test_4096_rsa
4 -rw------- 1 root root 3434 Oct  2 09:33 /home/ubuntu/.ssh/test_4096_rsa

$ ls -als /mnt/backup/ssh/recovered_ssh_key_* | awk '{print $6 " " $10}' | grep 3434               # rsa4096 is 3434 bytes
3434 /mnt/backup/ssh/recovered_ssh_key_c59f6a5000.key
3434 /mnt/backup/ssh/recovered_ssh_key_c5a37fe000.key
3434 /mnt/backup/ssh/recovered_ssh_key_c5aa130000.key

$ ls -als /mnt/backup/ssh/recovered_ssh_key_* | awk '{print $6 " " $10}' | grep 602                # ed55219-sk is 602 bytes
602 /mnt/backup/ssh/recovered_ssh_key_c5912d6000.key

$ ls -als /mnt/backup/ssh/recovered_ssh_key_* | awk '{print $6 " " $10}' | grep 444                # ed55219 is 444 bytes
444 /mnt/backup/ssh/recovered_ssh_key_c591374000.key
-
- Bruteforcing password
-
$ ubuntu@ubuntu:~$ find /mnt/backup/ssh/ | while read file;do ssh-keygen -p -P "toto" -N "" -f $file;\
done
Failed to load key /mnt/backup/ssh/recovered_ssh_encrypted_key_AAAAAA: incorrect passphrase supplied to decrypt private key
...
Saving key "./ssh/recovered_ssh_encrypted_key_BBBBB" failed: Permission denied.  # SUCCESS !
...
-
Conclusion
In the end, on top of carving back my GPG and SSH private keys, I also managed to recover other authentication secrets as well as some personal notes and some scripts.
The "cost" of this disaster for my employer has been 3 days of forensic and 2 days of reinstall (so a week a work in total) as well as 2x5 days in order to re-update the training slides from one year ago. If I hadn't made a backup of this training, it would have taken at least a good 2-people month to recreate it from scratch.
No need to say it has also exposed some glaring holes in Synacktiv's backup policy, especially regarding the backup of GPG keys. As some great modern philosopher said, "everyone has a plan until they get punched in the face".
Finally, regardless of whether its coming from a stupid mistake, a datacenter burning or an ransomware attack, data losses are traumatic events. During the span of a very stressful week I literally went through the 5 stages of grief. If you ever found yourself in my shoes try to get as many help as you can, whether it's emotional help from friends and family or forensic advice from professionals (thanks a lot jul, w4kfu and f4b for your help !). Conversely if you're the helping hand, be as benevolent as you can towards your friends/clients since they may not think entirely straight during an incident response.
Final Takeaways
- If you want to use Debian sid (aka unstable) you have to actually commit to it and regularly update your system, even if it breaks your workflow, since not all bugfixes are backported to previous unstable kernels/libraries. I half ass'ed it and it blew in my face.
- Catastrophic failures exists. Build your personal Disaster Recovery Plan and backup the critical stuff.
- Take a moment to check you've not became a SPOF for your organization on some capacity, aka the good ol' bus factor.
- Backup your stuff ! Regularly ! And not only of the critical stuff ! And test your backups ! And did I already told you to backup your stuff ?
- If something as calamitous also happens to you, don't stay by yourself and get help.
References
- https://elixir.bootlin.com/linux/v5.4.19/source/fs/fat/dir.c#L553
- https://elixir.bootlin.com/linux/v5.4.19/source/fs/readdir.c#L218
- POSIX specification being violated here : https://pubs.opengroup.org/onlinepubs/009696699/basedefs/xbd_chap04.html#tag_04_11
- Commit introducing
verify_dirent_name: https://github.com/torvalds/linux/commit/8a23eb804ca4f2be909e372cf5a9e7b30ae476cd# - diff-af576d64ae2545588eccef4be20a26feb455a36f119ae56e1637ce939a848180
- Patch introducing the countermeasure : https://lore.kernel.org/lkml/20190118161440.220134-2-jannh@google.com/
- 1. This blogpost is obviously not chronologically correct. I first tried to rescue my deleted data and reinstall a proper system on my laptop before attempting to understand what caused this situation.
- 2. I've spared you the countless back and forth between the differents codebases. Finding the root cause of this bug was way harder that I initially anticipated