Practical DMA attack on Windows 10
This post describes how Synacktiv defeated a workstation security measures by using a hardware approach.
Looking to improve your skills? Discover our trainings sessions! Learn more.
Edit (11/06/2018):
We are very pleased that this blogpost had a lot of feedbacks!
Thanks in particular to Xeno Kovah (@XenoKovah) that pointed out that Microsoft Windows does not take profit of VT-d/IOMMU properties on a stock install so far (assumption that was confirmed by, in no particular order, Alex Ionescu (@aionescu), Jeremiah Cox (@int0x6) and Dave Weston (@dwizzzleMSFT). Many thanks to them!).
Finally thanks to Yuriy Bulygin (@c7zero) for pointing out that some references were missing regarding existing hardware attacks.
Context
While trying to compromise an IT infrastructure, attackers usually try to first own a system then try to proceed to lateral movements in order to obtain further information and elevate their privileges. Thus two assets must be checked:
- is my system hardened enough?
- if my system happens to be compromised, what will the attacker be able to do afterwards?
To answer these questions, auditors usually try to consider the following attack vectors:
- with or without a physical access to the computer;
- with or without authenticated account.
This blogpost will give an overview of what was possible to do on an "all in one" computer aimed to be given for teleworking matters.
This workstation was up to date at the time of the assessment (Windows 10 Version 1709) with a strong hardening along with an AppLocker policy very close to the state of the art.
As the operating system did not offer an easy attack surface, another vector was used to compromise it: physical attack involving a Direct Memory Access (DMA).
Please note that this blogpost is rather a walkthrough of a fun and successful pentest than a deep analysis of DMA internals. Thus, many technical details are voluntarily left aside (or simplified) and would actually require a blogpost entry on their own :).
Investment
- Allotted time:
- 3 days regarding technical assets,
- 2 days for the reporting part;
- Hardware:
DMA: a link to the past
While any ressource (hardware devices but also software components) normally relies on the processor (CPU) and the embedded Memory Management Unit (MMU) to read or write data to the main memory (RAM), some may have an almost direct access to this main memory.
Best known as "Direct Memory Access" (DMA), the technology was created in order to guarantee optimum performance for data transfers between, for example, a system and a hardware device (remember your old videocamera).
Thus, instead of having to pass through the complete (and very slow back in the days) usual process to transfer data between the main memory and peripherals, DMA transfers rely on a dedicated BUS and a DMA hardware controller.
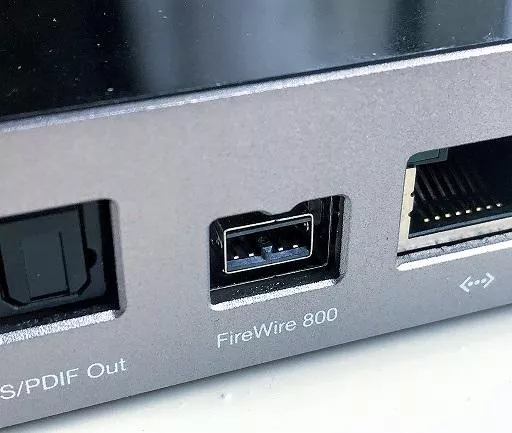
At that time, one of the technologies widely used on this purpose was a multiplexed serial interface called "IEEE 1394" best known as FireWire.
Despite FireWire being pretty outdated, some systems are still shipped with IEEE 1394 connectors and Operating Systems (OS) still provide drivers.
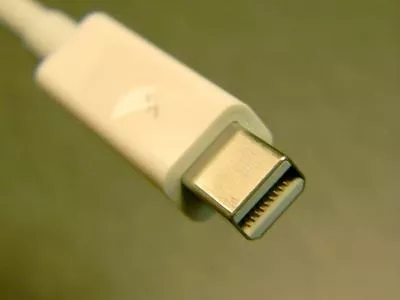
Nowadays, most of technologies that need to proceed to DMA rely on the PCI-Express (PCIe) standard. Among these technologies, some have well-known connectors:
- Thunderbolt (and USB-C that have
Thunderboltsupport);
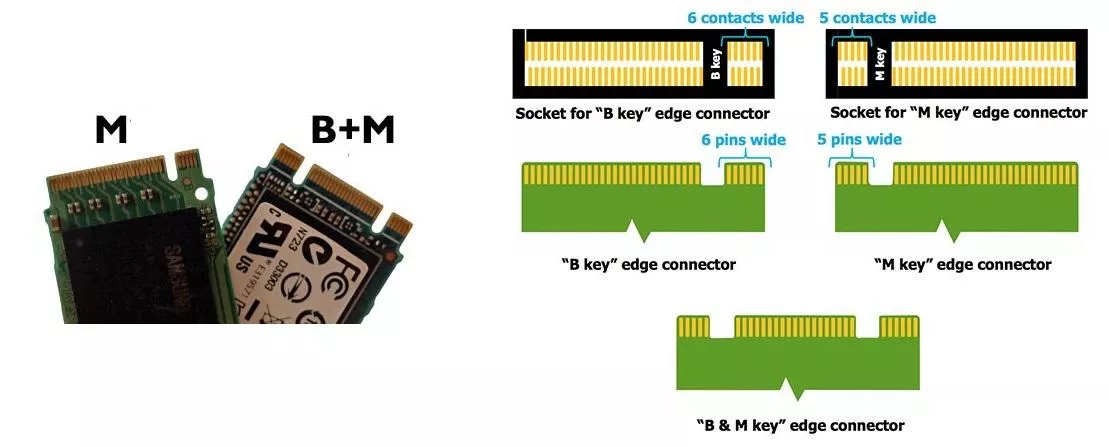
- M.2 key A/E (mostly Wi-Fi and Bluetooth integrated cards);
- M.2 key B/M (mostly SSD with NVMe support);
- (
ExpressCardexpansion slot).
One may think that because all the aforementioned technologies allow DMA, an attacker with physical access could easily interact directly with the RAM of its target.
While not being false, this is not totally true either. Conscious that DMA properties could threaten the security of their systems, most OS vendors took some decisions to restrict capabilities to interact directly with the main memory.
While most of these countermeasures have to be properly configured by an administrator, Microsoft Windows starting with 8.1 (included) and MacOS X starting with 10.7.2 (included) disable the SPB-2 driver in charge of FireWire transactions on the log-on screen (more on this later).
Alongside with the appearance of virtualization technologies, people realized that giving the opportunity to a virtualized environnement (called Guest) to share the same memory than its Host system was probably a bad idea.
Long story short, in order to address this problem (among others) and ensure a proper segregation between Host and Guest memory pages in the RAM, a software-emulated component called "Input Output Memory Management Unit" (IOMMU) was designed.
Unfortunately, adding this software component led to a big performance overhead. A dedicated IOMMU hardware component was later created and added to modern CPUs, the latter now having an extended instruction set dedicated to virtualization matters (Intel VT-d and AMD Vi will be the virtualization technologies that we are interested in).
The IOMMU is, among other things, responsible for the translation between virtual and physical memory addresses regarding virtualized environments/peripherals. These virtualized environments/peripherals will also see their access to main memory pages granted or denied by the IOMMU depending on their legitimacy. This way, the IOMMU guarantees that no ressources relying on it can access memory pages that are not of their ownership.
You may ask why I am talking about this. Well, basically it implies that enabling VT-d/Vi and IOMMU support will prevent a direct access to the whole RAM from a DMA-capable component (if the underlying OS takes advantage of these mechanisms though). Indeed, such a component will only be able to access its authorized memory pages.
DMA: your mission, should you choose to accept it
Amuse-bouche
Right now we should have enough theoretical background to talk about the assessment. As stated above, we were provided an "all in one" pretty hardened workstation. Here were the first observations regarding the provided computer:
- BIOS is password-protected;
- only possible to boot from the workstation's hard drive;
- 4GB of RAM;
- Windows 10 Version 1709;
BitLocker(seemingly with TPM-only protector2 as system decrypts itself on start-up);Windows Defender;AppLockerpolicy near the state of art;- cmd.exe/powershell.exe available;
- Unprivileged authenticated account.
As exposed in introduction, the goal was to determinate:
- if the system is vulnerable from outside;
- if an attacker managed to gain access to the system having user rights (for example after a succeeded phishing campaign) what could he accomplish.
After some additional checks, some elements could be added to the above list of observations:
- UEFI is used;
- system has
Secure Bootenabled; - Virtualization Based Security (VBS) technology is not activated (so, no
HVCI,KMCI,UMCIorCredential Guard); Intel VT-dis enabled.

The above caption being translated as follows:
VM Monitor Mode Extensions: Yes
Virtualization Enabled In Firmware: Yes
Second Level Address Translation: Yes
Data Execution Prevention Available: Yes
Because of the AppLocker policy, we could not execute any binary on the system. The only way to execute payloads was through an old version of bginfo.exe as this binary is signed by Microsoft.
Unfortunately, while bginfo.exe allowed us to execute arbitrary VBS scripts, the AppLocker policy only authorized the execution of scripts/binaries on particular locations where we did not have any write access (also Windows Defender was a bit annoying).
The remaining solution would have been to try to reverse-engineer the whitelisted clients' custom binaries in order to try to find vulnerabilities, but this would not have been feasible in the allotted time.
At this point, quite frustrated but also excited to see a Windows hardened near the state of the art, we decided to investigate on the hardware side.
DMA attack
In order to proceed to a straightforward DMA attack, many prerequisites must be met:
- the hard drive encrypting solution should not require a third-party secret (like password or certificate);
- the data to be extracted/tampered must be located in the first 4GBs of the RAM as we will use USB3380 hardware (more information on this);
- there must be DMA capable inputs;
VT-d/IOMMUmust not be taken into account by the OS.
The two first assumptions were verified as the workstation decrypts itself during start-up and has 4GBs of RAM. Unfortunately we could not find any connector that relies on DMA-enabled technologies on the "all in one" screen and it seemed that VT-d was enabled (though seemingly not taken into account as VBS is not enabled) as stated by the systeminfo command (see above).
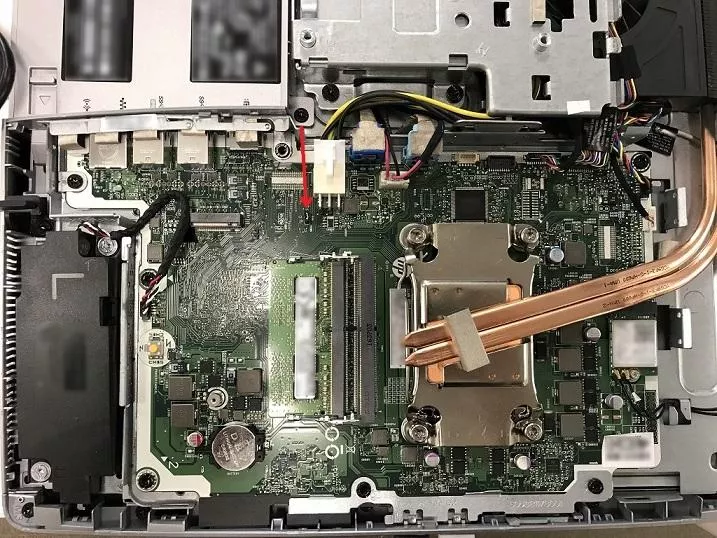
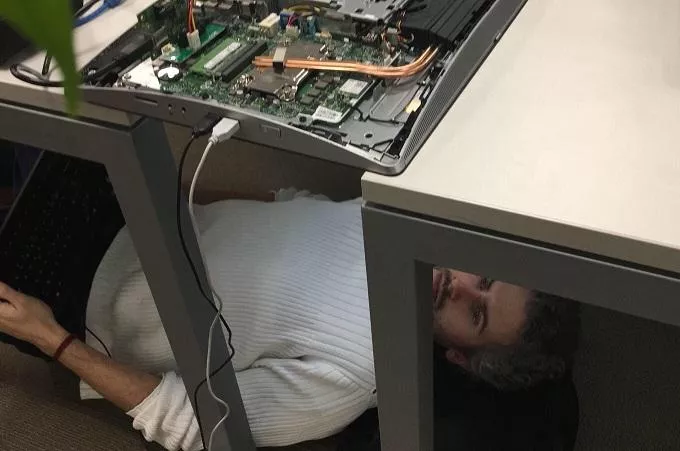
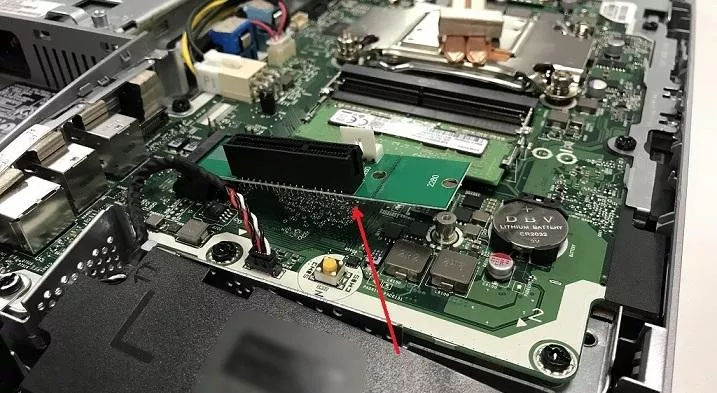
After opening the screen, we searched for the reference of the motherboard in order to find any connector that would be useful for our DMA attack. This research led to two major discoveries:
- there was an SSD NVMe M.2 key B/M connector (NVMe relies on PCIe in our case);
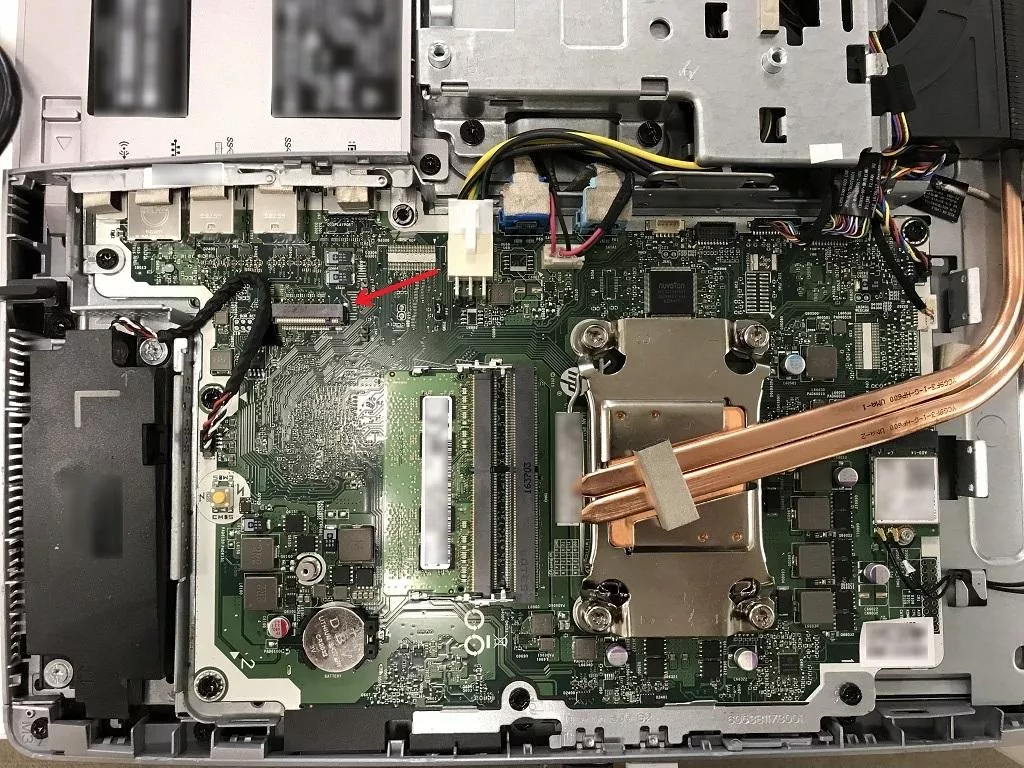
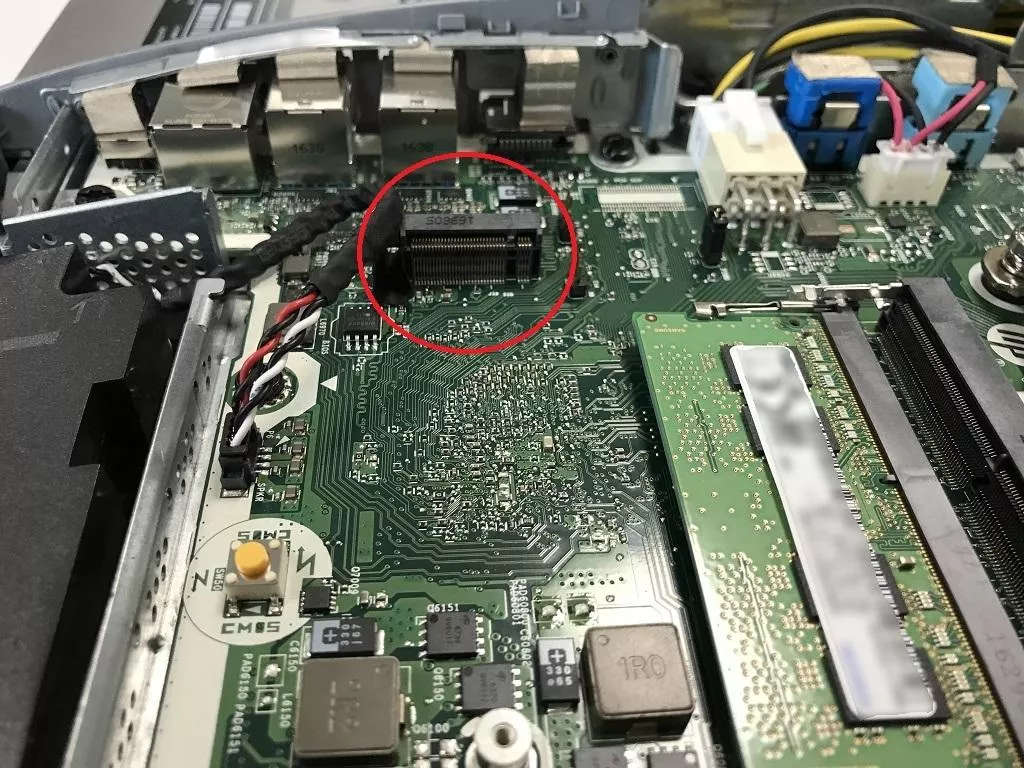
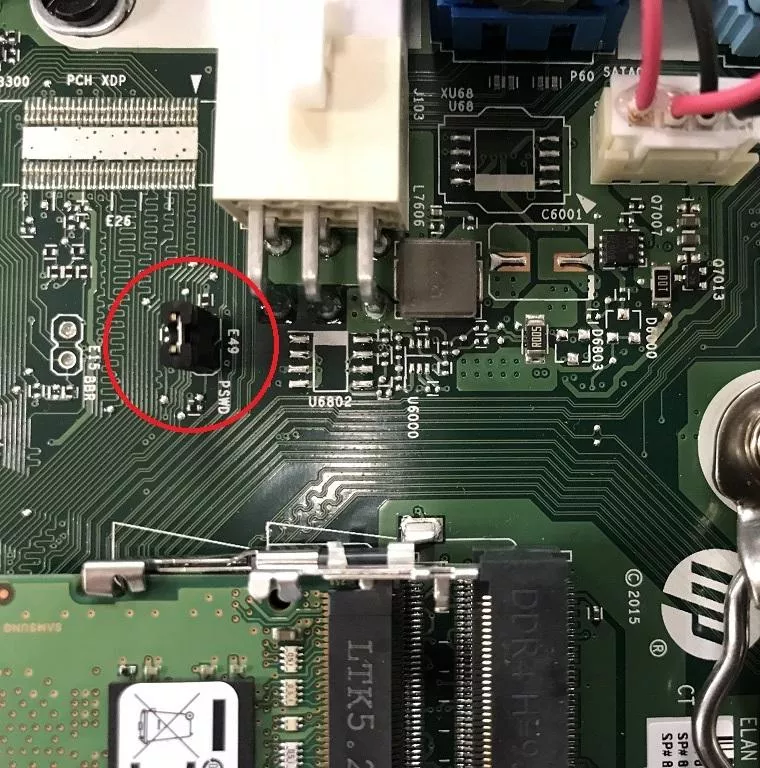
- it seems that there was an "emergency backup" option on this motherboard that allows clearing the BIOS password without altering its configuration3.
Having a reachable SSD NVMe connector did not mean that we could proceed to a DMA attack because this connector could have been disabled in the BIOS properties.
The only remaining solution was to try the "emergency backup" option, praying for two things:
- this option is enabled in BIOS, which is the default behavior as stated by the documentation (this "emergency backup" solution can be disabled though);
- resetting the BIOS password would not trigger measured boot.
This "emergency backup" solution consists of a jumper on the motherboard that must be removed.
Luckily for us, the option was kept unchanged in the BIOS as we managed to enter it without providing any password:
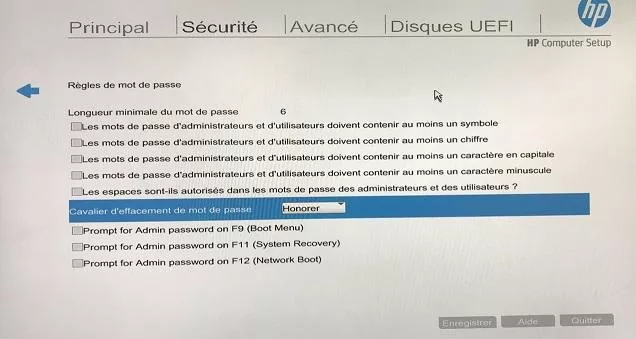
Furthermore, this parameter seems not to be taken into account by measured boot as we could boot the system without any problem(!).
Now that we could access to the BIOS we were able to disable the IOMMU and proceed with our DMA attack.
Having a M.2 B/M connector we should be able to interact with the main memory of the target by chaining many technologies4, as follows.
PCIe to M2 B/M adaptor:
Then the pentester's laptop connected through an USB3 PCIE dev card (USB3380) to the PCIe to M2 B/M adaptor:

At this point we had to decide what to do with this access. Two main[4][5] softwares/frameworks may be used out-of-the-box to proceed with DMA attacks and offer two options among others that are interesting for us:
- unlock (patch) the system on the log-on screen;
- install a backdoor.
We chose to use the awesome PCILeech by Ulf Frisk (@UlfFrisk) as he proved that he could succeed in chaining the kind of adaptors we were going to use.
We also chose the property of the tool to patch (unlock) the target operating system memory from the log-on screen in order to bypass authenticating process... and it worked!
The local administrator account was chosen and a random password was provided giving us a privileged access to the workstation.
cmd> pcileech.exe patch -sig unlock_win10x64

Current Action: Patching
Access Mode: DMA (hardware only)
Progress: 463 / 3520 (13%)
Speed: 16 MB/s
Address: 0x000000006A200000
Pages read: 117144 / 901120 (13%)
Pages failed: 102 (0%)
Patch: Successful. Location: XXXXXXXXX
In order to understand why this attack was successful, we must first understand how PCILeech "unlock" feature works. PCILeech offers the ability to hotpatch memory using its own signature system to find location to apply a patch.
The signature documentation details the format expected in order to build a proper signature:
MEMORY PATCH SIGNATURE FORMAT
=============================
A memory patch signature file have the extension '.sig'.     A file may contain
multiple memory patch signatures.     A memory patch signature consists exactly
three (3) chunks. Memory patch signatures support wildcard and relative offsets
in addition to the standard in-page offset.
chunk[0] = search pattern 'data' at 'offset' distance from page base.
chunk[1] = search pattern 'data' at 'offset' distance from page base.
           only searched in same page as chunk[0] if match is made in chunk[0].
           optional. if not used specify data: '-'
chunk[2] = replace contents with 'data' at distance 'offset' from page base.
In our case, we are searching for the MsvpPasswordValidate5 function in memory in order to null out the part that is responsible for validating the provided password:
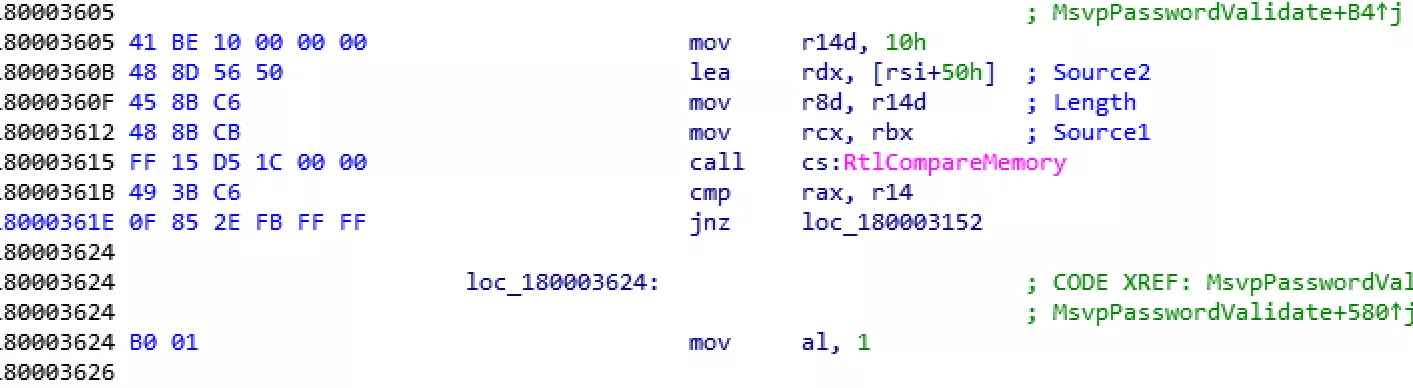
Doing so, user authentication would succeed no matter which password is provided.
One must note that this is possible on the log-on screen as data is already decrypted in memory.
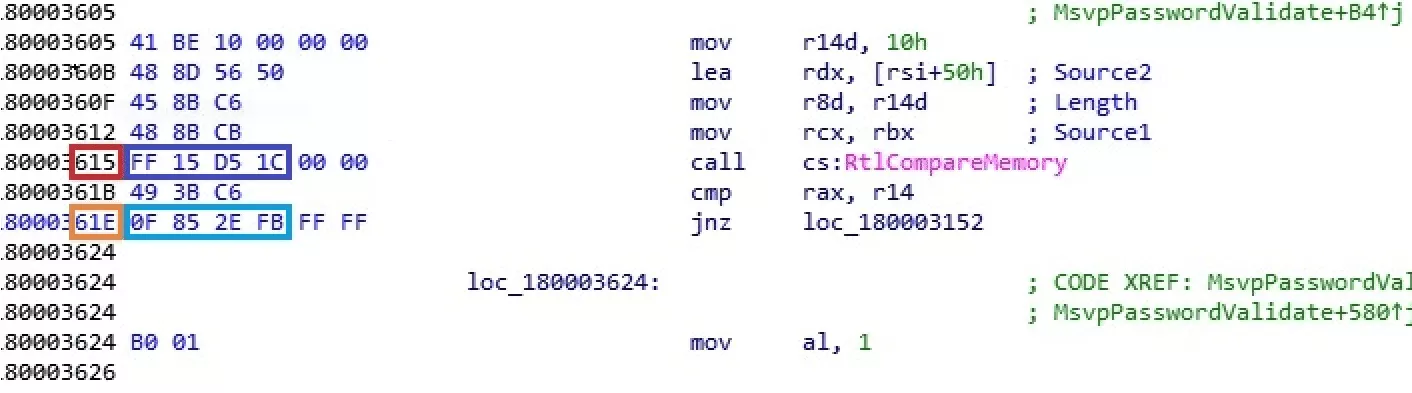
We could confirm that the following signature worked with our Microsoft Windows Version 1709:
615,FF15D51C,61e,0F852EFB,61e,909090909090
Finally, if the signature was not already existing within PCILeech, a script previously coded could have been used in order to automate the extraction of offsets among all the NtlmShared.dll with valid Microsoft signature that were dumped from VirusTotal.
Recommendations
Most OS vendors, Microsoft in particular, provide countermeasures which we propose to present below in order to increase the level of security of your Microsoft systems.
FireWire attack vector
As stated previously, starting with Microsoft Windows 8.1 the driver in charge of FireWire transactions (SPB-2) is disabled on the log-on screen.
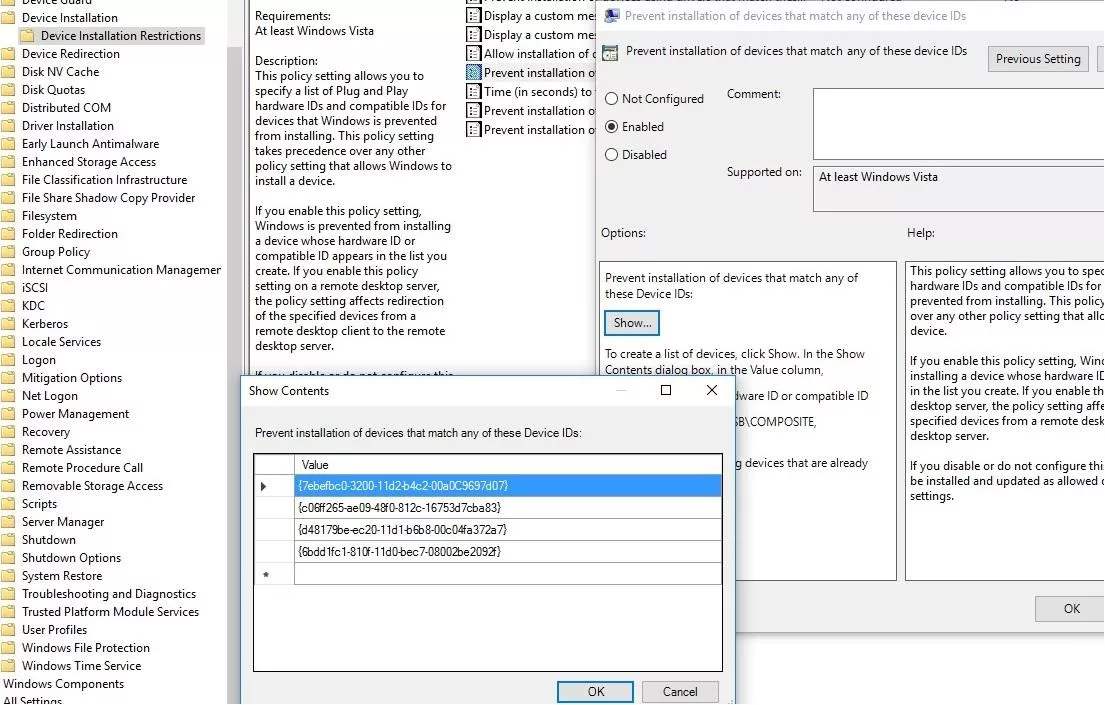
One may want to go further and deny any drivers matching the IEEE 1394 device setup class from being installed. To proceed so, Microsoft provides the GUID of the device class to deny from installation.
Nevertheless, as Sami Laiho states on his blog some more GUIDs may represent FireWire-capable devices.
The final list would then be the following:
| GUID |
|---|
| {7ebefbc0-3200-11d2-b4c2-00a0C9697d07} |
| {c06ff265-ae09-48f0-812c-16753d7cba83} |
| {d48179be-ec20-11d1-b6b8-00c04fa372a7} |
| {6bdd1fc1-810f-11d0-bec7-08002be2092f} |
Starting with Windows Vista/Windows Server 2008, this blacklisting may be achieved through local policies for a standalone workstation but also using a GPO applied to domain computers by following this path:
Computer Configuration
> Administrative Templates
> System
> Device Installation
> Device Installation Restrictionsthen in the details pane:
double-click "Prevent installation of devices using drivers that match these device setup classes"
tick "Enabled"
click "Show..."
Afterwards in the "Show Contents" dialog box, provide the above GUIDs.
PCI-Express attack vector
As with IEEE 1394 devices, one could prevent the OS from installing a new device driver. Nevertheless, this is not a viable solution as daily-used connectors rely on PCIe (as Thunderbolt) so some other countermeasures must be found.
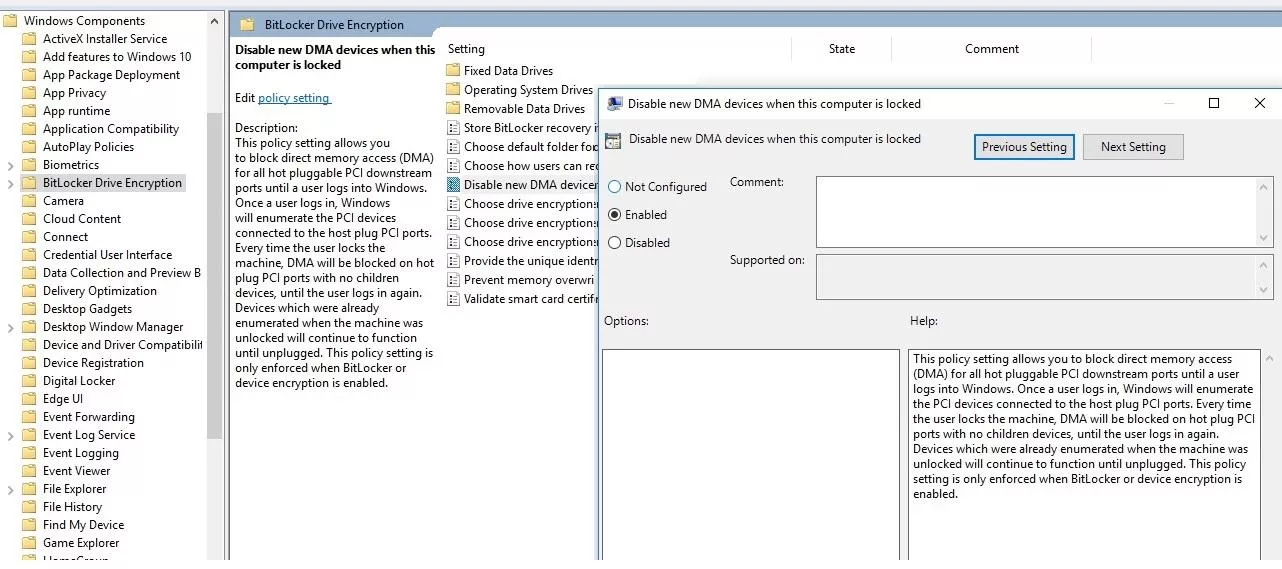
Starting with Windows 10 Version 1703/Windows Server 2016, Microsoft gives the possibility to disable all hot pluggable PCI downstream ports when computer is locked. This parameter can also be applied locally or through a GPO by following this path:
Computer Configuration
> Administrative Templates
> Windows Components
> BitLocker Drive Encryptionthen in the details pane:
double-click "Disable new DMA devices when this computer is locked"
tick "Enabled"
One must notice that BitLocker must be activated for this option to be taken into account. Furthermore this option is not enabled by default.
Finally, starting with Windows Version 1607/Windows Server 2016, Microsoft implements some (undocumented) mechanisms to protect systems from attacks using DMA.
These mechanisms rely on Microsoft (not so) new Virtualization Based Security (VBS) technology. In order to be able to apply this security feature, UEFI and Secure Boot must be activated (UEFI implemented must follow UEFI 2.3.1.c specifications) within the BIOS of every workstation.
When all the prerequisites are met, the policy may be applied through local policies for a standalone workstation but also using a GPO applied to domain computers by following this path:
Computer Configuration
> Administrative Templates
> System
> Device Guardthen in the details pane:
double-click "Turn on Virtualization Based Security"
tick "Enabled"
within the "Security Platform Security Level" dropdown list select "Secure Boot with DMA."
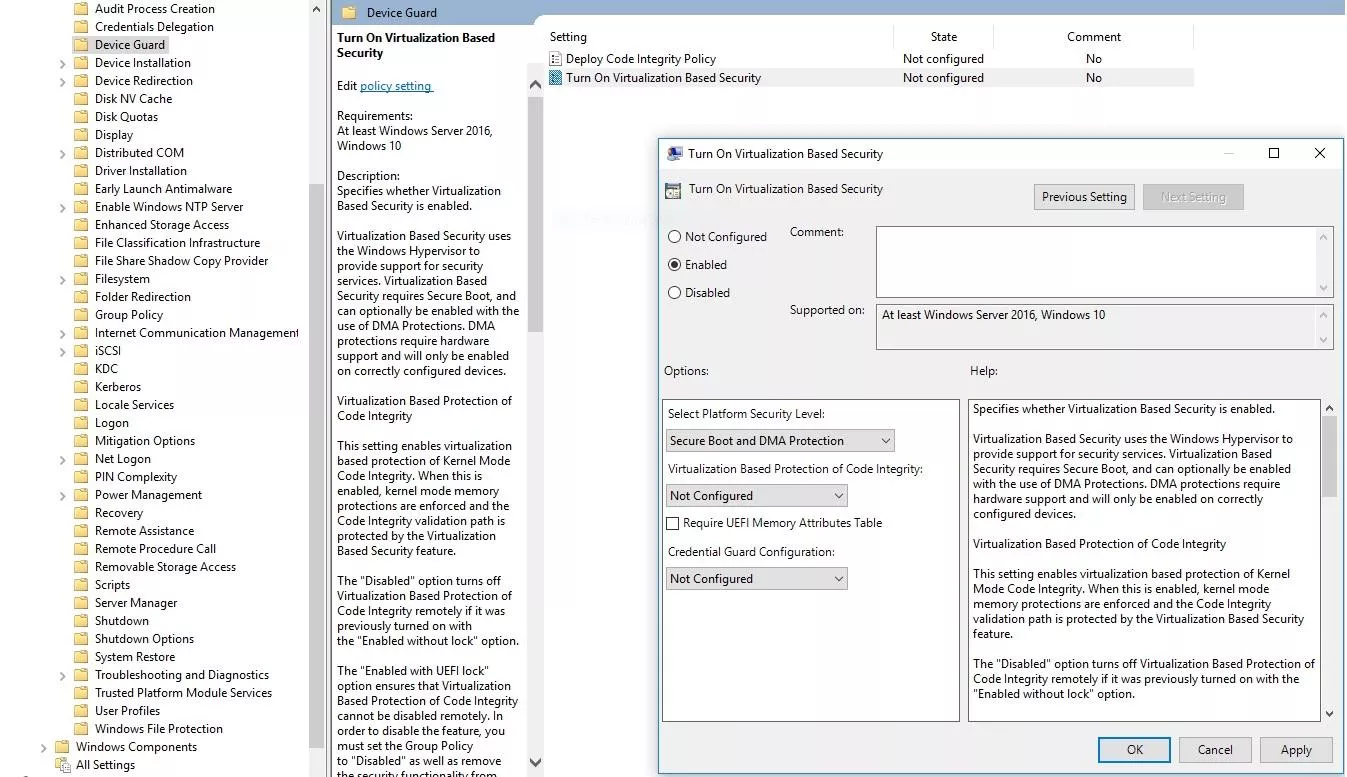
While claiming that this feature protects from DMA attack, Microsoft does not really give any implementation details on it... further reverse-engineering is needed, I guess ;).
One must notice that the workstation must have VT-d/Vi IOMMU (which has to be enabled in BIOS as explained before) in order for this recommendation to be effective. This feature is likely to be available on every CPU which is less than 10 years old.
Conclusion
We hope that this blogpost helped you realize that DMA attacks, even if known for a while, are not dead and are even more likely to occur as more and more technologies rely on PCIe (also FireWire is not completely dead thanks to ExpressCard expansion slots!).
I personnally really enjoyed this assessment as it involved many IT security fields I particularly appreciate:
- Windows and especially
Active Directoryaspects; - a bit of hardware knowledge and practice;
- a bit of reverse-engineering.
Thanks to the awesome work of some security researchers, whose tools[4][5] were cited in this article, DMA attacks may also be quite straightforward to set up.
Finally, if this blogpost focuses on a specific approach, several others could have been explored at the hardware level:
- plugging in to the TPM bus and dumping the FVEK while booting[6];
- flashing the BIOS[7];
- altering the
Boot Service TableorRuntime Service Table[8]; - etc.
References:
[1] https://en.wikipedia.org/wiki/IEEE_1394#/media/File:FireWire800_Stecker.jpeg
[2] https://en.wikipedia.org/wiki/Thunderbolt_(interface)#/media/File:Thunderbolt-Connector.jpg
#/media/File:Thunderbolt-Connector.jpg)
[3] https://rog.asus.com/articles/maximus-motherboards/buying-an-m-2-ssd-how-to-tell-which-is-which/
[4] https://github.com/carmaa/inception
[5] https://github.com/ufrisk/pcileech
[6] TPM Genie
[7] https://cansecwest.com/slides/2013/Evil%20Maid%20Just%20Got%20Angrier.pdf
[8] http://blog.frizk.net/2017/08/attacking-uefi.html
- 1. As of the time writing this blogpost, the USB3380 Evaluation board has not been available since a few months. Nevertheless the PCIeScreamer by Ramtin Amin (@key2fr) is now supported by PCILeech by Ulf Frisk (@UlfFrisk). This seems a less expensive alternative to the FPGA-only solution.
- 2. The almighty Aurelien Bordes (aurelien26[at]free.fr) published a complete analysis of
BitLockersome years ago which details the different protectors in use. I highly encourage you to take a look at his work (and what he generally does) if you are not afraid of frog runes, as many widely used tools are based on his researches. - 3. Many motherboard vendors nowadays ship "emergency backup" solutions on their devices in order to be able to reset configurations. "Dual" BIOS are one of these kinds of backups.
- 4. Chaining technologies was mandatory in this situation, as we wanted to interact with the main memory using PCIe from USB.
- 5.
MsvpPasswordValidatefromNtlmShared.dllis used by thewinlogon.exeprocess and is in charge of validating user's provided identity while the latter attempts to authenticate.