Dissecting NTLM EPA with love & building a MitM proxy
Looking to improve your skills? Discover our trainings sessions! Learn more.
Have you ever come across a website using NTLM as the authentication mechanism but could not authenticate with your browser or Burp even though you had valid credentials? NTLM EPA might be the culprit... Indeed, Firefox, among others, does not support the new NTLM Extended Protection for Authentication (EPA) mechanism and fails to connect.
The objective of this article is to provide a short and concise view of the NTLM protocol including the EPA extension used in combination with HTTP(s) and to provide solutions to correctly authenticate, even with a browser or tool not supporting such authentication mechanism.
As a result of our research, a custom proxy was built and is available on github.
- If you are only interested in the EPA attribute you can directly jump to What about EPA?.
- If you are only interested in the different solutions tested, you can directly jump to Building a MitM proxy.
- If you are only interested in the final solution description, you can directly jump to Prox-Ez.
And if you prefer reading it all, just keep going.
Dissecting NTLM EPA
NT Lan Manager (NTLM) is an authentication protocol designed by Microsoft. It is widely and mostly used in Windows based internal environments as it provides an easy way to implement Single Sign-On in Active Directory networks.
The protocol is based on a challenge/response exchange. This allows authenticating the client to the server without transmitting the password over the network. This exchange is composed of three messages:
- NEGOTIATE_MESSAGE: the client announces its will to authenticate. This message includes the capabilities the client supports.
- CHALLENGE_MESSAGE: message sent by the server in response to a NEGOTIATE_MESSAGE which encapsulates the server's challenge (8 random bytes).
- AUTHENTICATE_MESSAGE: response from the client to the server's CHALLENGE_MESSAGE. It includes the computed challenge response (from the server challenge and the user's secret) as well as some information about the client.
This exchange actually authenticates the TCP connection on which the authentication was made. However, in order to perform such exchanges, the messages must be encapsulated on a base protocol. Multiple very well written articles describes NTLM over SMB, LDAP, RPC, etc. but very few actually go into details about NTLM over HTTP.
In general, a web server that requires any type of authentication will return a 401 HTTP response code to any unauthenticated request. In such response, a WWW-Authenticate header, that specifies the authentication method expected by the server, is included. A normally constituted browser will automatically detect this header and prompt the user for credentials (or automatically perform the authentication if credentials are already stored on the computer).
In order to go into further detail, we need to explain a few things regarding NTLM.
LM Hash VS NT Hash
To connect, the client has to know the account credentials: the domain it is attached to; the username; the password. To limit the exposition of the password, only a hash value of this password will be used by the NTLM protocol.
Keep in mind that knowing the hash value of the password is, authentication wise, identical to knowing the clear text password.
Mainly two types of hashes were/are used:
- LM hash (deprecated and should not be used). Will only use the first 14 characters of the password and is case-insensitive. It corresponds to the concatenation of the DES encryption of the split password:
ConcatenationOf(
    DES(
        UpperCase(Passwd)[0..6],
        "KGS!@#$%"
    ), DES(
        UpperCase(Passwd)[7..13],
        "KGS!@#$%"
    )
)
An exhaustive brute force attack can be performed in a very reasonable amount of time: a few hours on a recent laptop.
- NT hash (often called NTLM hash, which should not be confused with the NTLM challenge response value: NetNTLMv1 or NetNTLMv2 values). Will use the full password and is case-sensitive. Depending on the NTLM version (see below), the user's secret used for authentication will be the NT hash or a value obtained from it and user's information:
# NT hash for NTLMv1
MD4(UNICODE(Passwd))

# Value obtained from the NT hash and user info for NTLMv2
HMAC_MD5(
    MD4(UNICODE(Passwd)),
    UNICODE(ConcatenationOf(
        Uppercase(User),
        UserDom
    ))
)
The user secret used for authentication is derived directly from the LM or NT hash.
NTLM versions
Two distinct versions of the NTLM protocol exist: NTLMv1 & NTLMv2.
The NTLMv1 version should not be used in production as it uses weak cryptography (based on the DES block cipher). That increases the success rate during brute force attacks conducted to retrieve the user's secret used during authentication.
The NTLMv2 was created to be a cryptographically stronger version of NTLMv1. It uses HMAC_MD5 to compute the challenge response. It also includes a timestamp and a client challenge to prevent some replay attacks.
Let's illustrate with a real authentication between a client (Chromium 90.0.4430.212) and a server (Microsoft IIS 10.0.19041.1) behind an NTLM authentication.
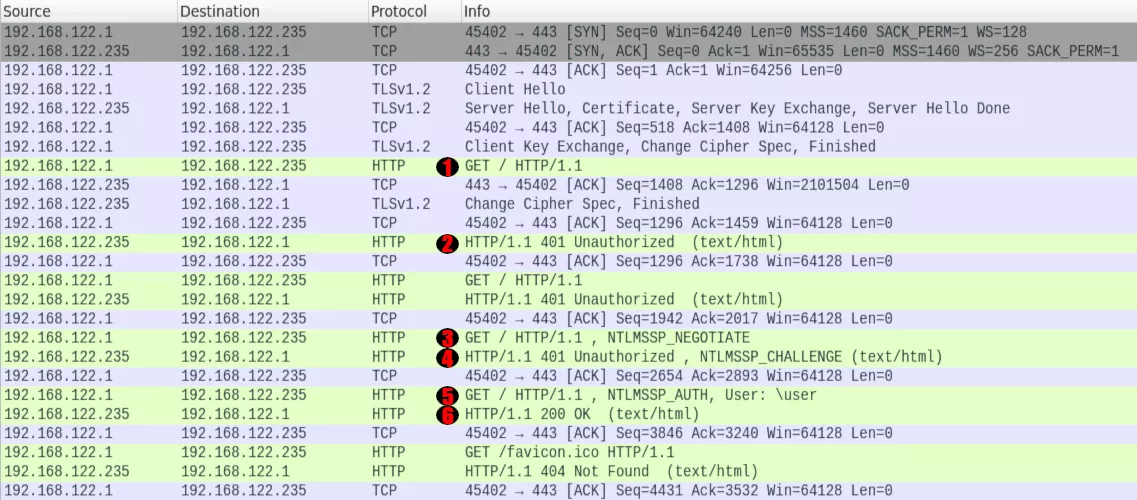
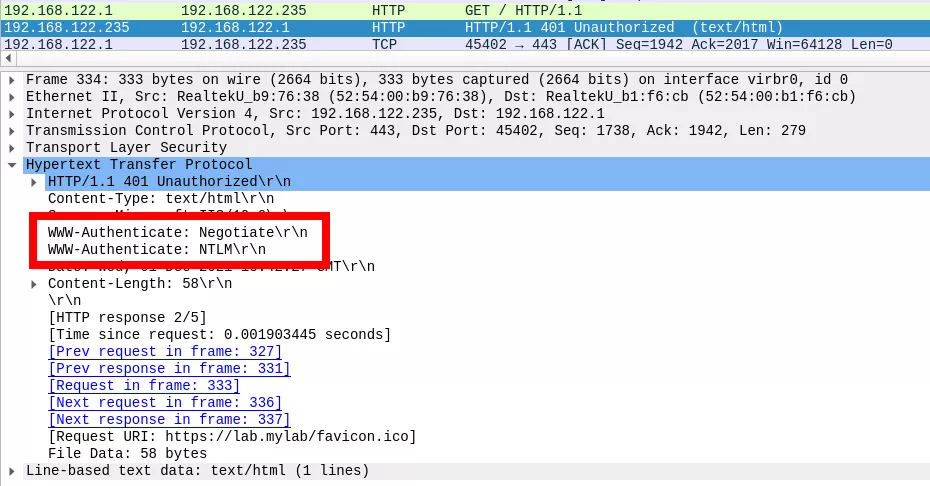
The client initially sends an HTTP request to the server (1). As the content is protected by an NTLM authentication, the web server responds with a 401 error page (2), including the WWW-Authenticate header assigned with the value NTLM or Negotiate, sometimes both:
NEGOTIATE_MESSAGE (type 1)
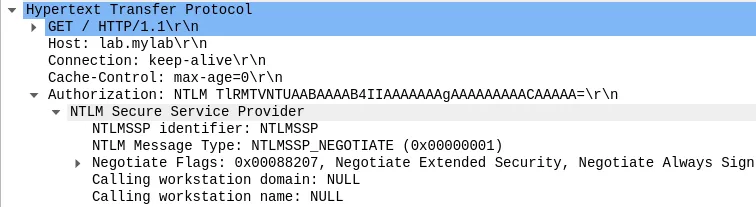
As for any protocol the NTLM is encapsulated in, the client will first include a NEGOTIATE_MESSAGE (3). It is mainly composed of a list of flags it supports and the name and domain the workstation initiating the authentication belongs to (may be left empty).
In NTLM over HTTP, this message is sent to the server within the Authorization header. The client therefore responds with the same initial request but includes this new header beginning with the string "NTLM " followed by the base64 encoded value of the NEGOTIATE_MESSAGE:
During authentication, the server will always send authentication data via the WWW-Authorization header whereas the client will use Authorization.
CHALLENGE_MESSAGE (type 2)
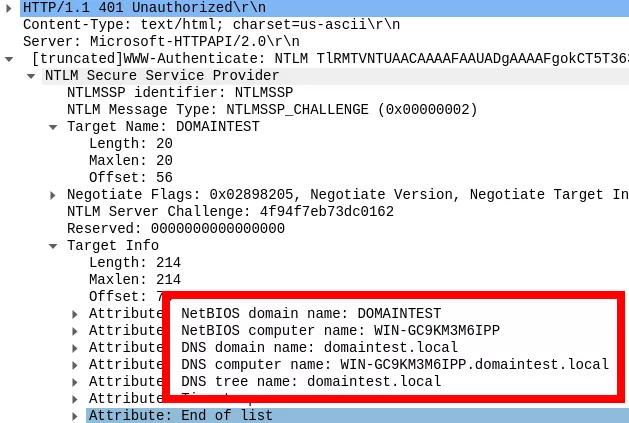
Upon reception, the server generates a random 8-byte value, dubbed challenge, and it returns it in a CHALLENGE_MESSAGE also conveyed via header (4).
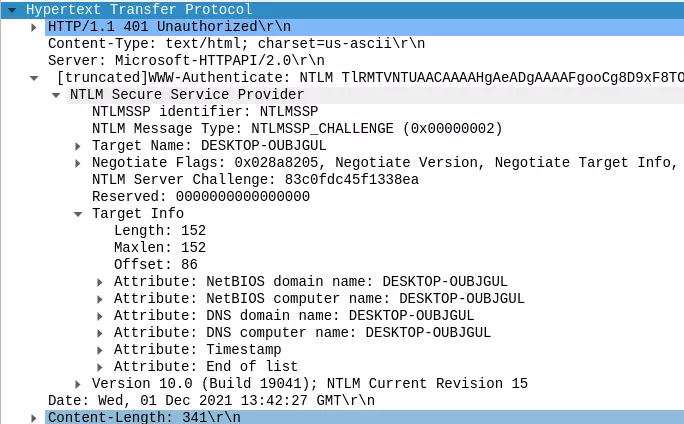
From an intrusion point of view, it is important to note that one can retrieve domain information without providing any valid credentials. Indeed, this second message is sent prior to any authentication and includes information about the domain. A reply example from an enrolled server in the domain DOMAINTEST is shown below:
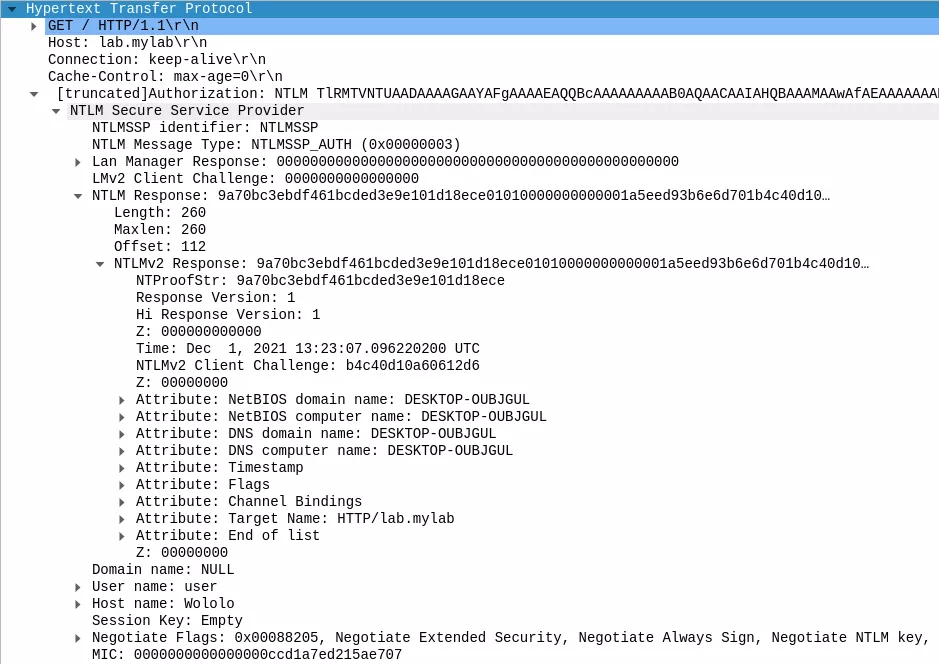
AUTHENTICATE_MESSAGE (type 3)
This message will contain the client authentication secrets and the security elements that ensure the correctness of the authentication exchange (5).
Depending on the NTLM version, the client will compute the challenge response:
- NTLMv1: see this Wikipedia article for a simple description of the challenge response computing; and this Microsoft article for a more detailed one.
- NTLMv2: see this Microsoft article for a detailed description of the computing algorithm.
Once this computation is done, the client can build the AUTHENTICATE_MESSAGE.
This message will include, among other elements:
- LM & NT responses. NT response contains, among other elements:
- Client challenge.
- Challenge response.
- Timestamp.
- Attributes list (target domain name, target computer name, flags, EPA channel binding, target name, ...).
- Username.
- Host name of the machine trying to authenticate (so be careful as it may automatically leak this information about your machine).
- MIC (Message Integrity Check): prevents an attacker from modifying one of the three messages when performing a MitM attack.
Upon reception of this message, the server will compute the corresponding values and perform verification to make sure that the client is the one he says he is. If the verifications succeed, the server will respond with the page that is requested by the client (6). Otherwise, it will just send a 401 error again.
Session
Finally, once the exchange has correctly taken place and as long as the TCP connection is kept alive, the client can browse the website as an authenticated user.
Some webservers will set an authentication cookie on the client browser in order to prevent the NTLM authentication from running each time the TCP connection is dropped. Otherwise, the whole process would have to be performed to authenticate the client yet again.
What about EPA?
Extended Protection for Authentication, dubbed EPA, is an extension for the NTLM authentication protocol to prevent NTLM relaying on HTTPS webservers. It works by binding the NTLM authentication to the outer tunnel: the TLS layer. Needless to say that it cannot be used on servers only providing clear text connections. This is the defense mechanism used to prevent relay attacks against the AD CS (Active Directory Certificate Services) web services.
This extension is far from being supported by all browsers and tools. As an example, Firefox 93.0 is not able to connect, and will prompt for credentials indefinitely, the same behavior is observable with BurpSuite Pro 2.
The only browsers that were tested and correctly performed the NTLM authentication against a webserver requiring EPA are:
- Chromium - version 90.0.4430.212 (Developer Build)
- Google Chrome - version 95.0.4638.54 (Official Build)
The NTLM Extended Protection for Authentication (EPA) simply adds a Channel Bindings attribute (aka. Channel Bindings hash) in the attributes' list transmitted in the NT response via the AUTHENTICATE_MESSAGE sent to the server:
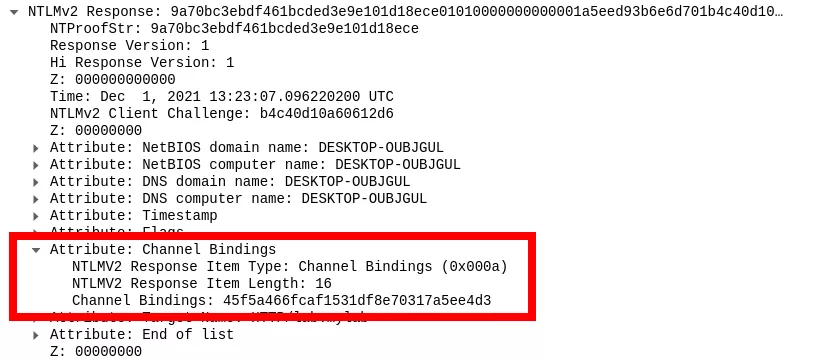
This attribute is based on the target's x509 certificate. In order to create a valid attribute, that is accepted by servers implementing NTLM EPA, it is first required to build the Channel Bindings token. It is defined here and is basically the byte by byte hash of the target's certificate as it appears in the TLS server's certificate message. . The hash function is defined as followed (taken from the corresponding RFC):
- If the certificate's signatureAlgorithm uses a single hash function, and that hash function is either MD5 or SHA-1, then use SHA-256.
-
If the certificate's signatureAlgorithm uses a single hash function and that hash function is neither MD5 nor SHA-1, then use the hash function associated with the certificate's signatureAlgorithm.
-
If the certificate's signatureAlgorithm uses no hash functions or uses multiple hash functions, then this channel binding type's channel bindings are undefined at this time.
Once this token is generated, the following python pseudo code can be run to compute the attribute:
import hashlib
import struct

# Compute cert hash
cert_hash = hash(cert)
# Prefixing the hash
token = b"tls-server-end-point:" + cert_hash

token_len = len(token)

# 16 null bytes to begin with
writer = b"\x00"*16
# Then the length
writer += struct.pack('I', token_len)

# Then we compute the MD5 hash of the concatenation of writer || token
digest = hashlib.md5()
digest.update(writer)
digest.update(token)

# attribute is the value to insert in the Channel Bindings' value
attribute = digest.hexdigest()
The Chromium source code provides a good code base to reimplement this algorithm, especially the file net/ntlm/ntlm.cc.
The result can then be inserted in the attributes list in the AUTHENTICATE_MESSAGE field.
Upon reception of the full authentication scheme, the remote server will compute on its own the corresponding Channel Bindings attribute and will compare with the provided one (that normally could not be tampered thanks to the MIC value). If they match, the client actually wanted to connect to the said server. Otherwise, the authentication was relayed and not initially targeted this server.
Building a MitM proxy
Since many tools and browsers do not support NTLM EPA authentication, it was naturally decided to use a proxy as a broker to perform the authentication instead. This allows having full control over the authentication, thus the possibility to use EPA compatible libraries, which becomes completely transparent to the upstream tool.
That is how Prox-Ez was born. You can find the source code, readme, and hopefully everything you need in the following repository:
While we agree that one should not reinvent the wheel, none of the other solutions quite met our need. To demonstrate this, we will present an overview of what was planned, why it did not cater our needs and finally, what we did.
Cntlm, aka. the veteran, has been around for the last 14 years, and is an obvious choice when you want a proxy capable of performing NTLM authentication. This was therefore our first choice.
As NTLM EPA takes place over TLS, the proxy has to perform TLS interception in order to decrypt the responses from the server and analyze WWW-Authenticate headers. Otherwise, our browser will simply send an HTTP CONNECT request to the Cntlm proxy, which will open a TCP connection to the remote server and simply forward traffic without being aware of the inner requests. Therefore, the authentication requests will be forwarded to the browser and it will fail performing it.
Unfortunately Cntlm does not provide TLS interception such as mitmproxy or Burp would.
However, by using socat as an intermediary to handle the TLS layer, it is still possible to use Cntlm. The setup is as follows:

- The client's browser or tool that does not support NTLM nor NTLM EPA. It is configured to communicate using a proxy, via environment variable or its own configuration. The hostname of the target machine has to resolve to the socat listening host IP address, it will automatically be forwarded to the correct host, see below. The following entry is registered in /etc/hosts:
127.0.0.1 lab.mylab
- Patched Cntlm: configured not to use any upstream proxy (NoProxy *); has registered the user credentials; will be listening on port 3128; and includes a patch to add the Channel Bindings attribute:
--- ntlm.c	2021-11-08 16:40:08.387269007 +0100
+++ ntlm_patched.c	2021-11-08 16:37:33.044620740 +0100
@@ -302,6 +302,21 @@
 	char *lmhash = NULL, *nthash = NULL;
 	int lmlen = 0, ntlen = 0;

+    int old_challen = challen;
+    char *old_challenge = challenge;
+
+    /*
+     * Adding channel binding token.
+     */
+    challen = challen + 20;
+    challenge = new(challen);
+    memcpy(challenge, old_challenge, old_challen);
+    memcpy(MEM(challenge, char, challen - 4), MEM(old_challenge, char, old_challen - 4), 4);
+    VAL(challenge, uint16_t, old_challen - 4) = U16LE(0x0A);
+    VAL(challenge, uint16_t, old_challen - 2) = U16LE(0x10);
+    VAL(challenge, uint64_t, old_challen) = U64BE(0x45f5a466fcaf1531);  # First 8 bytes of the attribute value
+    VAL(challenge, uint64_t, old_challen + 8) = U64BE(0xdf8e70317a5ee4d3);  # 8 following bytes of the attribute value
+
 	if (debug) {
 		printf("NTLM Challenge:\n");
 		tmp = printmem(MEM(challenge, char, 24), 8, 7);
@@ -334,6 +349,9 @@
 					case 0x5:
 						printf("\t      TLD: ");
 						break;
+ 					case 0xA:
+ 						printf("\t      Channel bindings: ");
+ 						break;
 					default:
 						printf("\t      %3d: ", ttype);
 						break;
This patch contains the hardcoded value of the Channels Bindings attribute (based on the remote server's certificate). Therefore, that value will need to be computed and replaced in the patch above to match your need. In the current context, the full attribute value is 0x45f5a466fcaf1531df8e70317a5ee4d3. Given the fact that Cntlm is not aware of the outer TLS tunnel, it is not straightforward to automatically compute this attribute.
Here is a Cntlm configuration file sample:
# Credentials
Username       user
Domain         test
Password       user

# Can actually be anything as it will NOT be used
Proxy          127.0.0.1:8080

NoProxy        *, localhost, 127.0.0.*, 10.*, 192.168.*

Listen         3128
- socat: it is used to establish the TLS connection to the remote server. This allows Cntlm to send/receive the HTTP traffic in clear text and thus perform the NTLM authentication. It can be launched using the following command:
socat -v TCP-LISTEN:80,fork,reuseaddr OPENSSL:<remote_server_ip>:443,verify=0
Thanks to this chain, it is possible to access a website that requires NTLM authentication as well as the EPA attribute. However, it is hardly extendable to multiple websites, nor simple to adapt for everyone use cases.
mitmproxy
mitmproxy is a Python 3 proxy capable of intercepting TLS connections and inspecting the underlying traffic. As we have seen with Cntlm, it is a crucial feature for the proxy to implement.
Thanks to the addon-oriented philosophy of mitmproxy, implementing new features is fairly simple. The initial idea was to modify the requests transiting through mitmproxy to modify the NTLM messages to add the Channel Bindings attribute. Beware that the final AUTHENTICATE_MESSAGE includes a MIC (Message Integrity Code) that allows the server to verify that the messages were not altered during authentication, this value has to be computed again to match the new messages.
To do so, the library pyspnego was used to handle the NTLM messages generation (the whole messages were replaced by the ones generated by pyspnego). This library only requires the Channel Bindings token (see section What about EPA?), as it computes by itself the Channel Bindings attribute. The rest is quite simple:
- Intercepting the requests.
- Checking if the Authenticate header is present in the request.
- If so, modify the request to use the newly created NTLM message.
- Otherwise, forward the request as is.
The main issue with this addon is that the upstream tool has to perform some sort of NTLM authentication, even if it does not work, in order for the proxy to patch the request on the fly with correct messages. The ideal solution would be to perform fresh requests directly from the proxy in the same TCP connection as the client's initiated one. Unfortunately, mitmproxy does not permit reusing connections to inject new requests, as mhils (one of the mitmproxy developers) said on the mitmproxy's Slack channel:
Reusing connections from replay is not really supported, and likely won't be for architectural reasons.
This tool had to be dropped.
After searching and experimenting diverse solutions, the final answer was the need to rewrite a proxy to exactly match our needs.
It features TLS interception, on-the-fly creation of certificates, NTLM (+EPA) authentication (fortunately), Kerberos authentication (soonTM), clear text connections, ... And is available here.
While building this proxy, multiple issues had to be addressed:
- TLS interception
As stated before, TLS interception is an essential part of the tool. This is made possible by installing on the client a certificate authority (so that there is no warning telling the client the connection is being intercepted) and generating certificates on-the-fly. The process is as followed:
- The client connects via TCP to the proxy and sends an HTTP CONNECT request specifying the remote destination IP or hostname.
- The proxy responds with an HTTP 200 OK response, so that the client believes it will now exchange directly with the remote server.
- The client establishes a TLS connection with what it believes being the remote server.
- The proxy receives the TLS initialization messages destined to the remote server but will complete the TLS exchange itself instead. To do so, it generates a certificate for the remote server name (found via the SNI, Host header in the CONNECT request or directly in the header line of the CONNECT request) and uses this one for the TLS connection.
- Because there is a certificate authority installed on the client, the certificate generated by the proxy is considered valid and the TLS tunnel can be established without error.
- The proxy will then establish a completely independent TCP and TLS connection to the remote server.
- The client sends HTTP request to what it believes being the remote server.
- The proxy receives the requests and forwards them to the remote server.
- The remote server sends responses.
- The proxy forwards responses to the client.
During step 8 and 10, it is possible to inspect the HTTP requests/responses and modify them.
The mitmproxy team made a nice article explaining how interception can be done.
- NTLM messages generation
Multiple libraries are doing this job just fine. pyspnego was used to perform such authentication.
- HTTP request/response parsing
This may have been the most complex part of building this proxy. At first, the HTTP requests and responses were parsed "by hand" which led to many corner cases and unsatisfactory results.
In a second stage, the library h11 was used. It parses raw data into HTTP requests and responses. This allows manipulating sockets as we desire and still have a solid HTTP parser. The proxy now uses this library to handle the parsing and the requests modifications. This is the library used by mitmproxy.
- Channel binding token generation
The Python snippets described in the first part of this article was used to generate the token.