Grehack 2018 qualification challenge
Looking to improve your skills? Discover our trainings sessions! Learn more.
Hacking for Chartreuse – A story in 10 chapters
- What is Chartreuse and why it is very relevant
- Punched
- More complicated than it should have been
- Weather station v0.1
- Network
- Find the password
- Micro-probing attack
- Be ready!
- The Band
- 43 years before
What is Chartreuse and why it is very relevant
The Chartreuse is the most amazing beverage ever invented, period. It's composed of 130 herbs and has an amazing taste. This liqueur is named after the Grande Chartreuse monastry, in the Chartreuse mountains, near Grenoble.
Every year, at GreHack conference, a jeopardy CTF is organized and one of the winners prices is a large bottle (some, like me, might say "2 days bottle") of chartreuse. As the conference and CTF are not free, they hold a little challenge approximately two months before and offer three places to first solvers. This year, the places were given to @Ioonag, who won the challenge in approximately two days, Ace17 and Fabrice (MrBrocoli was eaten before he could attend the conference).
Without further ado, let's dive in this year's challenges and see possible resolution methods. I'll try to detail as much as I can interesting/hard challenges, for the others, only little details will be given.
If you just want to see the solution of the most difficult step of this year's challenge (big crackme), I suggest you jump directly to The Band section. Other challenges can be fun too though and are easy to read so you probably want to read them too. Anyway, good luck. If you want to throw tomatoes at me because I talk too much, don't give enough details, say nonsense, or anything else, please do, that's all twitter is for!
Punched
As always, this type of challenges begin with a little warm up. This time you're given this image along with a hint:

We already know it's an IBM 5081 punch card (“C'est comme le Port-Salut, c'est écrit dessus”). After some time, we find an exploitable image that allows us to decode the following flag: GH18(WELCOME! GOOD LUCK AND HAVE FUN!)
More complicated than it should have been
This new challenge is a zip archive containing a website coded in Python. The hint says:
We just found in a S3 bucket the source of a dev version of the product of a trendy startup. Let's hope they have improved their security for the launch. (https://ohthahviengohsahphei.challenge.grehack.fr)
Quickly looking at the sources, we notice that middleware.py uses import jwt. If you know your buzzwords, you already did the hardest part of the challenge. If you don't, jwt stands for JSON Web Tokens. It is a standard supposed to securely transmit data between parties. Why “supposed”? That's because, usually, you would use it with a strong hash algorithm like HMACSHA256 to sign your message. But, in some cases, you can use it without any signing.
If we look more carefully at the code of middleware.py, the cookie verification is this:
try:
    token = jwt.decode(request.COOKIES['token'], SECRET_KEY)
except InvalidKeyError:
    token = jwt.decode(request.COOKIES['token'], None, False)  # TODO: debug only, remove it before production
Now, looking at our own token cookie in this debugger, here is what we have: eyJhbGciOiJIUzI1NiIsInR5cCI6IkpXVCJ9.eyJhZG1pbiI6ZmFsc2UsInVzZXIiOjE2fQ._6BiONay2o1dzdCeLUJrx0spOIBYJ03P4hdGG5cJtYk.
The first part is the header: {"alg": "HS256","typ": "JWT"}, the second part, the data: {"admin": false,"user": 16} and the last one is the signature. As we don't know the SECRET_KEY value, we cannot verify the signature or generate a new cookie. Or can we?
In the code, if the token can't be decoded, the website will try to decode it without using any signing algorithm. It means we can now create our own administrative cookie:
import jwt
jwt.encode({"admin": True, "user": 16}, '', None)
# b'eyJ0eXAiOiJKV1QiLCJhbGciOiJub25lIn0.eyJhZG1pbiI6dHJ1ZSwidXNlciI6MTZ9.'
This gives us access to the admin panel displaying the following flag: GH18{good_old_session_cookie_would_have_been_enough}
Weather station v0.1
This time, we're given an ELF executable for who knows which architecture. Running the file command on it will give us a first clue where to look for:
$ file 550e4ccc1dc33e029dca7e406aeb37cab6d10e013b8bd1081031069e1e589a83_station.elf.stripped
550e4ccc1dc33e029dca7e406aeb37cab6d10e013b8bd1081031069e1e589a83_station.elf.stripped: ELF 32-bit LSB executable, Atmel AVR 8-bit, version 1 (SYSV), statically linked, stripped
It's compiled for Atmel processors. The hint says:
Dave started a new Arduino project, he is creating a weather station. He started his project by writing a login function, can you find his password?
So Dave doesn't want to share its information with us? That's not very nice of him. Obviously, we could simply go ask him but we don't talk to people so we'll just break into its system (because that's what we do, with hoodies on).
DISCLAIMER: if you don't know any thing about assembly or reversing, this write-up won't help you because I won't go deep into the details. If you do know some things about crackme but not a damn thing about Atmel assembly, you won't learn either.
$ r2 550e4ccc1dc33e029dca7e406aeb37cab6d10e013b8bd1081031069e1e589a83_station.elf.stripped
Warning: Cannot initialize dynamic strings
 -- You crackme up!
[0x00000000]> aaaaaaaaaaaa
An r2 developer is coming to your place to manually analyze this program. Please wait for it

--press any key--
[0x00000000]> aaaa
[opcode st @84 returned 0 cycles.th sym. and entry0 (aa)
[x] Analyze all flags starting with sym. and entry0 (aa)
[ ]
[Value from 0x00000000 to 0x00000744
aav: 0x00000000-0x00000744 in 0x0-0x744
aav: 0x00000000-0x00000744 in 0x800100-0x8001f8
Value from 0x00800100 to 0x008001f8
aav: 0x00800100-0x008001f8 in 0x0-0x744
aav: 0x00800100-0x008001f8 in 0x800100-0x8001f8
[opcode std @156 returned 0 cycles.ns for references (aar)
opcode lds @2d6 returned 0 cycles.
[x] Analyze len bytes of instructions for references (aar)
[x] Analyze function calls (aac)
[x] Emulate code to find computed references (aae)
[x] Analyze consecutive function (aat)
[x] Constructing a function name for fcn.* and sym.func.* functions (aan)
[x] Type matching analysis for all functions (afta)
[0x00000000]> afl
0x00000000   13 1858 -> 88   entry0
0x0000017e    1 24           fcn.0000017e
0x00000196    3 20           fcn.00000196
0x000001aa    2 66   -> 64   fcn.000001aa
0x0000027a    8 68   -> 58   fcn.0000027a
0x000002be    3 20   -> 16   fcn.000002be
0x000002d2    1 26   -> 64   fcn.000002d2
0x000002f6    3 38           loc.000002f6
0x0000031c    5 20   -> 60   fcn.0000031c
0x00000330   11 36   -> 122  fcn.00000330
0x0000049c   32 564          fcn.0000049c
0x0000072a    1 12           fcn.0000072a
0x00000736    3 12   -> 14   fcn.00000736
Okay, so, I have to tell you: Radare2 is definitely not my favorite program in the world. But keeping this aside, the last command run gives us the list of function, their offset and what I suppose is the length. The entry point is big but I'm not interested. However, the function in 0x0000049c seems promising, let's disassemble it:
[0x00000000]> pdf @ 0x0000049c
/ (fcn) fcn.0000049c 564
|   fcn.0000049c ();
|           ; CALL XREF from 0x000000b2 (entry0)
|           ; CALL XREF from 0x0000049c (fcn.0000049c)
|           0x0000049c      7894           sei
|           0x0000049e      84b5           in r24, 0x24                ; '$' ; IO TCNT2: Timer/Counter2 (8 bits).
|           0x000004a0      8260           ori r24, 0x02
|           0x000004a2      84bd           out 0x24, r24               ; '$' ; IO TCNT2: Timer/Counter2 (8 bits).
|           0x000004a4      84b5           in r24, 0x24                ; '$' ; IO TCNT2: Timer/Counter2 (8 bits).
[...]
| |||||`--> 0x000005ee      0e948e01       call fcn.0000031c
| ||||| :   0x000005f2      8134           cpi r24, 0x41
| ||||| :   0x000005f4      9105           cpc r25, r1
| |||||,==< 0x000005f6      f1f5           brne 0x674
| ||||||:   0x000005f8      0e948e01       call fcn.0000031c
| ||||||:   0x000005fc      8635           cpi r24, 0x56
| ||||||:   0x000005fe      9105           cpc r25, r1
| ========< 0x00000600      c9f5           brne 0x674
| ||||||:   0x00000602      0e948e01       call fcn.0000031c
| ||||||:   0x00000606      8235           cpi r24, 0x52
| ||||||:   0x00000608      9105           cpc r25, r1
| ========< 0x0000060a      a1f5           brne 0x674
| ||||||:   0x0000060c      0e948e01       call fcn.0000031c
| ||||||:   0x00000610      8f35           cpi r24, 0x5f
| ||||||:   0x00000612      9105           cpc r25, r1
| ========< 0x00000614      79f5           brne 0x674
| ||||||:   0x00000616      0e948e01       call fcn.0000031c
| ||||||:   0x0000061a      8335           cpi r24, 0x53
| ||||||:   0x0000061c      9105           cpc r25, r1
| ========< 0x0000061e      51f5           brne 0x674
[...]
|      ::   0x000006c4      e104           cpc r14, r1
|      ::   0x000006c6      f104           cpc r15, r1
|      `==< 0x000006c8      19f7           brne 0x690
|       :   ; JMP XREF from 0x00000672 (fcn.0000049c)
| --------> 0x000006ca      0e945f01       call fcn.000002be
\       `=< 0x000006ce      60cf           rjmp 0x590
I don't know anything about Atmel assembly but we can see a lot of function calls to fcn.0000031c, followed by what might be a compare with ASCII values and a branch to an offset.
From my understanding, the function might decode a byte from our input and jump to a label if the decoded byte is not the one in the password. We could try to analyze the decoding function for fun, but I'm not funny. We're just going to grab the flag (I'm waaaay too lazy to take five years to learn r2 “hello world” scripting) with Python:
func = """
/ (fcn) fcn.0000049c 564
|   fcn.0000049c ();
|           ; CALL XREF from 0x000000b2 (entry0)
|           ; CALL XREF from 0x0000049c (fcn.0000049c)
[...]
|       :   ; JMP XREF from 0x00000672 (fcn.0000049c)
| --------> 0x000006ca      0e945f01       call fcn.000002be
\       `=< 0x000006ce      60cf           rjmp 0x590
""".splitlines()
print("".join([func[i+1].split(", 0x")[1].split(" ")[0].decode("hex") if "call fcn.0000031c" in l else "" for i, l in enumerate(func)]))
Running this very nice script displays GH18{AVR_St4t!on}.
Network
Okay, new step. This time we have a rather big cap file (31647 packets) and no hint.
Analysing the PCAP
After a quick look, we can observe three things:
- All communications are on port 443
- All communications are
SSL/TLS - All communications are initiated from a single host: 5.135.166.161, ivre.rocks
IVRE is a famous framework that allows you to perform massive network scans and analyze data afterwards. This can mean two things for our challenge:
- It is online so we have to find a vulnerable server to exploit
- It is offline so we have to find a way to decrypt communications between IVRE and at least one server
I obviously went for the first one.
Most of the attacks on SSL/TLS are performed by some kind of Man-in-The-Middle mechanism. For us, this has a big implication because we cannot MiTM IVRE's server (or Internet has a BIG problem). The most probable scenario was therefore that the authors of the challenge were renting one of the servers in the scan and that it was vulnerable to Heartbleed, with a bot accessing regularly some kind administration panel so we have some data to steal.
Following this lead I installed IVRE in a container and desperately tried to make it load the cap file but never succeeded. Then I decided this challenge was nonsense and most likely guessing so I just started a sslscan on all servers while looking for something else.
At that time I observed that most of the servers had a mention to CISCO so I tried to find a recent vulnerability on any type of device this constructor builds. I went as far as 2015 but didn't find anything promising.
Back to my scan. To my surprise, this was like a bad horror movie. There were sooo many servers using SSLv2, exports suites, 40 bits keys, or that were vulnerable to heartbleed. Unfortunately this meant for us that we were on the wrong track.
You must think this is when I switch to the offline idea? Yeah ... no! This is when I decided “Goodbye GreHack”.
Beyond the rage
On the 3rd of September, after I had long decided to stop this year's challenge, @GrehackConf published a hint on Twitter:
As many of you seem stuck on the "Network" challenge, here is a hint: The challenge is not steganography, is offline and is self-contained. Have fun!
I was still too vexed by my last attempt to give it a second try. So I just ignored that hint and went back to something else.
Some days later, a friend of mine told me this:
Hey! I found this vulnerability, this might interest you: https://packetstormsecurity.com/files/119363/Cisco-RV120W-RV220W-Weak-R…
OMG! I'm so dumb! I went back to 2015 but not to 2013. So, back to business. There are around 60 rv120 and roughly the same for rv220. Some might be vulnerable to the common factor attack.
Using NetworkMiner I extracted all certificates and from those certificates I extracted all public keys with the following command: openssl x509 -inform der -in CERTIF.cer -noout -pubkey.
Then I used g4n4p4t1's RsaCtfTool to run the common factor attack. Unfortunately this didn't work out of the box so I monkey patched it and obtained the private keys I needed. Then I added the files to Wireshark which successfully decrypted the conversations.
Looking at GH18 in Wireshark gave me the flag: GH18{factoring_is_difficult_GCD_is_easy}.
Find the password
Happy that I was finally done with the last step, I downloaded a new file named write_up.md.
Opening it in a text editor reveals us it's a binary file format. Running file on it tells the file is an ELF executable for ARM processors:
$ file write_up.md
write_up.md: ELF 32-bit LSB executable, ARM, EABI5 version 1 (SYSV), dynamically linked, interpreter /lib/ld-linux-armhf.so.3, for GNU/Linux 3.2.0, BuildID[sha1]=018af0cb56c51e3f91e5b2c4b6739a27bc24648b, stripped
Running strings (real reversers use almost only strings, it's widely known) gives us a first understanding of what we're facing:
[...]
Welcome to the super-secure standard compliant auth_modul.
Please enter the password:
Access Denied
%7%FbtzGmbhGpsV%k1qwFfxGXs4wB89WmW2upfmF5jlEtL4f8gOT4zF[QgPliYN7xnBIMd[L[h3LQ62ke89hHn5pgS28uUc1mXJpB2
/proc/sys/crypto/fips_enabled
./0123456789ABCDEFGHIJKLMNOPQRSTUVWXYZabcdefghijklmnopqrstuvwxyz..
GCC: (Raspbian 6.3.0-18+rpi1+deb9u1) 6.3.0 20170516
[...]
- The crackme was compiled on a raspbian, meaning we could use this platform to run the binary
- We will be invited to input a password to access a secure space
- There is a
bad boyand there is agood boymessage - The string
%7%Fb...%...is very likely our password in the form of acrypthash
So here, there are two approaches to obtain our flag: we could dive into reversing this binary and understanding its logic or we could run it. We'll use the third one and just assume we're right and the suspicious string is the hash of the password.
Usually, a crypt hash looks like this: $ALGID$SALT$HASH. Our string seems to respect the same syntax with minor changes: $ are % which corresponds to a difference of 1 in ASCII: 37 - 36 = 1. That said, there are some forbidden characters in the rest of the string to have a valid hash but it happens that [ - 1 = Z which is valid. So, what if we just apply minus 1 to all the string? It becomes $6$EasyFlagForU$j0pvEewFWr3vA78VlV1toelE4ikDsK3e7fNS3yEZPfOkhXM6wmAHLcZKZg2KP51jd78gGm4ofR17tTb0lWIoA1 which is a valid sha512crypt hash. We're one john away from the flag now:
$ john /tmp/ajklq --wordlist:rockyou
Using default input encoding: UTF-8
Loaded 1 password hash (sha512crypt, crypt(3) $6$ [SHA512 256/256 AVX2 4x])
[...]
Press 'q' or Ctrl-C to abort, almost any other key for status
winter           (flag)
We can validate with the flag winter.
Micro-probing attack
This new challenge is composed of two files: a Python script and a README which explains how the challenge works, what it does and how you can interact with it.
Long story short: an online service (the python script) emulates a device that “securely” computes a binary and on two constant values (the flag and a mask) and simulates leaks that could be obtained using side-channel attacks on the wires of that device.
You can probe up to 4 wires at a time. They are situated between different components of the device (for us this means at different steps of the computation).
Build a "debugger"
The problem sounds easy (and is probably) but looking at the code, it's really not immediate to understand what it does. So the first for me was to debug all the things. Obviously, by debug, I understand "print" (is there really another way to debug things?) all the values we can.
To do this I added "hooks" where necessary in the secure_and function. I then created a loop waiting for my inputs, very much like the Cmd module does (but far less complete as I didn't need too many things).
def play(flag, mask):
    import os


    ex = ["q", "exit", "quit"]
    while True:
        try:
            print("\n\n=== ")
            cmd = raw_input("What do we do? ")
            if cmd in ex:
                break
            if cmd in ["cls", "clear", "reset"]:
                os.system("reset||cls")
            if cmd.startswith("flag"):
                flag = bytearray()
                flag.extend(cmd.split("flag ")[1])
            elif cmd.startswith("mask"):
                mask = bytearray()
                mask.extend(cmd.split("mask ")[1])
            elif cmd.startswith("bits"):
                print(bytes_to_bits(flag), len(bytes_to_bits(mask)))
            elif cmd.startswith("sharing"):
                tmp = bytes_to_bits(flag)
                for i, a, b in zip(xrange(len(tmp)), tmp, bytes_to_bits(mask)):
                    print(i, sharing(a, d), sharing(b, d))
            elif cmd.startswith("probe"):
                probes = cmd.split("probe ")[1]
                print(simulate_leaks(flag, mask, probes))
            elif cmd.startswith("dbg"):
                # x to debug all
                # z to debug c_sharing tables
                # p to debug alpha
                # a to debug a
                # b to debug b
                # s to debug c_sharing
                # c to debug c
                print(simulate_leaks(flag, mask, [], cmd.split("dbg ")[1]))
        except KeyboardInterrupt:
            cmd = raw_input("\nDo we quit? ")
            if cmd in ex + ["y", "yes"]:
                break
        except IndexError:
            print("Error in the cmd")
The commands are self explanatory and the script can be found there.
What?! How?!
If you look at the calculation performed, you'll see that some xor and only one and are performed and all this combined results in flag & mask. So what the hell is happening? We will try to decompose each part using the dbg x command.
--- simulate_leaks("A", "B")
('flag', bytearray(b'A'), [1, 0, 0, 0, 0, 0, 1, 0])
('mask', bytearray(b'B'), [0, 1, 0, 0, 0, 0, 1, 0])
First, the flag ("A") and mask ("B") are decomposed in bits by the function simulate_leaks which then calls the function secure_and for every bit to and.
--- secure_and(1, 0)
before sharing a: 1
before sharing b: 0
So secure_and has to calculate a&b. For this, it will create what I interpreted as a checksum using the sharing function:
    s_sharing = []
    for i in range(d):
        s_sharing.append(randint(0,1))
    s_sharing.append(xor(s_sharing)^s)
This code creates a list with d random bits and xor all those with a. As a result, the last bit of the list is a check because if we xor all the bits between them we will always find a. This is a very very important property for the rest of the problem.
- sharing(a=1)
after sharing a: [0, 0, 1, 1, 1] = 0^0^1^1^1 = 1 = a || [0, 0, 1, 1, m]
- sharing(b=0)
after sharing b: [0, 0, 0, 1, 1] = 0^0^0^1^1 = 1 = b || [0, 0, 0, 1, n]
We will name those "checksum" bits m and n respectively.
A consequence of the rule we stated is that the only bit we care about in this list is the checksum bit because this is the only one linked to the original input.
After this we compute the and of every bit with every other bits:
    alpha = []
    for i in range(len(a)):
        alpha.append([])
        for j in range(len(b)):
            alpha[-1].append(a[i] & b[j])
This will result in a list of lists that would look like this for our example:
                            ||     0   1    2   3   4
alpha: [[0, 0, 0, 0, 0],    ||  0 [0   0    0   0   0&n]
        [0, 0, 0, 0, 0],    ||  1 [0   0    0   0   0&n]
        [0, 0, 0, 1, 1],    ||  2 [0   0    0   1   1&n]
        [0, 0, 0, 1, 1],    ||  3 [0   0    0   1   1&n]
        [0, 0, 0, 1, 1]]    ||  4 [m&0 m&0  m&0 m&1 m&n]
On the right I applied some tainting so you can see where are our checksum bits.
Then, this is where the magic happens and I honestly don't know how to explain with words what's happening:
c_0,0 = tmp ^ alpha[0][0] = 0 ^ 0 = 0   ||  0 ^ 0
c_0,1 = tmp ^ alpha[1][0] = 0 ^ 0 = 0   ||  0 ^ 0
c_0,2 = tmp ^ alpha[2][0] = 0 ^ 0 = 0   ||  0 ^ 0
c_0,3 = tmp ^ alpha[3][0] = 0 ^ 0 = 0   ||  0 ^ 0
c_0,4 = tmp ^ alpha[0][1] = 0 ^ 0 = 0   ||  0 ^ 0
c_sharing[0] = 0                        ||  0 ^ 0

c_1,0 = tmp ^ alpha[1][1] = 0 ^ 0 = 0   ||  0 ^ 0
c_1,1 = tmp ^ alpha[2][1] = 0 ^ 0 = 0   ||  0 ^ 0
c_1,2 = tmp ^ alpha[3][1] = 0 ^ 0 = 0   ||  0 ^ 0
c_1,3 = tmp ^ alpha[4][1] = 0 ^ 0 = 0   ||  0 ^ (m&0)
c_1,4 = tmp ^ alpha[1][2] = 0 ^ 0 = 0   ||  0 ^ 0
c_sharing[1] = 0                        ||  0 ^ 0

c_2,0 = tmp ^ alpha[2][2] = 0 ^ 0 = 0   ||  0 ^ 0
c_2,1 = tmp ^ alpha[3][2] = 0 ^ 0 = 0   ||  0 ^ 0
c_2,2 = tmp ^ alpha[4][2] = 0 ^ 0 = 0   ||  0 ^ (m&0)
c_2,3 = tmp ^ alpha[0][2] = 0 ^ 0 = 0   ||  0 ^ 0
c_2,4 = tmp ^ alpha[2][3] = 0 ^ 1 = 1   ||  0 ^ 1
c_sharing[2] = 1                        ||  0 ^ 1

c_3,0 = tmp ^ alpha[3][3] = 0 ^ 1 = 1   ||  0 ^ 1
c_3,1 = tmp ^ alpha[4][3] = 1 ^ 1 = 0   ||  1 ^ (m&1)
c_3,2 = tmp ^ alpha[0][3] = 0 ^ 0 = 0   ||  0 ^ 0
c_3,3 = tmp ^ alpha[1][3] = 0 ^ 0 = 0   ||  0 ^ 0
c_3,4 = tmp ^ alpha[3][4] = 0 ^ 1 = 1   ||  0 ^ (1&n)
c_sharing[3] = 1                        ||  0 ^ (1&n)

c_4,0 = tmp ^ alpha[4][4] = 0 ^ 1 = 1   ||  0 ^ (m&n)
c_4,1 = tmp ^ alpha[0][4] = 1 ^ 0 = 1   ||  1 ^ (0&n)
c_4,2 = tmp ^ alpha[1][4] = 1 ^ 0 = 1   ||  1 ^ (0&n)
c_4,3 = tmp ^ alpha[2][4] = 1 ^ 1 = 0   ||  1 ^ (1&n)
c_4,4 = tmp ^ alpha[4][0] = 0 ^ 0 = 0   ||  0 ^ (m&0)
c_sharing[0] = 0                        ||  0 ^ (m&0)

c_sharing: [0, 0, 1, 1, 0]              ||  [0^0, 0^0, 0^1, 0^(1&n), 0^(m&0)]
We xor things again in a weird way by cycle of 5 values, ending with a new list composed of the total xor of every cycle. Then, this list is (you won't guess that one!) ... xored again resulting in a&b = 1&0 = 0:
c: 0

[...]
Yes, I heard you say “what?! How?!” and, honestly, I don't have a damn clue...
Solving by bruteforcing
Thing is you don't necessarily have to understand how something is working to successfully break it. Here, we can break the “secure and” without understanding how it's computed. With the debug traces we have everything we need to solve the challenge. We quickly understand that by probing only the wires b_4;alpha_3,4;c_4,3 we are able to obtain the original flag by xoring alpha_3,4 and c_4,3 when b_4 = 1.
This is just combinatorial logic, understanding the solving script and why it works is left as an exercise to the reader. Anyways, playing this script will give you the flag GH18{Not_secure_against_d-probing_attacks}.
As you can see, we only probe three wires at a time while we can use four. I don't know what was the intended solution using all the wires but, hey, this one works. If the creator of the challenge reads this (or someone who used all the wires), I would be curious to read your solution.
Be ready!
Let's have a little interlude before the real deal:
$ file d6a5e6d12a54f89ce8c8adbbf5c5891542368d96a81f56a7393a8a70fae44c52_binary.elf
d6a5e6d12a54f89ce8c8adbbf5c5891542368d96a81f56a7393a8a70fae44c52_binary.elf: ELF 64-bit LSB executable, UCB RISC-V, version 1 (SYSV), dynamically linked, interpreter /lib/ld-linux-riscv64-lp64d.so.1, for GNU/Linux 3.0.0, BuildID[sha1]=248cf83d3109d51a4bae3c1a3f3f5ae1b219b9c7, with debug_info, not stripped
So that's a RISC-V crackme. The hint is pretty clear:
Reverse it or run it? Your choice.
If we run it, we have the flag. I'm obviously waaaay too lazy to install whatever is needed to run it. This architecture is pretty new but very well documented: instruction set, calling convention. There's an IDA processor 0xDeva developed for 2017's SSTIC challenge but it's not compatible with IDA >7.0. We'll just use r2 again.
[0x000103a0]> afl
0x00010380    1 76           sym.imp.printf
0x000103a0    1 44           entry0
0x000103cc    1 10           fcn.000103cc
0x000103d6    3 84           sym.deregister_tm_clones
0x00010430    1 108          sym.register_tm_clones
0x000104a2    1 32           sym.__do_global_dtors_aux
0x000104ca    1 16           sym.frame_dummy
0x000104e0    1 74           sym.setFlag
0x0001052a    3 362  -> 364  sym.setX_OrTable
0x0001056a    3 298  -> 300  sym.applyModify
0x000105aa    3 234  -> 236  sym.X_Or
0x00010662    1 108          sym.__libc_csu_fini
We have some interesting names here and weird thing is we do not have a main. Anyways, we'll take a quick look at the interesting functions and then we'll come back to that problem later.
[0x000103a0]> pdf @ sym.setFlag
/ (fcn) sym.setFlag 74
|   sym.setFlag ();
|           ; CALL XREF from 0x000105ec (sym.setX_OrTable)
|           0x000104e0      13071004       li a4, 65
|           0x000104e4      2380e182       sb a4, -2016(gp)
|           0x000104e8      93870182       addi a5, gp, -2016
|           0x000104ec      1307a007       li a4, 122
|           0x000104f0      a380e700       sb a4, 1(a5)
|           0x000104f4      13071006       li a4, 97
|           0x000104f8      2381e700       sb a4, 2(a5)
|           0x000104fc      1307e006       li a4, 110
|           0x00010500      a381e700       sb a4, 3(a5)
|           0x00010504      1307f006       li a4, 111
|           0x00010508      2382e700       sb a4, 4(a5)
|           0x0001050c      13076007       li a4, 118
|           0x00010510      a382e700       sb a4, 5(a5)
|           0x00010514      13079006       li a4, 105
|           0x00010518      2383e700       sb a4, 6(a5)
|           0x0001051c      13073006       li a4, 99
|           0x00010520      a383e700       sb a4, 7(a5)
|           0x00010524      23840700       sb zero, 8(a5)
|           0x00010528      8280           ret
Let's explain this a little:
li a4, 65, load immediate: puts the value65in the registera4sb a4, -2016(gp), store byte: stores the content of the registera4at the memory address contained ingpminus 2016addi a5, gp, -2016, add immediate: adds -2016 to the address contained ingpand puts the computed value ina5. This meansa5now points to the memory address where we just put65sb a4, 1(a5): stores the value ofa4ina5[1]
At the end of the function we have [65,122,97,110,111,118,105,99] in gp - 2016. Let's disassemble sym.setX_OrTable:
[0x000103a0]> pdf @ sym.setX_OrTable
/ (fcn) sym.setX_OrTable 364
|   sym.setX_OrTable ();
|           0x0001052a      5147           li a4, 20
|           0x0001052c      238ce180       sb a4, -2024(gp)
|           0x00010530      93878181       addi a5, gp, -2024
|           0x00010534      93069002       li a3, 41
|           0x00010538      a380d700       sb a3, 1(a5)
|           0x0001053c      2381e700       sb a4, 2(a5)
|           0x00010540      1307e003       li a4, 62
|           0x00010544      a381e700       sb a4, 3(a5)
|           0x00010548      13077003       li a4, 55
|           0x0001054c      2382e700       sb a4, 4(a5)
|           0x00010550      13072005       li a4, 82
|           0x00010554      a382e700       sb a4, 5(a5)
|           0x00010558      13071003       li a4, 49
|           0x0001055c      2383e700       sb a4, 6(a5)
|           0x00010560      13073004       li a4, 67
|           0x00010564      a383e700       sb a4, 7(a5)
|           0x00010568      8280           ret
[...]
            ;-- main:
|           0x000105e8      4111           addi sp, sp, -16
|           0x000105ea      06e4           sd ra, 8(sp)
|           0x000105ec      eff05fef       jal ra, sym.setFlag
|           0x000105f0      eff0bff3       jal ra, sym.setX_OrTable
|           0x000105f4      eff07ff7       jal ra, sym.applyModify
|           0x000105f8      eff03ffb       jal ra, sym.X_Or
|           0x000105fc      eff03ffd       jal ra, sym.printFlag
|           0x00010600      1305a002       li a0, 42
|           0x00010604      a260           ld ra, 8(sp)
|           0x00010606      4101           addi sp, sp, 16
|           0x00010608      8280           ret
[...]
So we now have our answer: radare had some troubles creating functions and put everything under sym.setX_OrTable. Good thing is we have the code of main and we now know the order in which functions are called. I won't dive into the details of sym.setX_OrTable as it's exactly the same thing as sym.setFlag but with different value. At the end, gp - 2024 = [20,41,20,62,55,82,49,67].
            ;-- applyModify:
|           0x0001056a      c967           lui a5, 0x12
|           0x0001056c      93870700       mv a5, a5
|           0x00010570      13870182       addi a4, gp, -2016
|           0x00010574      13860701       addi a2, a5, 16
|           0x00010578      21a8           j 0x10590
|           0x0001057a      83460700       lbu a3, 0(a4)
|           0x0001057e      83c51700       lbu a1, 1(a5)
|           0x00010582      8d9e           subw a3, a3, a1
|           0x00010584      2300d700       sb a3, 0(a4)
|           0x00010588      8907           addi a5, a5, 2
|           0x0001058a      0507           addi a4, a4, 1
|           0x0001058c      638ec700       beq a5, a2, 0x105a8
|           0x00010590      83c60700       lbu a3, 0(a5)
|           0x00010594      858a           andi a3, a3, 1
|           0x00010596      f5d2           beqz a3, 0x1057a
|           0x00010598      83460700       lbu a3, 0(a4)
|           0x0001059c      83c51700       lbu a1, 1(a5)
|           0x000105a0      ad9e           addw a3, a3, a1
|           0x000105a2      2300d700       sb a3, 0(a4)
|           0x000105a6      cdb7           j 0x10588
That's the somewhat tricky function. lui a5, 0x12 is load UPPER immediate and not UNSIGNED. It places the immediate in the top 20 bits of the register filling the lowest 12 bits with zeros meaning a5 = 0x12 << 12 = 0x12000
The equivalent of that function is:
a4 = [65,122,97,110,111,118,105,99]
a5 = [0x42,0x03,0x65,0x01,0x20,0x04,0x52,0x01,0x65,0x05,0x61,0x09,0x64,0x02,0x79,0x06]
f = []
for i in range(0, len(a5)-1, 2):
    if a5[i] & 1:
        f.append(a4[i/2] + a5[i+1])
    else:
        f.append(a4[i/2] - a5[i+1])
And the last one:
            ;-- X_Or:
|           0x000105aa      93870182       addi a5, gp, -2016
|           0x000105ae      93868181       addi a3, gp, -2024
|           0x000105b2      93858700       addi a1, a5, 8
|           0x000105b6      03c70700       lbu a4, 0(a5)
|           0x000105ba      03c60600       lbu a2, 0(a3)
|           0x000105be      318f           xor a4, a4, a2
|           0x000105c0      2380e700       sb a4, 0(a5)
|           0x000105c4      8507           addi a5, a5, 1
|           0x000105c6      8506           addi a3, a3, 1
|           0x000105c8      e397b7fe       bne a5, a1, 0x105b6
|           0x000105cc      8280           ret
This translates to:
print("".join([chr(x ^ y) for x,y in zip(f, [20,41,20,62,55,82,49,67])]))
This gives the flag GH18{*RISC-V*}.
As a bonus you can have this awesome one-liner I solved the challenge with:
print("GH18{%s}" % "".join([chr(((f - c) ^ x) & 0xff) if m & 1 == 0 else chr(((f + c) ^ x) & 0xff) for f, m, c, x in zip([65,122,97,110,111,118,105,99], [0x42,0x65,0x20,0x52,0x65,0x61,0x64,0x79], [3,1,4,1,5,9,2,6], [20,41,20,62,55,82,49,67])]))
The Band
Well, that one was easy. Now, an x86 binary! Yay!
$ file b6d154b60aa2231edaf083bf136cd09d34b8f68a35e422d21fee7abf6c53b527_theband
b6d154b60aa2231edaf083bf136cd09d34b8f68a35e422d21fee7abf6c53b527_theband: ELF 64-bit LSB shared object x86-64, version 1 (SYSV), for GNU/Linux 3.2.0, BuildID[sha1]=2778cbe1f44064a57728c680bfce0e13f6e47aab, dynamically linked, interpreter \004, stripped
Hmmm. There are some weird things happening here! First, it pretends to be a shared library and then it says its interpreter is \004. Someone must have messed with the headers. Let's try another command:
$ readelf -a 7/b6d154b60aa2231edaf083bf136cd09d34b8f68a35e422d21fee7abf6c53b527_theband
En-tête ELF:
  Magique:   7f 45 4c 46 02 01 01 00 00 00 00 00 00 00 00 00
  Classe:                            ELF64
  Données:                          complément à 2, système à octets de poids faible d'abord (little endian)
  Version:                           1 (current)
  OS/ABI:                            UNIX - System V
  Version ABI:                       0
  Type:                              DYN (fichier objet partagé)
  Machine:                           Advanced Micro Devices X86-64
  Version:                           0x1
  Adresse du point d'entrée:         0x22b0
  Début des en-têtes de programme :  64 (octets dans le fichier)
  Début des en-têtes de section :    0 (octets dans le fichier)
  Fanions:                           0x0
  Taille de cet en-tête:             64 (octets)
  Taille de l'en-tête du programme:  56 (octets)
  Nombre d'en-tête du programme:     11
  Taille des en-têtes de section:    64 (octets)
  Nombre d'en-têtes de section:      0
  Table d'indexes des chaînes d'en-tête de section: 0

Il n'y a pas de section dans ce fichier.

Il n'y a pas de section à grouper dans ce fichier.

En-têtes de programme :
  Type           Décalage           Adr.virt           Adr.phys.
                 Taille fichier     Taille mémoire      Fanion Alignement
  PHDR           0x0000000000000040 0x0000000000000040 0x0000000000000040
                 0x0000000000000268 0x0000000000000268  R      0x8
  INTERP         0x00000000000002a8 0x00000000000002a8 0x00000000000002a8
                 0x000000000000001c 0x000000000000001c  R      0x1
      [Réquisition de l'interpréteur de programme: /lib64/ld-linux-x86-64.so.2]
[...]
 0x000000006ffffff9 (RELACOUNT)          6
 0x0000000000000000 (NULL)               0x0

Il n'y a pas d'informations de réadressage statique dans ce fichier.
Pour voir les réadressages dynamiques, ajoutez --use-dynamic à la ligne de commande.

Le décodage de la section de déroulement pour le type de machine Advanced Micro Devices X86-64 n'est pas actuellement supporté.

L'information dynamique des symboles n'est pas disponible pour l'affichage des symboles.
Okay so there's some Camembert here but long story short: readelf can't find any section in the binary. That's a bit of a problem. Meh! Let's ignore that fact and just go reverse the binary. I'm too lazy to investigate (and TBH during the challenge I didn't even noticed the problem).
Removing obfuscation
Now for some reversing fun, let's fire up IDA and see what's the binary like:
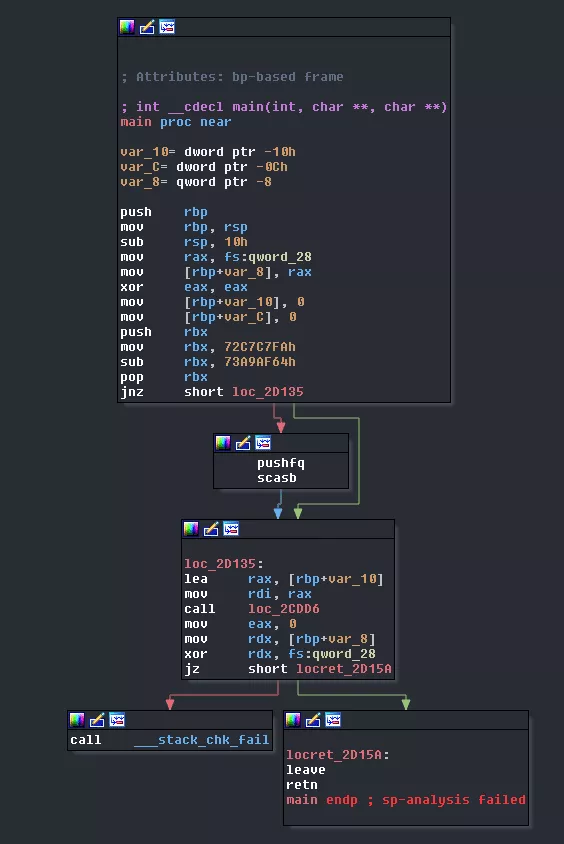
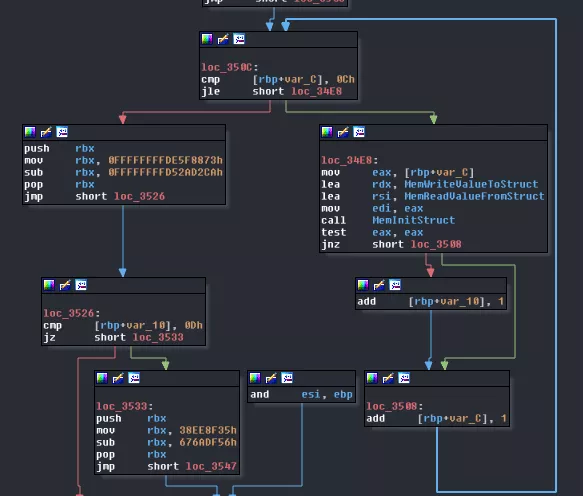
There's some obfuscation that prevents IDA from understanding what's happening in the stack (hence the sp-analysis failed). What's happening in loc_2cdd6?

Some more obfuscation. This time IDA is fooled into thinking the program will jump right in the middle of an instruction (indicated by the loc_X+2) resulting in the disassembler decoding a junk instruction. This type of obfuscation is called opaque predicate (if you are a Binary Ninja (awesome tool) user, this probably works almost out of the box, if not out the box). Basically it makes the disassembler think it cannot predict which branch will be taken while it's actually very predictable. This obfuscates both the real code executed and the flow graph. Removing the first one in IDA is pretty easy. You simply unset the instruction the jump points to. This will force IDA to display the real jump address which you can then transform back to code:
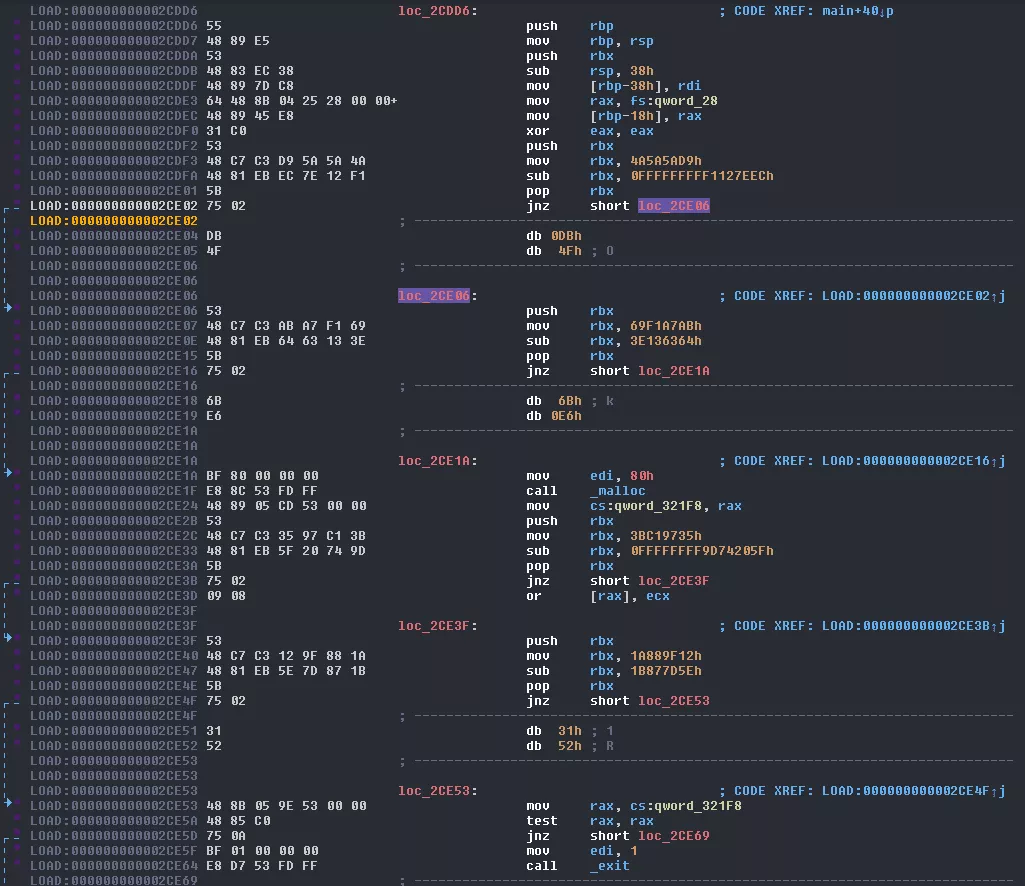
This is really cleaner and makes a lot more sense! Now we can see a call to malloc that was hidden before. That said, this still breaks the graph in IDA so we'll get rid of the fake jumps.
As this technique is used all over the place, we won't deobfuscate everything by hand, that would take soooo much time. Instead we will use some very very clean script to replace all the jnz (that are part of the obfuscation, obviously) by jmp (I didn't think about this technique during the challenge and replaced the whole obfuscation by nops, which was not very clean):
open("the_band_patched", "w").write(re.sub(r'\x5b\x75\x02', '\x5b\xeb\x02', open("b6d154b60aa2231edaf083bf136cd09d34b8f68a35e422d21fee7abf6c53b527_theband").read()))

That's neat! We have a really cleaner graph now. Let's dive into this thing!
High-level overview of the crackme
As of now, we still didn't execute the binary, let's see what happens (you should always run untrusted binaries in isolated environment):
$ b6d154b60aa2231edaf083bf136cd09d34b8f68a35e422d21fee7abf6c53b527_theband
a
Did you really think we would help you with the input format?
What a mess. People are throwing you tomatoes. Go fix your partition.
It's not giving us much information to work with. We do not have any clue what the input must look like.
Looking at this message, the name of the challenge and the fact that the CTF is very retro, my first thought was that we will be reversing a VM emulating a multi-tape Turing Machine. Turns out I was very wrong. Anyways, locating this message in the binary will still give us a bit of information.
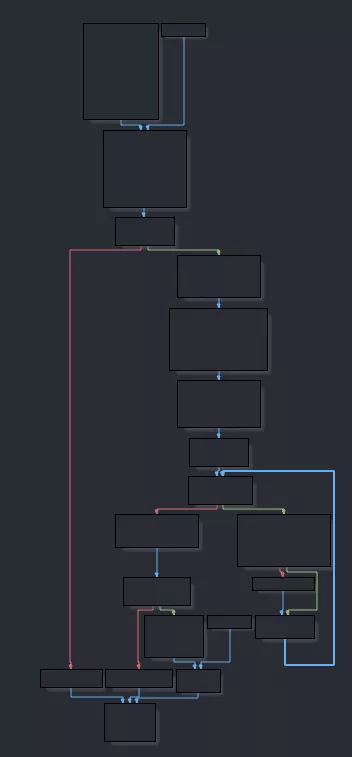
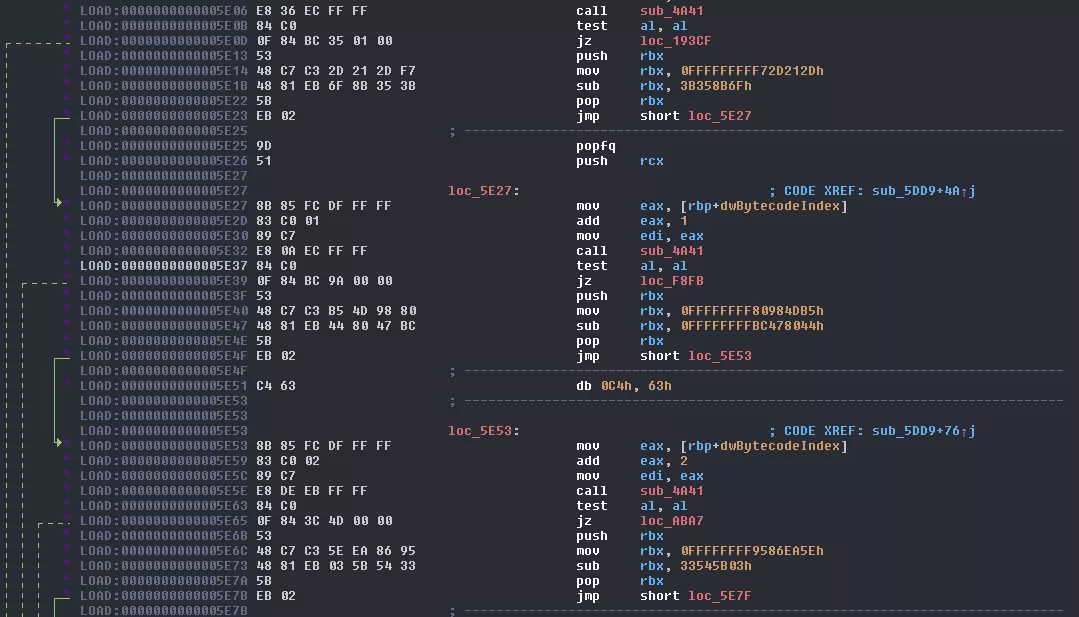
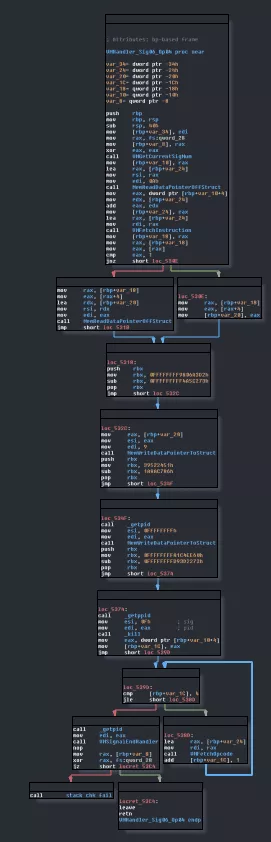
It is located in loc_2cdd6. This function first calls loc_2C881, sub_2CCBB, sub_2CC87, and then forks itself. The child process will proceed to loc_2CA4E and exit with the results of the previous function as exit code. The parent will proceed to loc_2CA4E, store its result, wait for the child to finish to get its exit code. Then, it will verify that the two results are the same and that the result of the call to loc_2C881 is equal to the constant 7. If these conditions are filled then, it means we won, otherwise, we lost. From now on, we will call loc_2cdd6 main.
Looking quickly at loc_2C881 we see that there are a bunch of calls to internal functions and some library ones. We can see that stdin is referenced in a call to fgets so we know this is where our input is obtained and processed. sub_2CCBB and sub_2CC87 initialize what seems to be three random numbers (I will call sub_2CCBB InitRands and sub_2CC87 ConstrainRand). loc_2CA4E has a bunch of calls too, which are pretty much the same as loc_2C881, and in the same order. Therefor, we will call loc_2C881 step0 and loc_2CA4E step1.
Analyzing the multi-core VM
Tracing the program
A good way to obtain information about a program is by tracing it. Many methods exist:
ltrace/strace- a PIN/DynamoRIO tool
- Symbolic execution (with angr tracer for example)
- ...
At first, I created a PIN tool but I obtain a ~3GB output, which was too painful to process. I could have reduced the amount of information I extracted but in the end it resulted in something like function input output so I decided to use strace.
$ strace -f ./the_band_patched_jmp
execve("./the_band_patched_jmp", ["./the_band_patched_jmp"], 0x7fff8ac68698 /* 92 vars */) = 0
[...]
statfs("/dev/shm/", {f_type=TMPFS_MAGIC, f_bsize=4096, f_blocks=4105956, f_bfree=4076151, f_bavail=4076151, f_files=4105956, f_ffree=4105551, f_fsid={val=[0, 0]}, f_namelen=255, f_frsize=4096, f_flags=ST_VALID|ST_NOSUID|ST_NODEV}) = 0
futex(0x7f7e60565370, FUTEX_WAKE_PRIVATE, 2147483647) = 0
openat(AT_FDCWD, "/dev/shm/KaHRGnS4AbEctG6msyzc", O_RDWR|O_CREAT|O_NOFOLLOW|O_CLOEXEC, 0660) = 3
ftruncate(3, 1048576)                   = 0
mmap(NULL, 1048576, PROT_READ|PROT_WRITE, MAP_SHARED, 3, 0) = 0x7f7e6085e000
read(0, AAAABBBBCCCCDDDD
"AAAABBBBCCCCDDDD\n", 1024)     = 17
rt_sigaction(SIGTERM, {sa_handler=0x55a15b06b3a9, sa_mask=[], sa_flags=SA_RESTORER, sa_restorer=0x7f7e60359f50}, NULL, 8) = 0
pipe([4, 5])                            = 0
pipe([6, 7])                            = 0
clone(strace: Process 27854 attached
child_stack=NULL, flags=CLONE_CHILD_CLEARTID|CLONE_CHILD_SETTID|SIGCHLD, child_tidptr=0x7f7e6095ee50) = 27854
[pid 27854] set_robust_list(0x7f7e6095ee60, 24) = 0
[pid 27839] clone( <unfinished ...>
[pid 27854] close(5)                    = 0
[pid 27854] mmap(NULL, 1048576, PROT_READ|PROT_WRITE, MAP_SHARED, 3, 0 <unfinished ...>
[pid 27839] <... clone resumed> child_stack=NULL, flags=CLONE_CHILD_CLEARTID|CLONE_CHILD_SETTID|SIGCHLD, child_tidptr=0x7f7e6095ee50) = 27855
strace: Process 27855 attached
[pid 27839] close(4 <unfinished ...>
[pid 27854] <... mmap resumed> )        = 0x7f7e5fafb000
[pid 27839] <... close resumed> )       = 0
[pid 27855] set_robust_list(0x7f7e6095ee60, 24 <unfinished ...>
[pid 27839] close(6 <unfinished ...>
[pid 27855] <... set_robust_list resumed> ) = 0
[pid 27839] <... close resumed> )       = 0
Well, this is something! Now, we know that:
- a shared memory,
/dev/shm(ortmpfs), is created with the very specific nameKaHRGnS4AbEctG6msyzc - two pipes are created
- at least 3 forks are running at the same time
From this we can deduce that one of the forks communicates with the two others via pipe. We can probably obtain some more information but the trace is not easily readable due to thread concurrency. So, first thing first, let's build a sequential trace!
Building a sequential trace with strace
The output of strace is very nice and convenient for us. We can see four patterns here:
function = result[pid X] function = result[pid X] function <unfinished[pid X] function resumed> = result
First, we will need to sort things by pIDs, then, we will group by functions, and last, we put pieces back together in the order they were executed.
The script rebuild_strace.py gives this output:
execve("./the_band_patched_jmp", ["./the_band_patched_jmp"], 0x7fff8ac68698 /* 92 vars */) = 0
[...]
statfs("/dev/shm/", {f_type=TMPFS_MAGIC, f_bsize=4096, f_blocks=4105956, f_bfree=4076151, f_bavail=4076151, f_files=4105956, f_ffree=4105551, f_fsid={val=[0, 0]}, f_namelen=255, f_frsize=4096, f_flags=ST_VALID|ST_NOSUID|ST_NODEV}) = 0
futex(0x7f7e60565370, FUTEX_WAKE_PRIVATE, 2147483647) = 0
openat(AT_FDCWD, "/dev/shm/KaHRGnS4AbEctG6msyzc", O_RDWR|O_CREAT|O_NOFOLLOW|O_CLOEXEC, 0660) = 3
ftruncate(3, 1048576)                   = 0
mmap(NULL, 1048576, PROT_READ|PROT_WRITE, MAP_SHARED, 3, 0) = 0x7f7e6085e000
fstat(0, {st_mode=S_IFCHR|0620, st_rdev=makedev(136, 1), ...}) = 0
read(0, AAAABBBBCCCCDDDD
"AAAABBBBCCCCDDDD\n", 1024)     = 17
rt_sigaction(SIGTERM, {sa_handler=0x55a15b06b3a9, sa_mask=[], sa_flags=SA_RESTORER, sa_restorer=0x7f7e60359f50}, NULL, 8) = 0
pipe([4, 5])                            = 0
pipe([6, 7])                            = 0
clone(strace: Process 27854 attached
child_stack=NULL, flags=CLONE_CHILD_CLEARTID|CLONE_CHILD_SETTID|SIGCHLD, child_tidptr=0x7f7e6095ee50) = 27854
[pid 27854] set_robust_list(0x7f7e6095ee60, 24) = 0
[pid 27839] clone(child_stack=NULL, flags=CLONE_CHILD_CLEARTID|CLONE_CHILD_SETTID|SIGCHLD, child_tidptr=0x7f7e6095ee50) = 27855
[pid 27854] close(5)                    = 0
[pid 27854] mmap(NULL, 1048576, PROT_READ|PROT_WRITE, MAP_SHARED, 3, 0)        = 0x7f7e5fafb000
strace: Process 27855 attached
[pid 27839] close(4)       = 0
Nicer, no? Now we can try to find some patterns, which would help us understand which operations are repeated, how many times and how parameters are changing.
Understanding signals role
The first pattern we can notice is the following one:
[pid thread0] rt_sigaction(SIGTERM, ...) = 0
[pid thread0] pipe([fd_thread1_read, fd_thread1_write])                            = 0
[pid thread0] pipe([fd_thread2_read, fd_thread2_write])                            = 0
[pid thread0] clone(...) = thread1
[pid thread0] clone(...) = thread2
[pid thread0] close(fd_thread1_read)       = 0
[pid thread0] close(fd_thread2_read)       = 0
[pid thread0] clone(...) = thread3
[pid thread0] futex(0x7f7e6085e720, FUTEX_WAIT_BITSET|FUTEX_CLOCK_REALTIME, 0, NULL, 0xffffffff)       = ? ERESTARTSYS (To be restarted if SA_RESTART is set)
[pid thread0] futex(0x7f7e6085e720, FUTEX_WAIT_BITSET|FUTEX_CLOCK_REALTIME, 0, NULL, 0xffffffff)       = 0
I added some useful information like names instead of numbers (for file descriptors and process IDs), deleted things we don't care about, and put things in a more meaningful order to make things easier.
So, here we can see that thread0 creates the pipes, forks itself three times and then puts itself in hold with futex(FUTEX_WAIT_BITSET).
[pid thread1] close(fd_thread1_write)                    = 0
[pid thread1] mmap(NULL, 1048576, PROT_READ|PROT_WRITE, MAP_SHARED, fd_shm, 0)        = 0x7f7e5fafb000
[pid thread1] rt_sigaction(SIGRT_2, ...) = 0
[pid thread1] rt_sigaction(SIGRT_3, ...) = 0
[pid thread1] rt_sigaction(SIGRT_4, ...) = 0
[pid thread1] rt_sigaction(SIGRT_5, ...) = 0
[pid thread1] rt_sigaction(SIGRT_6, ...) = 0
[pid thread1] rt_sigaction(SIGRT_7, ...) = 0
[pid thread1] rt_sigaction(SIGRT_8, ...) = 0
[pid thread1] rt_sigaction(SIGRT_9, ...) = 0
[pid thread1] rt_sigaction(SIGRT_10, ...) = 0
[pid thread1] rt_sigaction(SIGRT_11, ...) = 0
[pid thread1] rt_sigaction(SIGRT_12, ...) = 0
[pid thread1] rt_sigaction(SIGRT_13, ...) = 0
Then, thread1 & thread2 each reference 14 functions that will be called when SIGUSR2-13 will be emitted.
[pid thread3] mmap(NULL, 1048576, PROT_READ|PROT_WRITE, MAP_SHARED, fd_shm, 0)        = 0x7f7e5fafb000
[pid thread3] write(fd_thread1_write, "\10\0\0\0\n\0\0\0", 8)       = 8
[pid thread3] write(fd_thread2_write, "\10\0\0\0\v\0\0\0", 8)       = 8
[pid thread3] getpid()      = thread3
[pid thread3] kill(thread3, SIGSTOP)        = 0
[pid thread3] --- SIGSTOP {si_signo=SIGSTOP, si_code=SI_USER, si_pid=thread3, si_uid=1000} ---
[pid thread3] --- stopped by SIGSTOP ---
[pid thread0] --- SIGCHLD {si_signo=SIGCHLD, si_code=CLD_STOPPED, si_pid=thread3, si_uid=1000, si_status=SIGSTOP, si_utime=0, si_stime=0} ---
[pid thread2] read(fd_thread2_read,"\10\0\0\0\v\0\0\0", 8) = 8
[pid thread2] getpid()                    = thread2
[pid thread2] kill(thread2, SIGRT_10)        = 0
[pid thread2] --- SIGRT_10 {si_signo=SIGRT_10, si_code=SI_USER, si_pid=thread2, si_uid=1000} ---
[pid thread2] getpid()      = thread2
[pid thread2] rt_sigreturn({mask=[]}) = 0
[pid thread1] read(fd_thread1_read, "\10\0\0\0\n\0\0\0", 8) = 8
[pid thread1] getpid()                    = thread1
[pid thread1] kill(thread1, SIGRT_10)       = 0
[pid thread1] --- SIGRT_10 {si_signo=SIGRT_10, si_code=SI_USER, si_pid=thread1, si_uid=1000} ---
[pid thread1] getpid()                    = thread1
[pid thread1] futex(0x7f7e5fafb720, FUTEX_WAKE, 1) = 1
Here, things are a little more messy but everything boils down to:
thread3writes 8 bytes to the two pipes then stops itself viaSIGSTOPthread1&thread2read the 8 bytes from their respective pipes and send themselves aSIGRT_10thread1wakes upthread0viafutex
Second pattern we can see:
[pid thread1] rt_sigreturn({mask=[]}) = 0
[pid thread0] wait4(thread3,NULL, WSTOPPED, NULL) = thread3
[pid thread0] kill(thread3, SIGCONT)        = 0
[pid thread0] --- SIGCHLD {si_signo=SIGCHLD, si_code=CLD_CONTINUED, si_pid=thread3, si_uid=1000, si_status=SIGCONT, si_utime=0, si_stime=0} ---
[pid thread0] futex(0x7f7e6085e720, FUTEX_WAIT_BITSET|FUTEX_CLOCK_REALTIME, 0, NULL, 0xffffffff)       = ? ERESTARTSYS (To be restarted if SA_RESTART is set)
[pid thread3] --- SIGCONT {si_signo=SIGCONT, si_code=SI_USER, si_pid=thread0, si_uid=1000} ---
[pid thread3] write(fd_thread1_write, "\7\0\0\0\n\0\0\0", 8) = 8
[pid thread3] write(fd_thread2_write, "\10\0\0\0\v\0\0\0", 8)       = 8
[pid thread3] getpid()      = thread3
[pid thread3] kill(thread3, SIGSTOP)        = 0
[pid thread3] --- SIGSTOP {si_signo=SIGSTOP, si_code=SI_USER, si_pid=thread3, si_uid=1000} ---
[pid thread3] --- stopped by SIGSTOP ---
[pid thread0] --- SIGCHLD {si_signo=SIGCHLD, si_code=CLD_STOPPED, si_pid=thread3, si_uid=1000, si_status=SIGSTOP, si_utime=0, si_stime=0} ---
[pid thread0] futex(0x7f7e6085e720, FUTEX_WAIT_BITSET|FUTEX_CLOCK_REALTIME, 0, NULL, 0xffffffff)       = 0
[pid thread2] getpid()      = thread2
[pid thread2] kill(thread2, SIGRT_10)        = 0
[pid thread2] --- SIGRT_10 {si_signo=SIGRT_10, si_code=SI_USER, si_pid=thread2, si_uid=1000} ---
[pid thread2] getpid()      = thread2
[pid thread2] rt_sigreturn({mask=[]}) = 0
[pid thread2] read(fd_thread2_read,"\10\0\0\0\v\0\0\0", 8) = 8
[pid thread1] getpid()      = thread1
[pid thread1] kill(thread1, SIGRT_9)        = 0
[pid thread1] --- SIGRT_9 {si_signo=SIGRT_9, si_code=SI_USER, si_pid=thread1, si_uid=1000} ---
[pid thread1] getpid()                    = thread1
[pid thread1] read(fd_thread1_read,"\7\0\0\0\n\0\0\0", 8) = 8
[pid thread1] futex(0x7f7e5fafb720, FUTEX_WAKE, 1)       = 1
Thing is, the script that builds a sequential trace doesn't take into account that read waits for its input. So, sometimes, you can have a little confusion in the trace as threadX can read, wait for its input, and, a "long time after", thread3 writes to the input and threadX finishes read (t1 read begin; t1 read suspend; t3 write ; t1 read finished). This sequence will end-up in t1 read ; t3 write which doesn't make much sense so be careful about that when reading the captured data.
Anyways, we can still see that the same scheme is used again:
thread3writes 8 bytes to the two pipes then stops itself viaSIGSTOPthread1&thread2read the 8 bytes from their respective pipes and send themselves a signalthread1wakes upthread0viafutex
The main difference here lies in the values written/read. thread2 receives \10 (0x08) again, with the same signal as before (SIGRT_10), whereas thread1 receives \7 (0x7) with a signal SIGRT_9. At the same time, the second DWORD \v\0\0\0 does not seem to change across cycles for each thread.
Architecture of the VM
We can deduce some important things from the previous information we obtained:
- signal emitted depend on the value written/read through pipes
- cycles will almost look the same
Sadly (or happily, it depends on how much you enjoy reversing) for us, this probably means that:
- we are facing a multicore virtual machine
- its opcodes are sent to its "cores" through pipes
- its opcode handlers are signal handlers
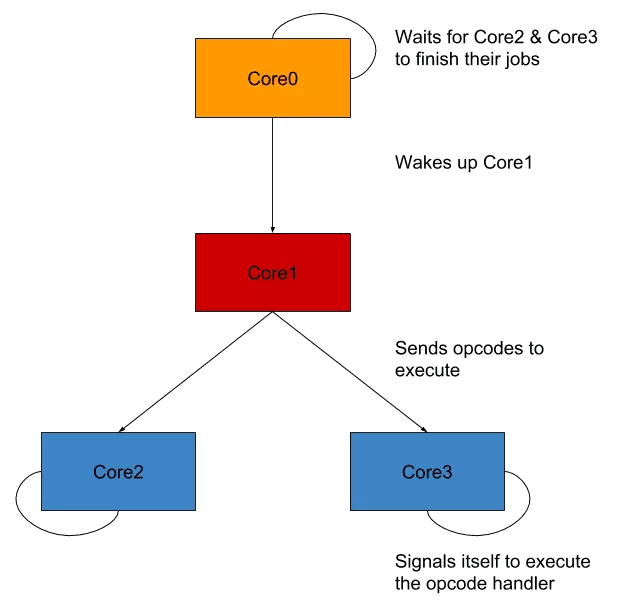
With all the information we obtained until now, we can make a little drawing of the VM architecture to make things clearer.
Until now we managed to obtain information about the crackme without reversing anything but I think now may be the time.
First, let's backport what we know in the disassembler. You'll see, we know a lot!
sub_36CDdefines all the signal handlers so it could be renamed toVMHandlersSetupAndExecutesub_547Ehandles signalSIGUSR2+7which was used with opcode7so let's rename itVMHandler_Sig09_Op07sub_565Ehandles signalSIGUSR2+8which was used with opcode8so let's rename itVMHandler_Sig10_Op08- it seems we have a new pattern here:
SIGUSR2+Xequals opcodeXso let's rename all handlers fromVMHandler_Sig02_Op00toVMHandler_Sig13_Op11 - ...
I won't do it all, you got the idea. Going back to the function step0, we have a lot of work to do.
First call we encounter is sub_245C. This one does two calls.
The first one checks if the shared memory is initialized, otherwise it creates it and seems to put some sort of weird structure into the beginning of the SHM. We will call sub_3DC4 MemCreateShm.
The second one, sub_3425, is a little trickier.
It first calls sub_3FB1 which does some black magic and takes an integer as argument, let's deal with that later. The result of that call goes into the global variable dword_32168.
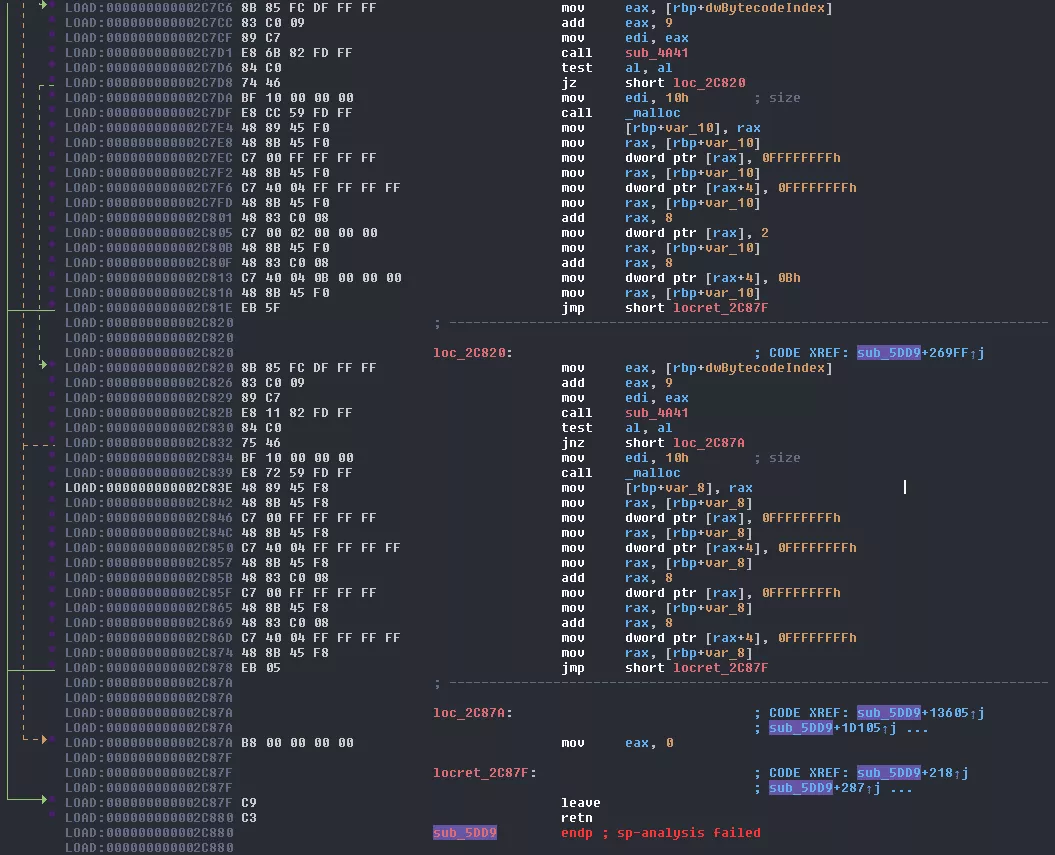
The second call, sub_4883, takes the result of the previous call as an argument and returns some sort of "index" from the SHM, let's call it MemGetOffset. Then it puts the value 0xffffffff in the first two DWORDs of the offset. Maybe the first call was some kind of allocation? Let's name it maybe_MemAlloc.
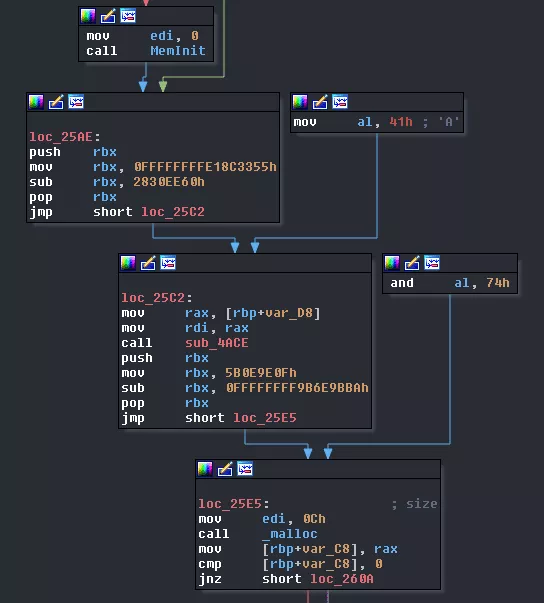
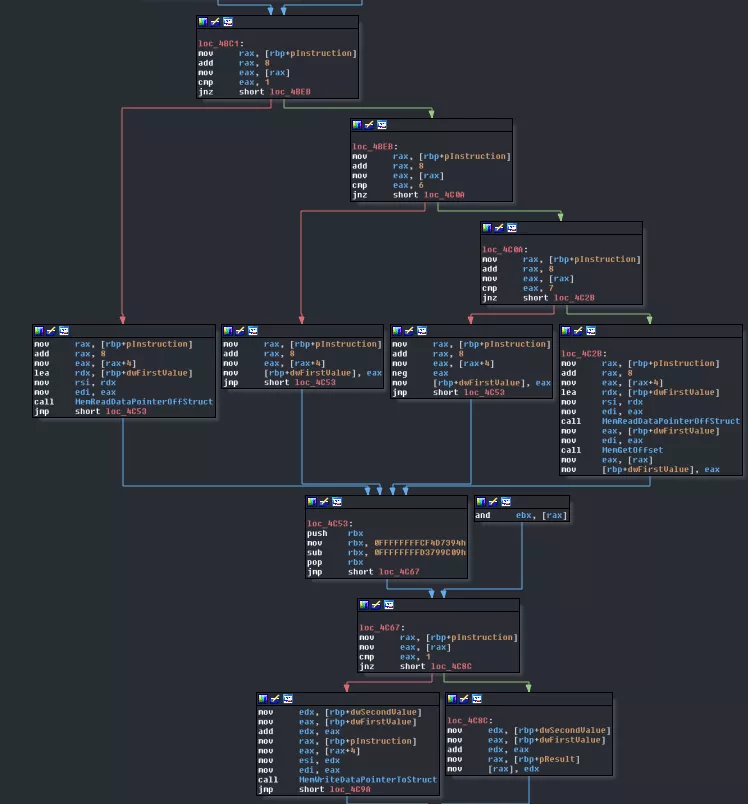
Then, there's a loop which calls 13 times the function sub_2B0C with three arguments: the loop index and two functions, sub_2DE5 and sub_2DF6. This function first verifies that dword_32168 is initialized. Then, it creates a structure (we will come back to this later) after a call to maybe_MemAlloc, which tends to indicate we were right so let's get rid of the maybe_. The last call inside that function takes the index as argument and walks through the SHM looking for an offset that corresponds to the argument. Once found, it returns its offset. As the index is the first value put in the structure previously created, we can consider it's its ID so we can rename sub_2A70 to MemFindStructOffsetFromID. sub_2B0C can be renamed to MemInitStruct. As for the functions used as arguments. sub_2DE5 takes a pointer as argument and read the value at @pointer+24. This could be the index of a value in the structure. We'll name it MemReadValueFromStruct. sub_2DF6 instead writes to that same index so we'll call it MemWriteValueToStruct. sub_3425 can be renamed to MemInitStructs.
With all this in mind, we will rename sub_245C to MemInit.
Going back to step0 we now have some new information that help us. We now know that 128 bytes will be allocated in the shared memory and then used for STDIN. Looking at sub_3085, it looks for the offset to a structure which ID was given as a parameter. Then it calls @struct+16, which we know is MemWriteValueToStruct. Maybe now is the time to create a structure from what we know:
struct VM_STRUCT_OBJECT
{
    _QWORD qwStructID;
    _QWORD pMemReadValueFromStruct;
    _QWORD pMemWriteValueToStruct;
    _QWORD pDataOffset;
    pthread_mutex_t* pMemMutex;
    _BYTE gap[64];
};
The call to the write function is made with the pointer to what we entered in STDIN so we can assume that @struct+24 is a pointer to some kind of data. Let's rename this function MemWriteDataToStruct.
sub_24DA seems too complicated for now. sub_2F7A behaves like MemWriteDataPointerToStruct but reads a pointer instead so we can call it MemReadDataPointerOffStruct.
Black magic strikes again with sub_44C4 but as its argument is a pointer to structure, it must have been allocated before thanks to MemAlloc si I guess it's its counterpart, MemFree. As for sub_24AB, it makes some calls to MemFree internally and puts 0s in the global variable that were used by MemInit so, same thing as before, it's its counterpart, MemFinish.
Wow, guys, see that?! We renamed all the functions called by step0 & step1 except one! I told you we know much more than we thought! Just to show you, here's what step0 looks like now:
__int64 Step0()
{
  unsigned int pScrambledInputOffset; // [rsp+14h] [rbp-24h]
  unsigned int v2; // [rsp+18h] [rbp-20h]
  unsigned int pInput; // [rsp+1Ch] [rbp-1Ch]
  void *pInputOffset; // [rsp+20h] [rbp-18h]
  void *pScrambledData; // [rsp+28h] [rbp-10h]
  unsigned __int64 v6; // [rsp+30h] [rbp-8h]

  v6 = __readfsqword(0x28u);
  MemInit(0);
  pInput = MemAlloc(128);
  pInputOffset = (void *)MemGetOffset(pInput);
  memset(pInputOffset, 0, 0x80uLL);
  fgets((char *)pInputOffset, 128, stdin);
  MemWriteDataPointerToStruct(0, pInput);
  sub_24DA((__int64)off_32170);
  MemReadDataPointerOffStruct(9u, &pScrambledInputOffset);
  pScrambledInput = (void *)MemGetOffset(pScrambledInputOffset);
  memcpy(src, pScrambledInput, 0x80uLL);
  MemReadDataPointerOffStruct(0, &v2);
  MemFree(pScrambledInputOffset);
  MemFree(pInput);
  MemFinish();
  return v2;
}
We understand pretty easily that all the juicy stuff happens in sub_24DA.
Bytecode decoding and execution
Well, now we have to deal with sub_24DA. We're still looking for some hints that will tell us we're facing a virtual machine. We need proof!
So, this function is used with a pointer to byte_2E048 as argument.
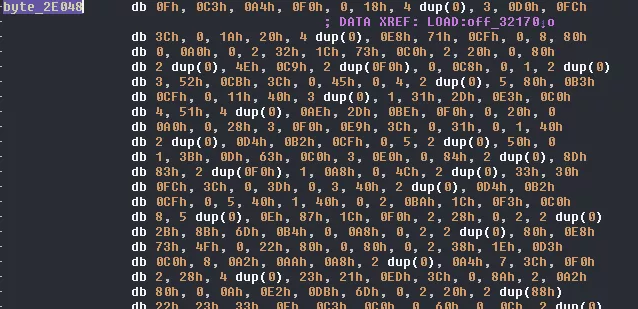
This is a list of 3664 bytes with no obvious pattern. There are a lot of 0s and other small values. There are some sequences that repeat themselves but we can't really deduce anything. That said, this could be a sort of bytecode. If you look closely, the call to the same function in step1 is used with a similar bytearray but a lot smaller. And there's a third bytearray that's very much alike but is never used. Maybe it is used by the VM itself and we cannot see the call until we know how to decode it.
Anyways, moving forward.
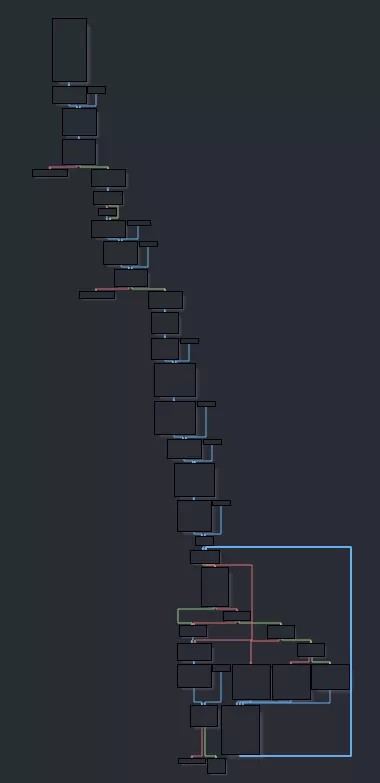
The control flow graph of the function is not too hard. We can easily spot four possible exits and one loop. Zooming in, we can see that it registers a handler for signal 15, SIGTERM.

Going back to our nice strace we can see that the only SIGTERM received is received by thread0:
[pid thread2] kill(thread0, SIGTERM)        = 0
[pid thread1] --- SIGRT_10 {si_signo=SIGRT_10, si_code=SI_USER, si_pid=thread1, si_uid=1000} ---
[pid thread0] --- SIGTERM {si_signo=SIGTERM, si_code=SI_USER, si_pid=thread2, si_uid=1000} ---
The function registered only puts 0 in the global variable used to exit from the loop we'll examine later.
Following we have a call to MemInit it was not already done. Then, we call sub_4ACE with what we think is the bytecode as argument. This pointer is put in a global variable. We can rename this function maybe_SetupBytecode. Following is a call to malloc with 12 as value which corresponds to the number of threads run by thread0 so that may be an array of threads.
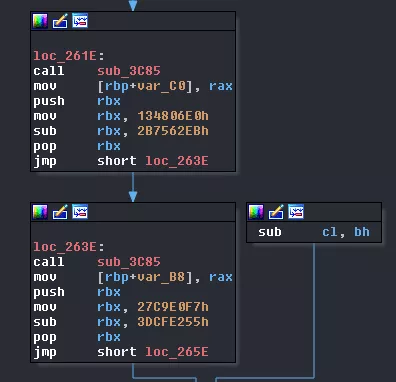
Now two consecutive calls to a function that creates the pipes we saw in the trace. We will rename it to CreatePipes.
Two more consecutive calls. They are not difficult to analyze but there are a lot of things happening. sub_23D1 is called with three arguments:
- respectively the 2nd and 3rd index of the previously
malloc'd array - the address of the function we named
VMHandlersSetupAndExecute - respectively the pipe array from the 1st and 2nd call to
CreatePipes
Once inside the function, the process will fork itself. The parent, thread0, will get back the PID of that process and create a VM_STRUCT_OBJECT with it in the function we'll name CreateCoreStructObject. At the same time, the child process, thread1 or thread2, will call VMHandlersSetupAndExecute and wait for instructions reading from its pipe.
The two following calls to sub_3C0A simply close the read end of the pipes.
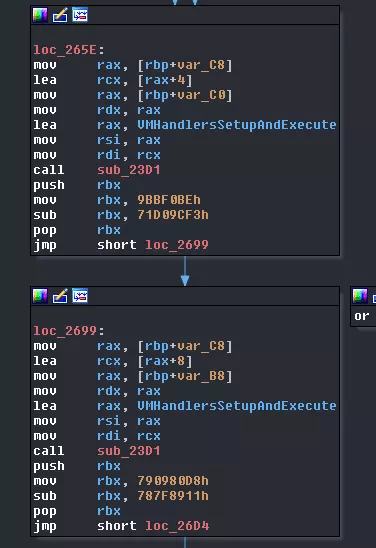
New call to sub_23D1 this time with:
- the 1st index of the
malloc'd array - a function we still don't know anything about,
sub_294E - an array containing the two
writeend of the pipes
Until now, this corresponds exactly to what we observed in the trace. Great! As sub_23D1 initializes and executes what we named core in our architecture drawing, we will name this function VMCoreExecute. Let's continue before we take a closer look at sub_294E.
The next two calls simply wait for their respective core to finish its execution and then read data in the corresponding VM_STRUCT_OBJECT. It's time to update this structure by the way.
struct VM_STRUCT_OBJECT
{
    _QWORD qwStructID;
    _QWORD pMemReadValueFromStruct;
    _QWORD pMemWriteValueToStruct;
    _QWORD pDataOffset;
    pthread_mutex_t* pMemMutex;
    _BYTE gap[32];
    sem_t * pCoreSem;
    _BYTE gap[24];
};

Then the result from the two executions is checked: if one of the value is 0xffffffff then we break the loop, otherwise, we continue. Depending on those values data from the VM_STRUCT_OBJECT 10 will be read and wrote back:
- if
core1had some value, we will write back(41 * value_core1) + VM_STRUCT_OBJECT[10]->Data - if
core2had some value, we will write back(41 * value_core2) + VM_STRUCT_OBJECT[10]->Data - if none had a value, we will write back
82 + VM_STRUCT_OBJECT[10]->Data

Then the data offset of core1 and core2 is cleared and core0 waits for core3 to emit a SIGSTOP. Immediately after, it sends a SIGCONT signal.
To finish, the last two calls simply close and free the pipes created.
Here is the state of the function:
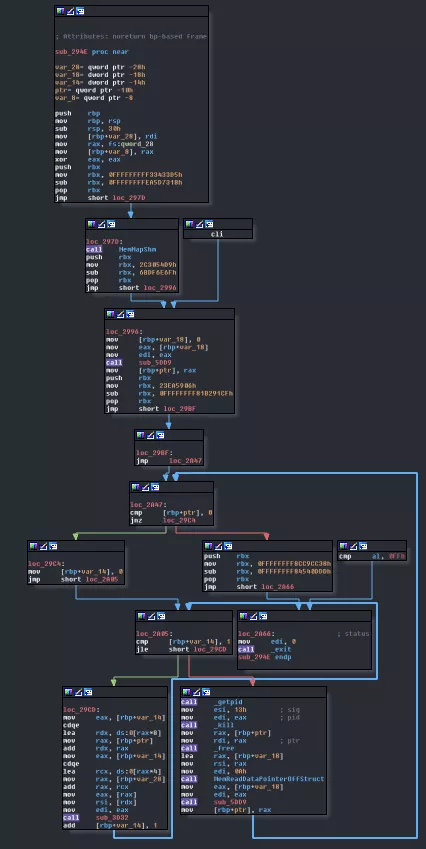
unsigned __int64 __fastcall sub_24DA(__int64 a1)
{
int dwValueAtObj10; // [rsp+1Ch] [rbp-CCh]
unsigned int *pdwVMCorePID; // [rsp+20h] [rbp-C8h]
int *pdwVMPipeCore1; // [rsp+28h] [rbp-C0h]
int *pdwVMPipeCore2; // [rsp+30h] [rbp-B8h]
int dwValueCore1; // [rsp+38h] [rbp-B0h]
int dwValueCore2; // [rsp+3Ch] [rbp-ACh]
__int64 pqwVMPipeCore3; // [rsp+40h] [rbp-A8h]
void (*_Sig15_Exit)(); // [rsp+48h] [rbp-A0h]
__int64 v10; // [rsp+50h] [rbp-98h]
int v11; // [rsp+D0h] [rbp-18h]
unsigned __int64 cookie; // [rsp+E0h] [rbp-8h]
cookie = __readfsqword(0x28u);
sigemptyset((sigset_t *)&v10);
v11 = 0;
_Sig15_Exit = Sig15_Exit;
if ( sigaction(15, (const struct sigaction *)&_Sig15_Exit, 0LL) )
exit(1);
if ( !dword_321CC )
MemInit(0);
maybe_SetupBytecode(a1);
pdwVMCorePID = (unsigned int *)malloc(0xCuLL);
if ( !pdwVMCorePID )
exit(1);
pdwVMPipeCore1 = CreatePipes();
pdwVMPipeCore2 = CreatePipes();
VMCoreExecute(pdwVMCorePID + 1, (void (__fastcall *)(__int64))VMHandlersSetupAndExecute, (__int64)pdwVMPipeCore1);
VMCoreExecute(pdwVMCorePID + 2, (void (__fastcall *)(__int64))VMHandlersSetupAndExecute, (__int64)pdwVMPipeCore2);
LODWORD(pqwVMPipeCore3) = ClosePipeRead((__int64)pdwVMPipeCore1);
HIDWORD(pqwVMPipeCore3) = ClosePipeRead((__int64)pdwVMPipeCore2);
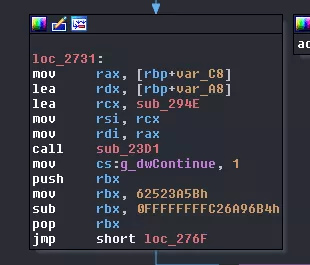
VMCoreExecute(pdwVMCorePID, (void (__fastcall *)(__int64))sub_294E, (__int64)&pqwVMPipeCore3);
g_dwContinue = 1;
while ( g_dwContinue )
{
VMWaitCore(pdwVMCorePID[1], &dwValueCore1);
VMWaitCore(pdwVMCorePID[2], &dwValueCore2);
if ( dwValueCore1 == -1 || dwValueCore2 == -1 )
{
g_dwContinue = 0;
break;
}
if ( dwValueCore1 )
{
MemReadDataPointerOffStruct(0xAu, &dwValueAtObj10);
MemWriteDataPointerToStruct(0xAu, 41 * dwValueCore1 + dwValueAtObj10);
}
else if ( dwValueCore2 )
{
MemReadDataPointerOffStruct(0xAu, &dwValueAtObj10);
MemWriteDataPointerToStruct(0xAu, 41 * dwValueCore2 + dwValueAtObj10);
}
else
{
MemReadDataPointerOffStruct(0xAu, &dwValueAtObj10);
MemWriteDataPointerToStruct(0xAu, dwValueAtObj10 + 82);
}
MemWriteDataPointerToStruct(pdwVMCorePID[1], 0);
MemWriteDataPointerToStruct(pdwVMCorePID[2], 0);
waitpid(*pdwVMCorePID, 0LL, 2);
kill(*pdwVMCorePID, SIGCONT);
}
DeletePipes(pdwVMPipeCore1);
DeletePipes(pdwVMPipeCore2);
return __readfsqword(0x28u) ^ cookie;
}
Looks great, no? We're getting closer to the juicy stuff each time! Exciting! Maybe it's time to update the architecture to reflect what we know and don't.
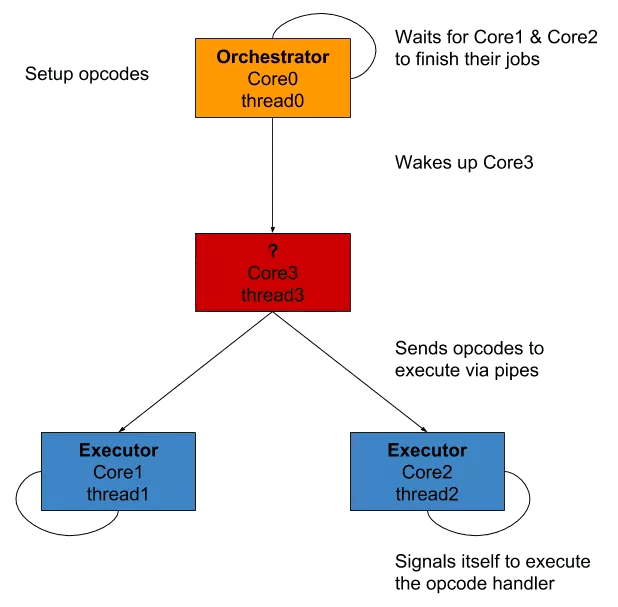
I took the liberty of mapping names from the code analysis to those of the trace. Then, I also named the cores with a more semantic name that reflects what they actually do.
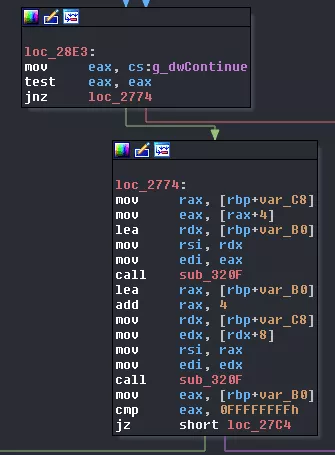
Looking at that drawing we see that only one name/function is missing. We don't have an instruction decoder! That HAS TO BE core3! Let's find out by analyzing sub_294E.
We can quickly spot some things: there a first loop and then an inner loop. The only way to step out of the function is by calling exit if rbp-0x10 == 0.
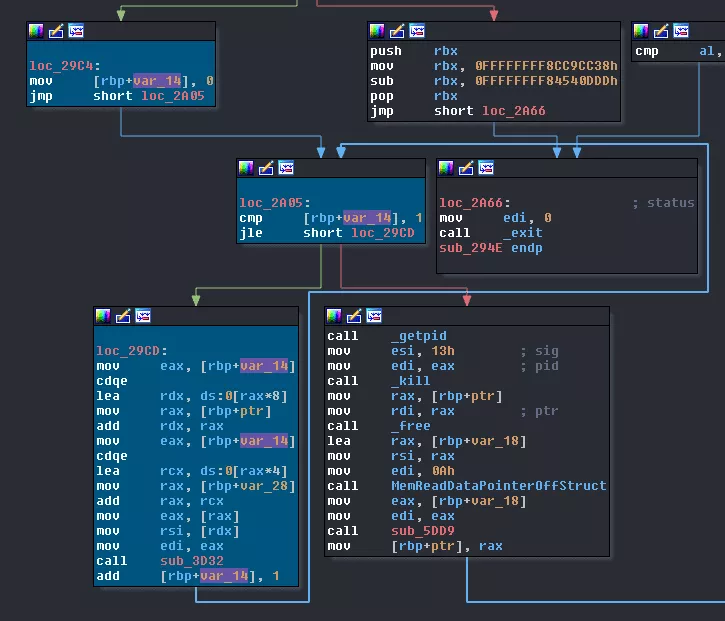
Zooming in to analyze the inner loop (I highlighted important basic blocs in teal to make it simpler), we can quickly spot that it really is the same code called twice every time for the outer loop. Looking at the only function called in the loop we see that it only writes 8 bytes to some file descriptor. This most probably writes some data to two pipes created, like we saw in the trace:
[pid thread3] write(fd_thread1_write, "\7\0\0\0\n\0\0\0", 8) = 8
[pid thread3] write(fd_thread2_write, "\10\0\0\0\v\0\0\0", 8)       = 8

Now, for the outer loop things are a little messier. First, we have a call to sub_5DD9. Then, while this call sends back something else than nothing, we first execute the inner loop, sending data to core1 & core2. Right after this, core3 puts itself in hold sending a SIGSTOP. And that's were you could ask: "yeah okay, it stops itself so what's the following instructions for?". Well, I'm glad you asked! Remember this part from core0's code?
    waitpid(*pdwVMCorePID, 0LL, 2);
    kill(*pdwVMCorePID, SIGCONT);
That's were the magic happens! core0 will send back a SIGCONT to core3 as soon it did its job. After it continues, core3 does this: MemReadDataPointerOffStruct(0xAu, &v2). Well, well well! What have we got here?! Code from core0 again:
    if ( dwValueCore1 )
    {
      MemReadDataPointerOffStruct(0xAu, &dwValueAtObj10);
      MemWriteDataPointerToStruct(0xAu, 41 * dwValueCore1 + dwValueAtObj10);
    }
    else if ( dwValueCore2 )
    {
      MemReadDataPointerOffStruct(0xAu, &dwValueAtObj10);
      MemWriteDataPointerToStruct(0xAu, 41 * dwValueCore2 + dwValueAtObj10);
    }
    else
    {
      MemReadDataPointerOffStruct(0xAu, &dwValueAtObj10);
      MemWriteDataPointerToStruct(0xAu, dwValueAtObj10 + 82);
    }
It really sounds like some way to move the instruction pointer, no? VM_STRUCT_OBJECT[10] would then be the instruction pointer.
This leaves us to only one important function left: sub_5DD9. This has to be the bytecode decoder! Moreover, its only parameter is the value we just obtained from VM_STRUCT_OBJECT[10].
First thing we notice when accessing this function: IDA refuses to display the graph view, complaining that there are too many nodes. We could go into the graph settings and expand the value but this will only slow down the tool and won't be that helpful.
I can't show you everything because this function really is too big but basically it does this: 1. takes the value sent in parameter (renamed to dwBytecodeIndex in the capture) 2. adds an immediate value to it 3. sends it to sub_4A41, which we don't really care about 4. depending on the result it jumps to another location
Eventually, things end-up between two states:
If the instruction could not be decoded, it goes to loc_2C87A which sends back 0 to the decoding loop, therefor finishing core3's execution.
If the instruction could be decoded a weird structure of 16 bytes is allocated on the stack. Based on the inner loop of sub_294E, the different values we can observe and what we can see in the trace, its pseudocode could look like this:
struct VM_CORE_SIG_HANDLER {
    _DWORD dwSigNum;
    _DWORD dwCoreID;
}

VM_CORE_SIG_HANDLER core[2];
Let's rename sub_5DD9 to VMDecodeInstruction and sub_294E to VMExecuteLoop, which makes sub_24DA VMExecute.
Final architecture
Before we dive into the VM handlers and how we'll build an emulator, I want to be sure we all are on the same page.
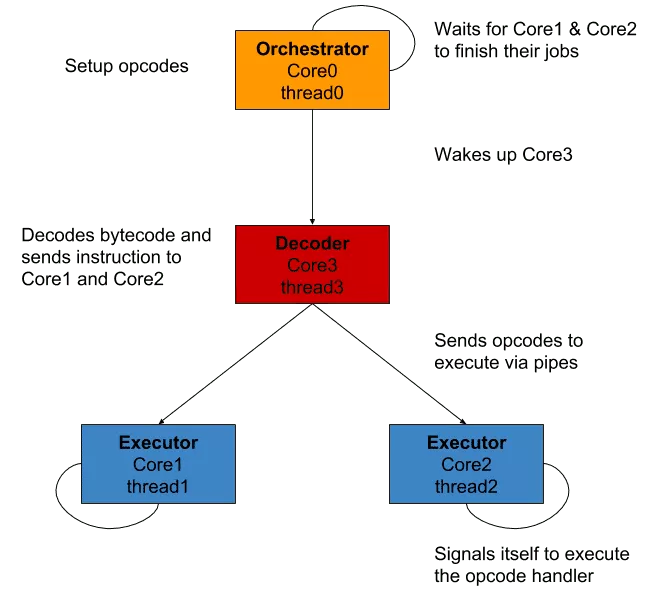
To sum up what happens (and I hope I can make all that process appear simpler):
core0, theorchestrator, creates 3 threads and two pipes- it launches all the executions and put itself in hold of
core1&core2, theexecutors core0&core1read from their respective pipes, waiting for instructionscore3, thedecoder, loops through the bytecode and decode it- then, it sends the instructions to the
executors through the pipes and put itself in hold, waiting to be continued - the
executors signal themselves which handler has to be executed - they then signal the
orchestratortheir job is done - it moves the execution pointer based on the
executors results and resets the state of eachexecutor - it sends the
SIGCONTsignal to thedecoderto continue the execution if needed
See? Nothing too hard! Now let's build an emulator!
Building an emulator
To create an emulator we will need three things:
- a bytecode decoder
- execution handlers
- mimic the behavior of the shared memory
First, decode all the things!
Creating a lookup table with MIASM
When you looking at the massive VMDecodeInstruction, it's obvious you won't try to reimplement the decoder by hand.
At first, I created a python script that would walk through Binary Ninja's MLIL to rebuild automatically the python code. As it was taking forever, I decided to drop that solution, reap the code of the functions I needed along with the bytecode and recreate an ELF using LIEF. Talking with a friend about that solution, he asked me "why don't you simply create a lookup table with MIASM? I just did that for a challenge and it worked out pretty well". Yes, WHY?
MIASM is a very powerful reverse engineering framework developed in python. It embeds some "tools" you can play with to automate your reverse engineering tasks. Today we will only be interested in the emulator capabilities of MIASM. I've never used it before so please, don't be mad at me for the code I'll share with you!
parser = Sandbox_Linux_x86_64.parser(description="ELF sandboxer")
parser.add_argument("filename", help="ELF Filename")
options = parser.parse_args()
sb = Sandbox_Linux_x86_64(options.filename, options, globals())
machine = Machine('x86_64')
cont = Container.from_stream(open(options.filename))
mdis = machine.dis_engine(cont.bin_stream)
First, we create a Sandbox object and a disassembler. Then, we break on three addresses:
sb.jitter.add_breakpoint(0x2C87F, GetMem)  # break on return of VMDecodeInstruction
sb.jitter.add_breakpoint(0x21B0, Malloc)  # Break on call to _malloc because for some reason MIASM can't find the symbol
sb.jitter.add_breakpoint(0x4A9C, GetBytecode)  # break on return of VMDecodeBytecode to return the good value that could not be loaded because of global variable not set
First, we will break on the last instruction of VMDecodeInstruction to obtain the structure in rax. Then, we'll break on malloc just no to break the execution and, finally, we'll break on sub_4A41, which we skipped earlier.
This function, that I renamed to VMDecodeBytecode simply takes the dwBytecodeIndex+imm value as parameter. It adds it to the global variable containing the pointer to the current's step bytecode and performs some bit-level operations on it, and returns a boolean.
def GetMem(jitter):
    global lookup_table
    lookup_table.append(jitter.cpu.get_mem(jitter.cpu.RAX, 16))
    return True


def GetBytecode(jitter):
    try:
        jitter.cpu.RAX = (u8(bytecode[jitter.cpu.RDI/8]) >> ((7 - jitter.cpu.RDI) % 8)) & 1
    except:
        pass
    return True


def Malloc(jitter):
    jitter.cpu.RAX = linobjs.heap.alloc(sb.jitter, 0x10)  # simulate malloc (the jmp malloc was rewritten by a ret to prevent MIASM error)
    return True
For some reasons I had to patch malloc calls to a simple ret to make it work. But as you see, nothing hard here. GetBytecode is simply the translation of VMDecodeBytecode to python. Why didn't I just let MIASM execute it? It's because it's using a global variable that I didn't know how to initialize using MIASM. So I decided to reimplement it and extract the bytecode from the binary.
def emulate(sb, x, bc, lt):
    global bytecode, lookup_table
    bytecode = bc
    lookup_table = lt
    for i in range((len(bytecode) * 8) - 1):
        sb.call(0x5DD9, i)  # VMDecodeInstruction
    print(lt)


emulate(sb, 0, step0, lookup_table_step0)
emulate(sb, 1, step1, lookup_table_step1)
emulate(sb, 2, step2, lookup_table_step2)
As you can see, the emulation steps are really easy. We simply ask MIASM to directly call VMDecodeInstruction with an index and we're done. Then, we just have to save the output to a file and we have the lookup tables for all the steps of the crackme, including the "hidden" bytecode.
Here is what it looks like for step0 after the emu.py script is run:
['\x08\x00\x00\x00\n\x00\x00\x00\x08\x00\x00\x00\x0b\x00\x00\x00', '\x08\x00\x00\x00\n\x00\x00\x00\xff\xff\xff\xff\xff\xff\xff\xff', '\xff\xff\xff\xff\xff\xff\xff\xff\xff\xff\xff\xff\xff\xff\xff\xff', '\xff\xff\xff\xff\xff\xff\xff\xff\xff\xff\xff\xff\xff\xff\xff\xff', ...
This data looks exactly like what is sent to the cores and the first row is the same as the first batch of write/read so we know we have the good input!
Analyzing instruction handlers
So know we know how everything is executed but we still don't know what is executed so let's tackle this and reverse the handlers!
This is a first time I reverse a virtual machine so I'm very new to the process. I did not really know were to start so I first looked for the easiest function possible, which happened to be VMHandler_Sig08_Op06.
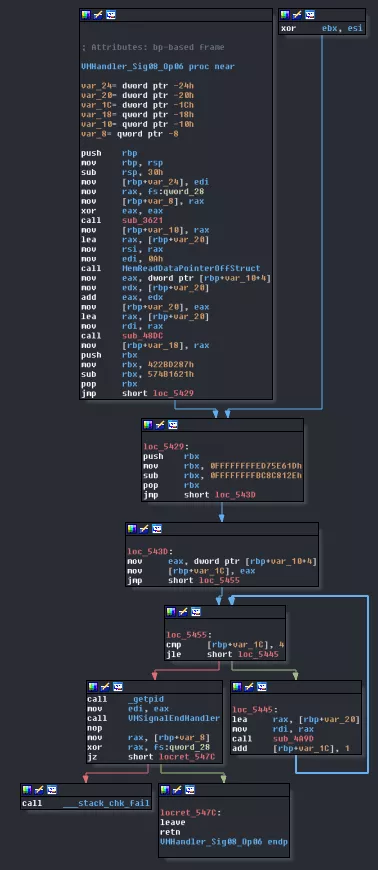
We only have three calls we don't know anything about and one small loop.
The first call, to sub_3621, simply returns the current signal number.
The last call, to sub_4A9D, seems to simply move forward the current instruction pointer of two and return the instruction before the pointer was moved. This function is called five time.
The call in the middle, to sub_48DC is more difficult, that's why I kept it for the end. If we look for XREFs we see that the function (like the two others) is used by every handler. Looking inside the function, we can see 2 main loops each having one inner loop. Those loops fill a malloc'd block of 0x18 bytes with VMFetchOpcode's result (sub_4A9D renamed) and an addition. To be honest, I didn't really try to understand what this was doing, I just reimplemented the whole thing in python.
This is what it looks like:
    def DecodeBytecode(self, offset):
        return (u8(self.bytecode[offset/8]) >> (7 - offset % 8)) & 1

    def FetchOpcode(self):
        x = self.DecodeBytecode(self.pc)
        self.pc += 2
        return x

    def FetchInstruction(self):
        regs = [None] * 6
        for i in range(3):
            regs[i * 2] = 0
            for _ in range(3):
                x = 2 * regs[i * 2]
                regs[i * 2] = x + self.FetchOpcode()
        for i in range(3):
            regs[(i * 2) + 1] = 0
            for _ in range(9):
                x = 2 * regs[(i * 2) + 1]
                regs[(i * 2) + 1] = x + self.FetchOpcode()
        return regs
The function itself:
  dwCurrentSignal = VMGetCurrentSigNum();
  MemReadDataPointerOffStruct(0xAu, &dwIndex);
  dwIndex += HIDWORD(dwCurrentSignal);
  _ = VMFetchInstruction((__int64)&dwIndex);
  for ( i = HIDWORD(dwCurrentSignal); i <= 4; ++i )
    VMFetchOpcode(&dwIndex);
  dwPid = getpid();
  VMSignalEndHandler(dwPid);
So, we fetch the instruction pointer from the object 0xA, we fetch the instruction and immediately after, we move the pointer forward. This here is a NOP! We do nothing except moving the instruction pointer. The loop really looks like an epilogue and everything until the loop to a prologue.
The second one was VMHandler_Sig06_Op04.
This might look like it's doing a lot but actually we already have all the information we need for this one. We have the prologue and epilogue and in between we have this:
  if ( *pInstruction == 1 )
    MemReadDataPointerOffStruct(pInstruction[1], &pSomeData);
  else
    pSomeData = pInstruction[1];
  MemWriteDataPointerToStruct(9u, pSomeData);
  dwPID = getpid();
  MemWriteDataPointerToStruct(dwPID, 0xFFFFFFFF);
  _dwPID = getppid();
  kill(_dwPID, SIGTERM);
We know that core0 will stop if one of the executors' data is 0xffffffff plus we see the SIGTERM. We know that step0 pulls data from object 9 and put the content into a variable after the VM execution:
  VMExecute((__int64)VMOpcode0);
  MemReadDataPointerOffStruct(9u, &pScrambledInputOffset);
  pScrambledInput = (void *)MemGetOffset(pScrambledInputOffset);
  memcpy(src, pScrambledInput, 0x80uLL);
So this handler has to be a VMExit! Continuing, we see that VMHandler_Sig07_Op05 is easy too. The actual payload of the handler is this:
  pInstruction = VMFetchInstruction((__int64)&dwIndex);
  pSomeData = 0;
  if ( *pInstruction != 1 )
    exit(1);
  MemReadDataPointerOffStruct(pInstruction[1], &pSomeData);
  MemWriteDataPointerToStruct(pInstruction[1], -pSomeData);
This is obviously a neg. Moving on to VMHandler_Sig04_Op02, we're not scared anymore! That said, this one is a little messier and demands some more explanation.
  pBuf = (unsigned __int64)VMFetchInstruction((__int64)&dwIndex);
  dwSize = 0;
  pBuffer = 0;
  if ( *(_DWORD *)pBuf == 1 )
    MemReadDataPointerOffStruct(*(_DWORD *)(pBuf + 4), &dwSize);
  else
    dwSize = *(_DWORD *)(pBuf + 4);
  if ( *(_DWORD *)(pBuf + 8) == 2 )
    MemReadDataPointerOffStruct(*(_DWORD *)(pBuf + 12), &pBuffer);
  *((_QWORD *)&pBuf + 1) = MemGetOffset(pBuffer);
  memset(*((void **)&pBuf + 1), 0, dwSize);
  read(STDIN_FILENO, *((void **)&pBuf + 1), dwSize);
Okay so HEX-RAYS's doing some weird things because of compiler's optimizations. Anyways, to understand what's going on we get rid of what we know.
We know how read works: it's reading data (here from STDIN) of given size and putting it in a buffer. So here, if VMFetchInstruction first value decoded is 1, we need to fetch the size of the data from an object, otherwise, it's fixed. That's the same thing for the buffer. As for the current function we analyze, this is obviously a ReadSTDIN.
VMHandler_Sig05_Op03 come down to the same thing excepts that it outputs to STDOUT instead so that the handler to WriteSTDOUT.
Now, real things begin.
Basically, this is nothing more than what we already saw but with more values. This all comes down to "if it's a pointer then,", "if it's an immediate then,", etc. In the end, this is nothing more than b = *b + a, so, it's an ADD. VMHandler_Sig11_Op09 is very much the same except it's an AND.
Looks very much like ReadSTDIN and WriteSTDOUT
  pFreeObject = MemAlloc(dwSize);
  if ( *pInstruction == 1 )
    MemWriteDataPointerToStruct(pInstruction[1], pFreeObject);
  else
    *pSomePointer = pFreeObject;
is a MemAlloc with VMHandler_Sig12_Op10 being it counterpart, a MemFree. We're getting good at this, only three handlers left!
Now VMHandler_Sig10_Op08:
  if ( *pInstruction == 1 )
    MemWriteDataPointerToStruct(pPointer0, pPointer1);
  else
    *_pPointer0 = pPointer1;
Do you know why I give you such small code every time? This is because we already figured out all the rest. We already know that all the ifs are only there to know what kind of data the instruction will have to deal with. As that's always the same code (or almost), this makes it very easy the extract the real payload of each handlers. So here, this is obvious we're facing a MemMove.
VMHandler_Sig03_Op01 is a little trickier so I'll give you some additional code as it's not implementing the same mechanisms the others do:
  for ( i = 0; i <= 2; ++i )
  {
    if ( pInstruction[2 * i] == 6 )
    {
      *((_DWORD *)&v12 + i) = pInstruction[2 * i + 1];
    }
    else if ( pInstruction[2 * i] == 7 )
    {
      *((_DWORD *)&v12 + i) = -pInstruction[2 * i + 1];
    }
  }
  MemReadDataPointerOffStruct(0xBu, &flag);
  if ( flag )
  {
    if ( flag >= 0 )
      _where = v13;
    else
      _where = HIDWORD(v12);
    _CoreObj = getpid();
    MemWriteDataPointerToStruct(_CoreObj, _where);
  }
  else
  {
    where = v12;
    CoreObj = getpid();
    MemWriteDataPointerToStruct(CoreObj, where);
  }
As always, let's begin by the end. We can see that we're writing some data to the current executor's structure. The only reason to do this we know of lies yet again in the orchestrator's code:
    if ( dwValueCore1 )
    {
      MemReadDataPointerOffStruct(0xAu, &dwValueAtObj10);
      MemWriteDataPointerToStruct(0xAu, 41 * dwValueCore1 + dwValueAtObj10);
    }
    else if ( dwValueCore2 )
    {
      MemReadDataPointerOffStruct(0xAu, &dwValueAtObj10);
      MemWriteDataPointerToStruct(0xAu, 41 * dwValueCore2 + dwValueAtObj10);
    }
    else
    {
      MemReadDataPointerOffStruct(0xAu, &dwValueAtObj10);
      MemWriteDataPointerToStruct(0xAu, dwValueAtObj10 + 82);
    }
If one of the executors had a value in its data at the end of an execution cycle, the instruction pointer would be moved relatively to that value. So here, we quickly understand that the value we'll write is the size of the jump.
Before this we have two if. Now, why would we have if except if the jump was a conditional jump based on flag value?
The rest, I don't know and, honestly, we don't really care for the emulator. We will simply reap the code and it'll work, like for the other functions!
The last function what a discovery for me so I will try to explain it in details.
  MemReadDataPointerOffStruct(pInstruction[1], &pSomeData);
  nptr = (char *)&pSomeData;
  dwIntValue = atoi((const char *)&pSomeData);
  if ( dwIntValue )
  {
    v0 = log10((double)(signed int)abs(dwIntValue));
    v5 = (signed int)(floor(v0) + 1.0);
  }
  else
  {
    v5 = 1;
  }
  if ( dwIntValue < 0 || *nptr == '-' )
    ++v5;
  v8 = (dwIntValue + 192) & 0xFF;
  MemWriteDataPointerToStruct(pInstruction[1], v8);
  MemWriteDataPointerToStruct(9u, v5);
I guess some of you already know what it does just by looking at it but for the others, like me, let's try to understand it bit by bit.
First, we obtain an integer value from a pointer thanks to atoi. Then, if it's non zero, we make some weird calculation. As we all know, log10(1)=0, log10(10)=1, log10(100)=2, and so on. So, 1<log10(90)<2, same goes for 1<log10(15)<2. Then, floor(log10(100)+1)=3, floor(log10(15657)+1)=5. Do you see where we're going? floor(log10(abs(X))+1) is simply calculating the number of figures (or length) your integer is composed of! This blew my mind! If the number was 0, its length is 1.
The second simply ignores negative numbers. The last calculation, you'll see later!
This function is nothing more than DecodeInt! And here we are, we analyzed all the handlers. Now, we just have to add them to our emulator (which is left as an exercise for you or you can check the code in vm.py.
To be sure we're on the same page, here are our functions renamed:
VMHandlerADD_Sig02_Op00
VMHandlerJMPCond_Sig03_Op01
VMHandlerReadSTDIN_Sig04_Op02
VMHandlerWriteSTDOUT_Sig05_Op03
VMHandlerExit_Sig06_Op04
VMHandlerNEG_Sig07_Op05
VMHandlerNOP_Sig08_Op06
VMHandlerMemAlloc_Sig09_Op07
VMHandlerMemMove_Sig10_Op08
VMHandlerAND_Sig11_Op09
VMHandlerMemFree_Sig12_Op10
VMHandlerDecodeInt_Sig13_Op11
Avoiding problems with the allocator
The last bit missing to build a complete emulator is memory management. Until now we did not really care about what the SHM was used for. We know it's a shared memory between all core that's used to hold some data. Most of the data is in the form of a VM_STRUCT_OBJECT. We also know the executors states are stored in there, and our input too. We also know what are some of them used for:
0x9: results0xA: instruction pointer0xB: conditional flags
We did not check at all the allocator's implementation and called it "black magic". At first, I tried to reimplement it by simply observing the state of the memory between each allocation. After quite some times I managed to have a working implementation.
That being said, when coding the emulator, I ran into some problems I didn't think about. I decided to put all this work into the trash (I love to do this) and use a simple python list to hold what I then named objects.
VM_OBJ_RESULT = 9
VM_OBJ_CONTEXT = 0xa
VM_OBJ_FLAGS = 0xb
VM_OBJ_THREAD0 = 0x1 << 12
VM_OBJ_THREAD1 = VM_OBJ_THREAD0 | 0x1 << 8
VM_OBJ_THREAD2 = VM_OBJ_THREAD1 | 0xa
VM_OBJ_THREAD3 = VM_OBJ_THREAD1 | 0xb
VM_OBJ_START = 0x1 << 20
VM_OBJ_END = 0xf << 20
VM_OBJ_INPUT = 0x1 << 8


# SNIP
        self.objs = {}
        for i in range(13):
            self.objs[i] = 0
        self.objs[VM_OBJ_THREAD1] = 0
        self.objs[VM_OBJ_THREAD2] = 0
        self.objs[VM_OBJ_THREAD3] = 0

    def MakeObj(self, to, length):
        idx = random.randint(VM_OBJ_START, VM_OBJ_END)
        for i in range(length):
            self.objs[idx+i] = 0
        self.objs[to] = idx
        return idx

    # SNIP
    def Malloc(self, core):
        # SNIP
        idx = self.MakeObj(v0, v1)

    # SNIP

    def run(self, input):
        for i, l in enumerate(input):
            self.objs[VM_OBJ_INPUT+i] = ord(l)
        self.objs[0] = VM_OBJ_INPUT

# SNIP
This allowed me to quickly build a fully functional emulator! As you can see pointers are simply dictionary values and the actual data at the address (key of the dict) pointed to is simply put in the next keys. For example, the input "rainismean" will look like this:
self.obj[256] = "r"
self.obj[257] = "a"
# snip
self.obj[265] = "n"
So, the "pointer address" will be 256.
Solving the real problem
Okay, so, we have an emulator capable of playing any part of the challenge. Problem is we still don't know what the input format looks like. We still have no idea what we have to do and what the original problem is.
$ python vm.py INPUT="a"
[!] 0x0000:    EXECUTOR0: mov obj[0x01], 0x00                     EXECUTOR1: mov obj[0x02], obj[0x00] = 0x100
[!] 0x000a:    EXECUTOR0: alloc obj[0x3], 0x80 = 0x6b01e6         EXECUTOR1: mov obj[0x04], 0x00
[!] 0x0014:    EXECUTOR0: mov obj[0x05], obj[0x03] = 0x6b01e6     EXECUTOR1: NOP
[!] 0x001e:    EXECUTOR0: add obj[0x05], obj[0x04] = 0x6b01e6     EXECUTOR1: NOP
[!] 0x0029:    EXECUTOR0: mov obj[0x6b01e6], 0x00                 EXECUTOR1: add obj[0x04], 0x01 = 0x0001
[!] 0x0033:    EXECUTOR0: NOP                                     EXECUTOR1: mov obj[0x0b], obj[0x04] = 0x01
[!] 0x003d:    EXECUTOR0: NOP                                     EXECUTOR1: neg obj[0x0b] = 0x-1
[!] 0x0047:    EXECUTOR0: NOP                                     EXECUTOR1: add obj[0x0b], 0x80 = 0x007f
[!] 0x0052:    EXECUTOR0: jmp -12 (0x0014)                        EXECUTOR1: NOP
[!] 0x0014:    EXECUTOR0: mov obj[0x05], obj[0x03] = 0x6b01e6     EXECUTOR1: NOP
[!] 0x001e:    EXECUTOR0: add obj[0x05], obj[0x04] = 0x6b01e7     EXECUTOR1: NOP
[!] 0x0029:    EXECUTOR0: mov obj[0x6b01e7], 0x00                 EXECUTOR1: add obj[0x04], 0x01 = 0x0002
[!] 0x0033:    EXECUTOR0: NOP                                     EXECUTOR1: mov obj[0x0b], obj[0x04] = 0x02
[!] 0x003d:    EXECUTOR0: NOP                                     EXECUTOR1: neg obj[0x0b] = 0x-2
[!] 0x0047:    EXECUTOR0: NOP                                     EXECUTOR1: add obj[0x0b], 0x80 = 0x007e
[...]
[!] 0x0052:    EXECUTOR0: jmp -12 (0x0014)                        EXECUTOR1: NOP
[!] 0x0014:    EXECUTOR0: mov obj[0x05], obj[0x03] = 0x6b01e6     EXECUTOR1: NOP
[!] 0x001e:    EXECUTOR0: add obj[0x05], obj[0x04] = 0x6b0265     EXECUTOR1: NOP
[!] 0x0029:    EXECUTOR0: mov obj[0x6b0265], 0x00                 EXECUTOR1: add obj[0x04], 0x01 = 0x0080
[!] 0x0033:    EXECUTOR0: NOP                                     EXECUTOR1: mov obj[0x0b], obj[0x04] = 0x80
[!] 0x003d:    EXECUTOR0: NOP                                     EXECUTOR1: neg obj[0x0b] = 0x-80
[!] 0x0047:    EXECUTOR0: NOP                                     EXECUTOR1: add obj[0x0b], 0x80 = 0x0000
Holy cow! This is working! We can see the matrix!
So, we see we allocate an object of length 128. Then we see a loop. This is easily recognizable as we see the same group of 7 instructions repeated again and again. We can see that they iterate over the newly created object and initialize it to 0.
[!] 0x0052:    EXECUTOR0: jmp 2 (0x005c)                          EXECUTOR1: NOP
[!] 0x005c:    EXECUTOR0: mov obj[0x04], 0x00                     EXECUTOR1: mov obj[0x05], obj[0x03] = 0x6b01e6
[!] 0x0066:    EXECUTOR0: NOP                                     EXECUTOR1: mov obj[0x06], obj[0x03] = 0x6b01e6
[!] 0x0070:    EXECUTOR0: mov obj[0x07], obj[0x04] = 0x00         EXECUTOR1: add obj[0x06], 0x01 = 0x6b01e7
[!] 0x007b:    EXECUTOR0: add obj[0x07], 0x02 = 0x0002            EXECUTOR1: alloc obj[0x8], 0x0a = 0x34e5fb
[!] 0x0085:    EXECUTOR0: add obj[0x06], 0x02 = 0x6b01e9          EXECUTOR1: add obj[0x07], 0x03 = 0x0005
[!] 0x008f:    EXECUTOR0: NOP                                     EXECUTOR1: mov obj[0x07], obj[0x06] = 0x6b01e9
[!] 0x0099:    EXECUTOR0: free obj[0x08]                          EXECUTOR1: NOP
To be honest I'm not sure I get what's happening here... We put a pointer to 0x6b01e6 in 0x05 and 0x06, then we allocate an object almost immediately freed. Then we put a pointer to 0x6b01e9 in 0x07.
[!] 0x00a4:    EXECUTOR0: mov obj[0x0b], obj[0x01] = 0x00         EXECUTOR1: NOP
[!] 0x00ae:    EXECUTOR0: jmp 14 (0x00f6)                         EXECUTOR1: NOP
[!] 0x00f6:    EXECUTOR0: NOP                                     EXECUTOR1: mov obj[0x0b], obj[0x100] = 0x61
[!] 0x0100:    EXECUTOR0: NOP                                     EXECUTOR1: and obj[0xb], 0x61, 0xff
[!] 0x010a:    EXECUTOR0: NOP                                     EXECUTOR1: neg obj[0x0b] = 0x-61
[!] 0x0114:    EXECUTOR0: NOP                                     EXECUTOR1: add obj[0x0b], 0x6c = 0x000b
[!] 0x011f:    EXECUTOR0: jmp 58 (0x0248)                         EXECUTOR1: NOP
[!] 0x0248:    EXECUTOR0: mov obj[0x0b], obj[0x100] = 0x61        EXECUTOR1: NOP
[!] 0x0252:    EXECUTOR0: and obj[0xb], 0x61, 0xff                EXECUTOR1: NOP
[!] 0x025c:    EXECUTOR0: neg obj[0x0b] = 0x-61                   EXECUTOR1: NOP
[!] 0x0267:    EXECUTOR0: add obj[0x0b], 0x72 = 0x0011            EXECUTOR1: NOP
[!] 0x0271:    EXECUTOR0: jmp 62 (0x03af)                         EXECUTOR1: NOP
[!] 0x03af:    EXECUTOR0: mov obj[0x0b], obj[0x100] = 0x61        EXECUTOR1: NOP
[!] 0x03b9:    EXECUTOR0: and obj[0xb], 0x61, 0xff                EXECUTOR1: NOP
[!] 0x03c3:    EXECUTOR0: neg obj[0x0b] = 0x-61                   EXECUTOR1: NOP
[!] 0x03cd:    EXECUTOR0: add obj[0x0b], 0x73 = 0x0012            EXECUTOR1: NOP
[!] 0x03d8:    EXECUTOR0: jmp 118 (0x0634)                        EXECUTOR1: NOP
[!] 0x0634:    EXECUTOR0: mov obj[0x0b], obj[0x100] = 0x61        EXECUTOR1: NOP
[!] 0x063f:    EXECUTOR0: and obj[0xb], 0x61, 0xff                EXECUTOR1: NOP
[!] 0x0649:    EXECUTOR0: neg obj[0x0b] = 0x-61                   EXECUTOR1: NOP
[!] 0x0653:    EXECUTOR0: add obj[0x0b], 0x67 = 0x0006            EXECUTOR1: NOP
[!] 0x065d:    EXECUTOR0: jmp 96 (0x0849)                         EXECUTOR1: NOP
[!] 0x0849:    EXECUTOR0: mov obj[0x0b], obj[0x100] = 0x61        EXECUTOR1: NOP
[!] 0x0854:    EXECUTOR0: and obj[0xb], 0x61, 0xff                EXECUTOR1: NOP
[!] 0x085e:    EXECUTOR0: neg obj[0x0b] = 0x-61                   EXECUTOR1: NOP
[!] 0x0868:    EXECUTOR0: add obj[0x0b], 0x0a = 0x-057            EXECUTOR1: NOP
[!] 0x0872:    EXECUTOR0: jmp 166 (0x0bc5)                        EXECUTOR1: NOP
[!] 0x0bc5:    EXECUTOR0: Write D                                 EXECUTOR1: NOP
[!] 0x0bcf:    EXECUTOR0: Write i                                 EXECUTOR1: NOP
[!] 0x0bda:    EXECUTOR0: Write d                                 EXECUTOR1: NOP
[!] 0x0be4:    EXECUTOR0: Write                                   EXECUTOR1: NOP
[!] 0x0bee:    EXECUTOR0: Write y                                 EXECUTOR1: NOP
[...]
[!] 0x0e41:    EXECUTOR0: mov obj[0x00], obj[0x04] = 0x00         EXECUTOR1: exit(0x00)
[-] exec done
Here comes the juicy part.
Available instructions
So in the previous listing we can see that the first byte of our input (object 0x100) is put into object 0x0b and then compared (thanks to the ADD) to some values: 0x6c, 0x72, 0x73, 0x67, and 0x0a. These are the ASCCI values 'lrsg\n'.Then, as our input doesn't correspond to any of those, the error message is displayed. We lost!
But that's our first tangible clue! What happens if we put a 'l' instead?
$ python vm.py INPUT="l"
[!] 0x00a4:    EXECUTOR0: mov obj[0x0b], obj[0x01] = 0x00         EXECUTOR1: NOP
[!] 0x00ae:    EXECUTOR0: jmp 14 (0x00f6)                         EXECUTOR1: NOP
[!] 0x00f6:    EXECUTOR0: NOP                                     EXECUTOR1: mov obj[0x0b], obj[0x100] = 0x6c
[!] 0x0100:    EXECUTOR0: NOP                                     EXECUTOR1: and obj[0xb], 0x6c, 0xff
[!] 0x010a:    EXECUTOR0: NOP                                     EXECUTOR1: neg obj[0x0b] = 0x-6c
[!] 0x0114:    EXECUTOR0: NOP                                     EXECUTOR1: add obj[0x0b], 0x6c = 0x0000
[!] 0x011f:    EXECUTOR0: jmp 2 (0x0129)                          EXECUTOR1: NOP
[!] 0x0129:    EXECUTOR0: add obj[0x01], 0x01 = 0x0001            EXECUTOR1: add obj[0x02], 0x01 = 0x0101
[!] 0x0133:    EXECUTOR0: NOP                                     EXECUTOR1: mov obj[0x0b], obj[0x101] = 0x0a
[!] 0x013d:    EXECUTOR0: NOP                                     EXECUTOR1: and obj[0xb], 0x0a, 0xff
[!] 0x0148:    EXECUTOR0: NOP                                     EXECUTOR1: neg obj[0x0b] = 0x-a
[!] 0x0152:    EXECUTOR0: NOP                                     EXECUTOR1: add obj[0x0b], 0x65 = 0x005b
[!] 0x015c:    EXECUTOR0: jmp 274 (0x06d8)                        EXECUTOR1: NOP
[!] 0x06d8:    EXECUTOR0: jmp 246 (0x0bc5)                        EXECUTOR1: NOP
[!] 0x0bc5:    EXECUTOR0: Write D                                 EXECUTOR1: NOP
[!] 0x0bcf:    EXECUTOR0: Write i                                 EXECUTOR1: NOP
[!] 0x0bda:    EXECUTOR0: Write d                                 EXECUTOR1: NOP
This time, we passed the first check and a new one appeared, looking for a 0x65 as second character in the input. Continuing this iterative process we observe the four following inputs:
leftrightskipnextgoto INT
When a valid input is detected, the following happens (here the input was left):
[!] 0x01d7:    EXECUTOR0: jmp 2 (0x01e1)                          EXECUTOR1: NOP
[!] 0x01e1:    EXECUTOR0: add obj[0x01], 0x01 = 0x0004            EXECUTOR1: add obj[0x02], 0x01 = 0x0104
[!] 0x01ec:    EXECUTOR0: mov obj[0x05], obj[0x03] = 0x7fb3c9     EXECUTOR1: NOP
[!] 0x01f6:    EXECUTOR0: add obj[0x05], obj[0x04] = 0x7fb3c9     EXECUTOR1: NOP
[!] 0x0200:    EXECUTOR0: add obj[0x04], 0x01 = 0x0001            EXECUTOR1: mov obj[0x7fb3c9], 0x01
[!] 0x020a:    EXECUTOR0: mov obj[0x0b], 0x00                     EXECUTOR1: NOP
[!] 0x0215:    EXECUTOR0: jmp -72 (0x00a4)                        EXECUTOR1: NOP
[!] 0x00a4:    EXECUTOR0: mov obj[0x0b], obj[0x01] = 0x04         EXECUTOR1: NOP
[!] 0x00ae:    EXECUTOR0: jmp 2 (0x00b8)                          EXECUTOR1: NOP
[!] 0x00b8:    EXECUTOR0: mov obj[0x0b], obj[0x104] = 0x3b        EXECUTOR1: NOP
[!] 0x00c2:    EXECUTOR0: and obj[0xb], 0x3b, 0xff                EXECUTOR1: NOP
[!] 0x00cd:    EXECUTOR0: neg obj[0x0b] = 0x-3b                   EXECUTOR1: NOP
[!] 0x00d7:    EXECUTOR0: add obj[0x0b], 0x3b = 0x0000            EXECUTOR1: NOP
We can see that a value of 0x1 is put in the first offset of the object allocated at the beginning of the execution. Then, the application looks for a ";". Using the same technique as earlier, we can find the following values:
left=0x01right=0x02skipnext=0x03goto INT=0xC0+INT
Remember when we saw v8 = (dwIntValue + 192) & 0xFF; and I said "we'll see for this later"? Well, later is now. This is where the 0xC0+INT comes from.
If we input one or more valid instructions, then, this is what happens (input was right;skipnext;right;left;left;):
[!] 0x0849:    EXECUTOR0: mov obj[0x0b], obj[0x11f] = 0x0a        EXECUTOR1: NOP
[!] 0x0854:    EXECUTOR0: and obj[0xb], 0x0a, 0xff                EXECUTOR1: NOP
[!] 0x085e:    EXECUTOR0: neg obj[0x0b] = 0x-a                    EXECUTOR1: NOP
[!] 0x0868:    EXECUTOR0: add obj[0x0b], 0x0a = 0x0000            EXECUTOR1: NOP
[!] 0x0872:    EXECUTOR0: jmp 2 (0x087d)                          EXECUTOR1: NOP
[!] 0x087d:    EXECUTOR0: mov obj[0x00], obj[0x04] = 0x05         EXECUTOR1: exit(0x57103b)
[+] Exec done; Return: 5
We can see that executor1 sends the exit instruction along with the pointer to the object created at the beginning. It also returns the value 5 here, which corresponds to the total number of instructions in the input. Say we give the program left;, it will return 1.
Original problem: robots parachuted on a line
Now that we now what the input must look like, we can try understanding the problem. At first, I ran stage1 for hours without understanding what was happening. Then, I asked "what if this is a known problem?". I tried to formulate the behavior I was witnessing to Almighty Google but nothing was coming out. Then I tried with the instruction. And that's when I realized how dumb I have been this entire time.
This problem is pretty easy to understand and solve. It was originally asked during Amazon interviews. Two robots are parachuted at random positions on the same line.
In the binary, the position of the robots and their respective parachutes is simulated thanks to the functions we named InitRands and ConstrainRand in main.
To solve the problem we have to make the two robots collide. For this, you have the four listed instructions. When a robot leaves its original position, it leaves its parachutes there. Things is skipnext will skip the next instruction for the robot if a parachute exists on its current position. So the tips is to make one robot move "faster" than the other one using this instruction.
For example, the following program will make the robots collide on the debugger:
start: left
skipNext
goto start
quick: left
left
goto quick
Added constraints and solution
Sadly for us, this solution won't work on the challenge because some constraints were added.
  if ( *pdwPositions != pdwPositions[1] || dwNbInstruction != 7 )
  {
    puts("What a mess. People are throwing you tomatoes. Go fix your partition.");
  }
  else
  {
    puts("The Band is off the stage. The public applauses. Everyone is tremendously happy.");
    puts("Good job. Use your input as the flag (and if you get this message but your flag is not accepted, contact us).");
  }
Here we see one of those constraints. We have to use exactly 7 instructions, otherwise, we fail. Adapting the payload would be quite easy if that was all but the second, and more perfidious constraint, checks that exactly 128 steps are executed. If you do less, you loose. More, you loose. Honestly, I don't really understand the interest of this. Moreover, the validation interface was not ready for this. There were tones of solutions so the organizers had to add them by hand whenever someone wanted to validate with an unattended solution.
That said, as I was too lazy to create a script that would find all the solutions, I felt around until I finally succeeded with the following input:
./the_band_patched_jmp
goto 1;goto 1;left;skipnext;goto -3;left;goto -1;
The Band is off the stage. The public applauses. Everyone is tremendously happy.
Good job. Use your input as the flag (and if you get this message but your flag is not accepted, contact us).
Easter egg bonus
As you can see, we don't look at the second and third bytecode at all because there was no need too (although I studied the second one for HOURS). So what was in the third one? Let's see:
[!] 0x0000:    Core0: Write P                                     Core1: NOP
[!] 0x000a:    Core0: Write l                                     Core1: NOP
[!] 0x0014:    Core0: Write e                                     Core1: NOP
[!] 0x001e:    Core0: Write a                                     Core1: NOP
[!] 0x0029:    Core0: Write s                                     Core1: NOP
[!] 0x0033:    Core0: Write e                                     Core1: NOP
[!] 0x003d:    Core0: Write                                       Core1: NOP
[!] 0x0047:    Core0: Write e                                     Core1: NOP
[!] 0x0052:    Core0: Write n                                     Core1: NOP
[!] 0x005c:    Core0: Write t                                     Core1: NOP
[!] 0x0066:    Core0: Write e                                     Core1: NOP
[!] 0x0070:    Core0: Write r                                     Core1: NOP
[!] 0x007b:    Core0: Write                                       Core1: NOP
[!] 0x0085:    Core0: Write t                                     Core1: NOP
[!] 0x008f:    Core0: Write h                                     Core1: NOP
[!] 0x0099:    Core0: Write e                                     Core1: NOP
[!] 0x00a4:    Core0: Write                                       Core1: NOP
[!] 0x00ae:    Core0: Write f                                     Core1: NOP
[!] 0x00b8:    Core0: Write l                                     Core1: NOP
[!] 0x00c2:    Core0: Write a                                     Core1: NOP
[!] 0x00cd:    Core0: Write g                                     Core1: NOP
[!] 0x00d7:    Core0: Write :                                     Core1: NOP
[!] 0x00e1:    Core0: Write                                       Core1: NOP
[!] 0x00eb:    Core0: alloc obj[0x0], 0xff = 0x879dd2             Core1: NOP
>>> give me 255 char: aaaa&
[!] 0x00f6:    Core0: Read obj[0x879dd2], aaaa&                   Core1: NOP
[!] 0x0100:    Core0: mov obj[0x03], obj[0x879dd2] = 0x61         Core1: NOP
[!] 0x010a:    Core0: neg obj[0x03] = 0x-61                       Core1: NOP
[!] 0x0114:    Core0: add obj[0x03], 0x41 = 0x-020                Core1: NOP
[!] 0x011f:    Core0: jmp 2 (0x0129)                              Core1: NOP
[!] 0x0129:    Core0: add obj[0x00], 0x01 = 0x879dd3              Core1: NOP
[!] 0x0133:    Core0: mov obj[0x03], obj[0x879dd3] = 0x61         Core1: NOP
[!] 0x013d:    Core0: neg obj[0x03] = 0x-61                       Core1: NOP
[!] 0x0148:    Core0: add obj[0x03], 0x59 = 0x-008                Core1: NOP
[!] 0x0152:    Core0: jmp 2 (0x015c)                              Core1: NOP
[!] 0x015c:    Core0: add obj[0x00], 0x01 = 0x879dd4              Core1: NOP
[!] 0x0166:    Core0: mov obj[0x03], obj[0x879dd4] = 0x61         Core1: NOP
[!] 0x0171:    Core0: neg obj[0x03] = 0x-61                       Core1: NOP
[!] 0x017b:    Core0: add obj[0x03], 0x4f = 0x-012                Core1: NOP
[!] 0x0185:    Core0: jmp 2 (0x018f)                              Core1: NOP
[!] 0x018f:    Core0: add obj[0x00], 0x01 = 0x879dd5              Core1: NOP
[!] 0x019a:    Core0: mov obj[0x03], obj[0x879dd5] = 0x61         Core1: NOP
[!] 0x01a4:    Core0: neg obj[0x03] = 0x-61                       Core1: NOP
[!] 0x01ae:    Core0: add obj[0x03], 0x6c = 0x000b                Core1: NOP
[!] 0x01b8:    Core0: jmp 2 (0x01c3)                              Core1: NOP
[!] 0x01c3:    Core0: add obj[0x00], 0x01 = 0x879dd6              Core1: NOP
[!] 0x01cd:    Core0: mov obj[0x03], obj[0x879dd6] = 0x26         Core1: NOP
[!] 0x01d7:    Core0: neg obj[0x03] = 0x-26                       Core1: NOP
[!] 0x01e1:    Core0: add obj[0x03], 0x33 = 0x000d                Core1: NOP
[!] 0x01ec:    Core0: jmp 2 (0x01f6)                              Core1: NOP
[!] 0x01f6:    Core0: add obj[0x00], 0x01 = 0x879dd7              Core1: NOP
[!] 0x0200:    Core0: mov obj[0x03], obj[0x879dd7] = 0x0a         Core1: NOP
[!] 0x020a:    Core0: neg obj[0x03] = 0x-a                        Core1: NOP
[!] 0x0215:    Core0: add obj[0x03], 0x33 = 0x0029                Core1: NOP
[!] 0x021f:    Core0: jmp 2 (0x0229)                              Core1: NOP
[!] 0x0229:    Core0: add obj[0x00], 0x01 = 0x879dd8              Core1: NOP
[!] 0x0233:    Core0: mov obj[0x03], obj[0x879dd8] = 0x00         Core1: NOP
[!] 0x023e:    Core0: neg obj[0x03] = 0x00                        Core1: NOP
[!] 0x0248:    Core0: add obj[0x03], 0x74 = 0x0074                Core1: NOP
[!] 0x0252:    Core0: jmp 2 (0x025c)                              Core1: NOP
[!] 0x025c:    Core0: add obj[0x00], 0x01 = 0x879dd9              Core1: NOP
[!] 0x0267:    Core0: mov obj[0x03], obj[0x879dd9] = 0x00         Core1: NOP
[!] 0x0271:    Core0: neg obj[0x03] = 0x00                        Core1: NOP
[!] 0x027b:    Core0: add obj[0x03], 0x66 = 0x0066                Core1: NOP
[!] 0x0285:    Core0: jmp 2 (0x0290)                              Core1: NOP
[!] 0x0290:    Core0: add obj[0x00], 0x01 = 0x879dda              Core1: NOP
[!] 0x029a:    Core0: mov obj[0x03], obj[0x879dda] = 0x00         Core1: NOP
[!] 0x02a4:    Core0: neg obj[0x03] = 0x00                        Core1: NOP
[!] 0x02ae:    Core0: add obj[0x03], 0x6c = 0x006c                Core1: NOP
[!] 0x02b9:    Core0: jmp 2 (0x02c3)                              Core1: NOP
[!] 0x02c3:    Core0: add obj[0x00], 0x01 = 0x879ddb              Core1: NOP
[!] 0x02cd:    Core0: mov obj[0x03], obj[0x879ddb] = 0x00         Core1: NOP
[!] 0x02d7:    Core0: neg obj[0x03] = 0x00                        Core1: NOP
[!] 0x02e2:    Core0: add obj[0x03], 0x61 = 0x0061                Core1: NOP
[!] 0x02ec:    Core0: jmp 2 (0x02f6)                              Core1: NOP
[!] 0x02f6:    Core0: add obj[0x00], 0x01 = 0x879ddc              Core1: NOP
[!] 0x0300:    Core0: mov obj[0x03], obj[0x879ddc] = 0x00         Core1: NOP
[!] 0x030b:    Core0: neg obj[0x03] = 0x00                        Core1: NOP
[!] 0x0315:    Core0: add obj[0x03], 0x47 = 0x0047                Core1: NOP
[!] 0x031f:    Core0: jmp 2 (0x0329)                              Core1: NOP
[!] 0x0329:    Core0: add obj[0x00], 0x01 = 0x879ddd              Core1: NOP
[!] 0x0334:    Core0: mov obj[0x03], obj[0x879ddd] = 0x00         Core1: NOP
[!] 0x033e:    Core0: neg obj[0x03] = 0x00                        Core1: NOP
[!] 0x0348:    Core0: add obj[0x03], 0x21 = 0x0021                Core1: NOP
[!] 0x0352:    Core0: jmp 2 (0x035d)                              Core1: NOP
[!] 0x035d:    Core0: Write O                                     Core1: NOP
[!] 0x0367:    Core0: Write k                                     Core1: NOP
[!] 0x0371:    Core0: Write                                       Core1: NOP
[!] 0x037b:    Core0: Write g                                     Core1: NOP
[!] 0x0386:    Core0: Write o                                     Core1: NOP
[!] 0x0390:    Core0: Write o                                     Core1: NOP
[!] 0x039a:    Core0: Write d                                     Core1: NOP
[!] 0x03a4:    Core0: Write                                       Core1: NOP
[!] 0x03af:    Core0: Write j                                     Core1: NOP
[!] 0x03b9:    Core0: Write o                                     Core1: NOP
[!] 0x03c3:    Core0: Write b                                     Core1: NOP
[!] 0x03cd:    Core0: Write !                                     Core1: NOP
[!] 0x03d8:    Core0: Write
                                         Core1: NOP
It asks you to input 255 characters and then, whatever you give it, it says "good job" even though all comparisons fail. If we decode bytes compared it gives us the fake flag AYOl33tflaG!.
Thank you guys, that was a really nice challenge!
43 years before
Okay, that's the last one, finally! We're given a .asm with the following information:
Don't always trust emulators... sometimes they are wrong
What's that?
From the image we can deduce the ASM will be assembly for 6502 processors.
The file is not that big and the assembly is pretty easily understandable without having to look at any documentation (for now). Let's see what we can understand rapidly:
// reset at $0000 & full ram zeroed

    org $0000
    JMP start
org may be a directive to explain at which address the next instructions will be in memory and JMP start probably jumps to the label start.
    org  $0666
:start
    LDA first
    BNE run
:alreadyrunned
    JMP alreadyrunned

:run
    INC first
[...]
    org  $08f4
:first  DB $ff
Next instructions will probably be loaded from address 0x666. We have our start label and the we jump to run if first is not 0 otherwise we simply do an infinite loop. first seems to be defined to the value 0xff so our program will jump to run.
:main
    DEC fctsel
    LDA fctsel
    CMP #1
    BEQ callfct1
    CMP #2
    BEQ callfct2
    CMP #3
    BEQ callfct3
    CMP #4
    BEQ callfct4
    CMP #5
    BEQ callfct5
    JMP alreadyrunned
[...]
    org  $08f4
:first  DB $ff
:tmp    DB 0
:fctsel DB 6
First, we decrement fctsel which is defined to 6 and then we compare it to an immediate value: if that's the same, we branch to the accorded label. Here, we'll branch to callfct5.
:callfct5
    JSR jmpfct5
    JMP main
[...]
:jmpfct5
    JMP(fcttbl+2*0)
[...]
    org  $08f4
:first  DB $ff
:tmp    DB 0
:fctsel DB 6
:fcttbl DW fct5
    DW fct4
    DW fct3
    DW fct2
    DW fct1
Long story short: JSR is the equivalent of the call instruction in x86 and all that fuss is nothing more than a jump table which will end in a call fct5.
:fct5
    LDA #$1A
    EOR $9005
    STA $9005
    LDA #$79
    EOR $9006
    STA $9006
    LDA #$46
    EOR $9007
    STA $9007
    LDA #$7C
    EOR $9008
    STA $9008
    RTS

    org  $9000
    data 'GH18{....}'
Nothing fancy: EOR stands for Exclusive OR so we're basically xor'ing values like so:
def f5(flag):
    flag[5] ^= 0x1a
    flag[6] ^= 0x79
    flag[7] ^= 0x46
    flag[8] ^= 0x7c
    return flag

flag = map(ord, "GH18{....}")
flag = f5(flag)
First thing to note here: don't fall into this vicious trap: “....” is not a placeholder, it's the actual value we want to xor!
Coming back to main, we decrement fctsel and call fct4:
:fct4
    LDA $9008
    TAX
    LDA $9007
    TAY
    LDA $9005
    STA $9008
    TXA
    STA $9005
    LDA $9006
    STA $9007
    TYA
    STA $9006
    RTS
Just a bit of explanation here: A stands for accumulator, a register where almost all operation results are put, and X and Y are special registers which can be used for temporary operations. Basically all this code is doing is swapping some values:
def f4(flag):
    x = flag[8]
    y = flag[7]
    flag[8] = flag[5]
    flag[5] = x
    flag[7] = flag[6]
    flag[6] = y
    return flag
Continuing, we now call fct3:
:fct3
    LDX $9008
:loop3  DEC $9005
    DEX
    CPX #'0'
    BNE loop3
    RTS
This one seems very easy but, actually, the second trap of the crackme is here. Look very closely. Yeap, it's CPX #'0' and not CPX #0 so it compares with the actual character 0 and not the number!
def f3(flag):
    x = flag[8]
    while True:
        flag[5] -= 1
        x -= 1
        if x == ord('0'):
            break
    return flag
We're almost done!
:fct2
    LDA $9007
    STA tmp
:loop2  CMP $9005
    BMI end2
    INC $9006
    DEC tmp
    LDA tmp
    JMP loop2
:end2   RTS
This one is a little harder even though it's still very understandable: BMI is “branch minus” and CMP simply does A - $9005 meaning we branch if A < $9005.
def f2(flag):
    tmp = flag[7]
    while True:
        if tmp < flag[5]:
            break
        flag[6] += 1
        tmp -= 1
    return flag
Aaaand, finally, the last one! Almost the same as fct4 but with a EOR:
    org  $1500
:fct1
    LDA $9008
    TAY
    LDA $9007
    TAX
    LDA $9005
    STA $9007
    TYA
    STA $9005
    LDA $9006
    STA $9008
    TXA
    STA $9006
    LDA #$34
    EOR $9006
    STA $9006
    RTS
def f1(flag):
    y = flag[8]
    x = flag[7]
    flag[7] = flag[5]
    flag[5] = y
    flag[8] = flag[6]
    flag[6] = x
    flag[6] ^= 0x34
    return flag
So now, we're done:
flag = map(ord, "GH18{....}")
flag = f5(flag)
flag = f4(flag)
flag = f3(flag)
flag = f2(flag)
flag = f1(flag)
print("".join(map(chr, flag)))
And we can now put the flag GH18{4cNr} into the website and we're dooooooone!
Or not. So what happened?
OMG! WHAT'S THAT?!
Yeah, WHAT THE HELL HAPPENED? That's where I reviewed all my functions for hours, literally. Then I remembered there's a hint:
Don't always trust emulators... sometimes they are wrong
I'm pretty sure you forgot it too. What could that mean? At first I just though “yeah okay man, I don't use any emulator so I don't care”. And then I went crying to a friend that already solved the challenge and he said “this hint is really important” so I decided I'll try to understand what the author of the challenge means.
So what do emulators usually do? They execute some kind of bytecode as if it was the real processor doing it. It seems, for this architecture at least, things can sometimes/often go wrong so there may be a problem with some instructions that are harder than we think to emulate. Let's ask Google “6502 weird”. Nothing very useful. “6502 intricacies” maybe? Still nothing.“6502 emulator bug” is when it becomes interesting. For the first result, Google lists the following links:
6502.org • View topic - (Yet Another) 6502 emulator in C
forum.6502.org › ... › Emulation and Simulation
[...]
Bug or Feature?                         4 posts     10 mars 2018
emulator performance on embedded cpu    15 posts    24 juin 2015
AVR-based 6502 Emulator                 15 posts    26 oct. 2012
Intentional 6502 "Bugs"                 5 posts     3 févr. 2006
Okay now we can talk. We have two interesting results: “Bug or Feature?” and “Intentional 6502 "Bugs"”.
The first one is disappointing but here is what the second one explains: 6502 processors have a weird behavior when executing some instructions which people usually refer to as “bugs”. This post is not very clear but typing “6502 bug” leads us to nesdev. Looking more closely at the content, only two things can interest us:
[...]
 o *An indirect JMP (xxFF) will fail because the MSB will be fetched from address xx00 instead of page xx+1.
[...]
Unlike most microprocessors, the 6502 does not make memory accesses on an
 "as needed" basis.  It always does a fetch or store on every single clock
 cycle.  There are a few cases, though, where there isn't anything to be
 fetched or stored, and a "garbage" fetch or store occurs.  This is mainly
 of importance with the memory-mapped I/O devices:

 o *When doing a fetch-modify-store instruction (INC, DEC, ASL, LSR, ROL,
    ROR) garbage is stored into the location during the "modify" cycle...
    followed by the "real" store cycle which stores the correct data.  The
    CMOS chips do a second fetch instead of a garbage store.
[...]
Reading more carefully we understand that the second one cannot be what we're after: it is only when doing I/O, which we don't, plus the data is correct in the end. This leaves us with the jump problem.
Here we have an even clearer explanation of the problem:
AN INDIRECT JUMP MUST NEVER USE A VECTOR BEGINNING ON THE LAST BYTE OF A PAGE

For example if address $3000 contains $40, $30FF contains $80, and $3100 contains $50, the result of JMP ($30FF) will be a transfer of control to $4080 rather than $5080 as you intended i.e. the 6502 took the low byte of the address from $30FF and the high byte from $3000.
So, now let's find the culprit! First JMP we think of the one in fct2 but it's an absolute one. The only indirect jumps are the ones used by the jump table:
    org  $0666
[...]

:jmpfct5
    JMP(fcttbl+2*0)

:jmpfct4
    JMP(fcttbl+2*1)

:jmpfct3
    JMP(fcttbl+2*2)

:jmpfct2
    JMP(fcttbl+2*3)

:jmpfct1
    JMP(fcttbl+2*4)
So many jumps! Here we see that instructions start at 0x666, most-likely the culprit won't jump into any of these instructions.
    org  $08f4
:first  DB $ff
:tmp    DB 0
:fctsel DB 6
:fcttbl DW fct5
    DW fct4
    DW fct3
    DW fct2
    DW fct1
Data begins at 0x8f4 which is only 11 bytes from a 0x8ff value. Let's count (DB are bytes and DW are words):
    org  $08f4
:first  DB $ff      ; 0x8f4
:tmp    DB 0        ; 0x8f5
:fctsel DB 6        ; 0x8f6
:fcttbl DW fct5     ; 0x8f7
    DW fct4         ; 0x8f9
    DW fct3         ; 0x8fb
    DW fct2         ; 0x8fd
    DW fct1         ; 0x8ff
Yeah! Here we are! The culprit is JMP(fcttbl+2*4) as it jumps to 0x8ff. As fct1 is located at 0x1500, the low byte will be 00 and the high byte too because the memory at 0x800 is probably uninitialized.
This will jump to 0x0000, which the beginning of the program but this time, first won't be zero, meaning we'll end-up in the infinite loop I told you about. What this means for us is that fct1 won't be executed, leaving us with the following code:
flag = map(ord, "GH18{....}")
flag = f5(flag)
flag = f4(flag)
flag = f3(flag)
flag = f2(flag)
print("".join(map(chr, flag)))
This time, we obtain the flag GH18{NrW4} by running solve.py which allows us to finally be done with this year's challenge!
I want to thank the creators of this year's challenge. Despite some very frustrating moments I had fun solving the problems. Let's play again next year!
Thank you to my proof-readers too. They were not even scared by the length of the article!