Introducing ntdissector, a swiss army knife for your NTDS.dit files
This article tells our journey inside the ESE database and the NTDS features that led us to produce the ntdissector tool, suitable for offensive and defensive actions.
Vous souhaitez améliorer vos compétences ? Découvrez nos sessions de formation ! En savoir plus
Introduction
In the end of 2022, we had to perform a password audit for a customer. As usual, we extracted the hashes from the NTDS.dit file and cracked as many as we could. In addition, our customer wanted us to provide statistics by account type, which was stored in a non-standard extensionAttribute. As you probably already know, the usual extraction tools, such as secretsdump from impacket, do not extract such attribute. If we had access to the LDAP service, we could have simply used ldeep, but we only had the NTDS.dit file in our hands.
As a quick solution, we stumbled upon go-ese that converts ESE records to JSON objects. The output is quite rough as the tool does not translate attributes ID to understandable attribute names, but still, it was doing the job, so we could split users' hashes into different files depending on the extensionAttribute value.
Also, this go-ese tool came in handy to extract textual information (departments, location, etc.) to create a custom wordlists and increase the cracking ratio.
Unfortunately, go-ese did not perform any kind of data decryption, so we still had to combine different tools for future assessments. Moreover, during another engagement, it failed to extract a specific DPAPI domain backup key. This is why we decided to dig into this subject to come up with a solution that can convert an NTDS file to well formatted JSON objects (similar to the ldeep output), with decoded and decrypted fields: ntdissector.
Internals
Basically, ntdissector processes the NTDS data in two major steps:
- Extract the record catalog to build various cache files, mostly for ID mappings but also for DN resolution and objects links.
- Record serializing, decryption and formatting.
In order to parse the NTDS file, we decided to rely on the dissect.esedb Python library (and opened a pull request to increase the record serialization speed). Thanks to this library, we could focus on NTDS related features:
- Decrypt secrets.
- Translate to LDAP naming convention and formatting (
DN,members,memberOf, etc.)
How to use ntdissector?
As one can expect, ntdissector requires an NTDS.dit file along with the bootkey or the SYSTEM hive:
$ ntdissector.py [-system SYSTEM] -ntds NTDS [-bootKey BOOTKEY]
In case the bootkey is missing, encrypted attributes will be extracted as is.
By default, the tool works in the ~/.ntdissector/ folder to store its output and cache files. However, the locations can be overridden using -outputdir and -cachedir.
The output directory will contain one JSON file per object class. By default, ntdissector will filter on the following classes: user, secret, group and domainDNS. It is possible to filter by any object class with the -filter option, and, of course, you can filter on all object classes to extract every object. You can also rely on the -filters option to enumerate defined object classes.
$ ntdissector.py -system SYSTEM -ntds NTDS.dit -filters
[*] PEK # 0 found and decrypted: XXXXXXXXXXXXXXXXX
[*] Available classes
dMD
dSA
mTA
top
leaf
room
site
user
fTDfs
addIn
group
domain
person
rIDSet
secret
subnet
volume
mTACfg
...
Moreover, records marked as deleted are discarded by default. Use the -keepDel switch to include them in the output. This option might be useful for incident response analysis.
Performance-wise, the -w option is available to set the number of workers used by the pool running serialization tasks.
And what can it do?
As stated in the introduction, we wanted this tool to be able to extract more than just NT and LM hashes. To do so, we extensively worked on other secrets stored in the NTDS database:
- DPAPI backup keys: the backup key is formatted as a
PVKkey and can be directly used by DPAPI tools such as dpapi.py - Supplemental credentials
- LAPS legacy passwords: plaintext passwords of the local administrators and their associated expiration time.
- Windows LAPS passwords: also known as LAPSv2.
- Authentication secrets related to incoming and outgoing trusts
If you only want to extract LM and NT hashes, a small helper is available in tools:
$ python tools/user_to_secretsdump.py path/to/files/*.json
<millions of hashes>
Some technical challenges
Long values
After the initial parsing and formatting, we wanted to extract the DPAPI backup keys. According to the documentation, these keys are stored as secret objects with the following common names:
BCKUPKEY_P SecretBCKUPKEY_PREFERRED SecretBCKUPKEY_guid1BCKUPKEY_guid2
These objects contain a currentValue attribute which may hold the data or a reference known as the Long Value ID (LID). This comes directly from the ESE database structure that limits the size of the record values. If the value is too large to be stored directly in the record itself, it will be stored in a separate B-tree known as the Long Value tree. Thus, when a record column has the separated flag, the LID is to be used to search the LV tree.
For long values that do not fit within a single entry of the LV tree, the data is split into smaller chunks then stored in multiple entries prefixed with the LID and an offset.
For more details, Microsoft published an article in 2019 (sadly, the part 2 was never published...).
Thankfully, dissect.esedb already implements the Long Value transparent retrieval, so we did not have to implement it ourselves.
DN resolution
In order to mimic the LDAP output, we needed to implement the distinguished name (DN) resolution process. To do so, we had to understand how this information is stored inside the NTDS database.
First, let's describe how the objects are organized (tree structure):
- A
DNT_colattribute contains a unique ID identifying the object itself. - Another
PDNT_colattribute contains the parent object's ID.
Now that we understand how the tree structure is carried out, let's see how to format the relative distinguished name (RDN) of a node:
- A
RDNtyp_colattribute contains an ID referencing anattributeSchemaobject which is theDNtype (CN,OU,DC,CO...). - Another
RDNattribute contains the name of the object.
Using these attributes and some internal ID lookups, we can format the RDN of each node with {RDNtyp_col}={RDN} and the tree structure will allow constructing the full DN as follows: {RDNtyp_col}={RDN}, {RDNtyp_col N-1}={RDN of N-1}, {RDNtyp_col N-2}={RDN of N-2},... until you have a DN such as "CN=Administrator,CN=Users,DC=test,DC=example,DC=com".
Performance
Although the first version of the tool was quite slow, we decided to improve the process speed. By analyzing the time of each function, we quickly identified the source of the problem: the dissect.esedb serialization process.
The former was inefficient since it required, for each record to be serialized, to query all the columns defined in the table. This was pretty time-consuming since a large portion of the columns are not defined in the targeted record. Therefore, to get rid of useless reads, we adopted a solution relying on extracting identifiers from the record data definitions and then mapping them back to the right column. Non-empty identifiers are trivially computed thanks to the last identifier of fixed and variable size fields stored in the record’s header, and the data type identifiers set in the first two bytes of each tagged data definitions.
After patching the root cause, the processing speed time was divided by a factor of 10.
Also, to get an idea of the speed difference between ntdissector and other tools, we took a real example of more than 300K records (3 Go NTDS file):
$ time python ntdissector.py -ntds ntds.dit  -system SYSTEM -f all
...
>>> NTDS
...
* Object Class Schema: 772
* Resolved Columns: 3899/3991
* Total Records: 340272
...
real    23m13,423s
user    42m42,269s
sys    0m35,630s
The first benchmark we chose was, of course, Impacket's secretsdump:
$ time python secretsdump.py -ntds ntds.dit -system SYSTEM LOCAL -history -outputfile output.txt
...
real    12m38,646s
user    12m18,277s
sys    0m9,664s
Obviously, secretsdump is ~2x faster as it only reads 9 specific attributes of a few object classes while ntdissector reads all attributes of all object classes.
LAPSv2
In early 2023, Microsoft released a new version of the LAPS solution named Windows LAPS. Among the significant changes introduced by this new version, password encryption is now supported to avoid unsecure storage as plaintext in the Active Directory. It mainly relies on the DPAPI-NG mechanism and AES-256.
Consequently, the following attributes are introduced in the AD Schema by Windows LAPS:
msLAPS-PasswordmsLAPS-EncryptedPasswordmsLAPS-EncryptedPasswordHistorymsLAPS-EncryptedDSRMPasswordmsLAPS-EncryptedDSRMPasswordHistory
If encryption is disabled, the msLAPS-Password attribute stores a JSON object such as:
{
    "n":"Administrator",    # Name of the managed local account
    "t":"1d91d7c83e34480",  # UTC password update timestamp
    "p":"<password>"        # Plaintext password
}
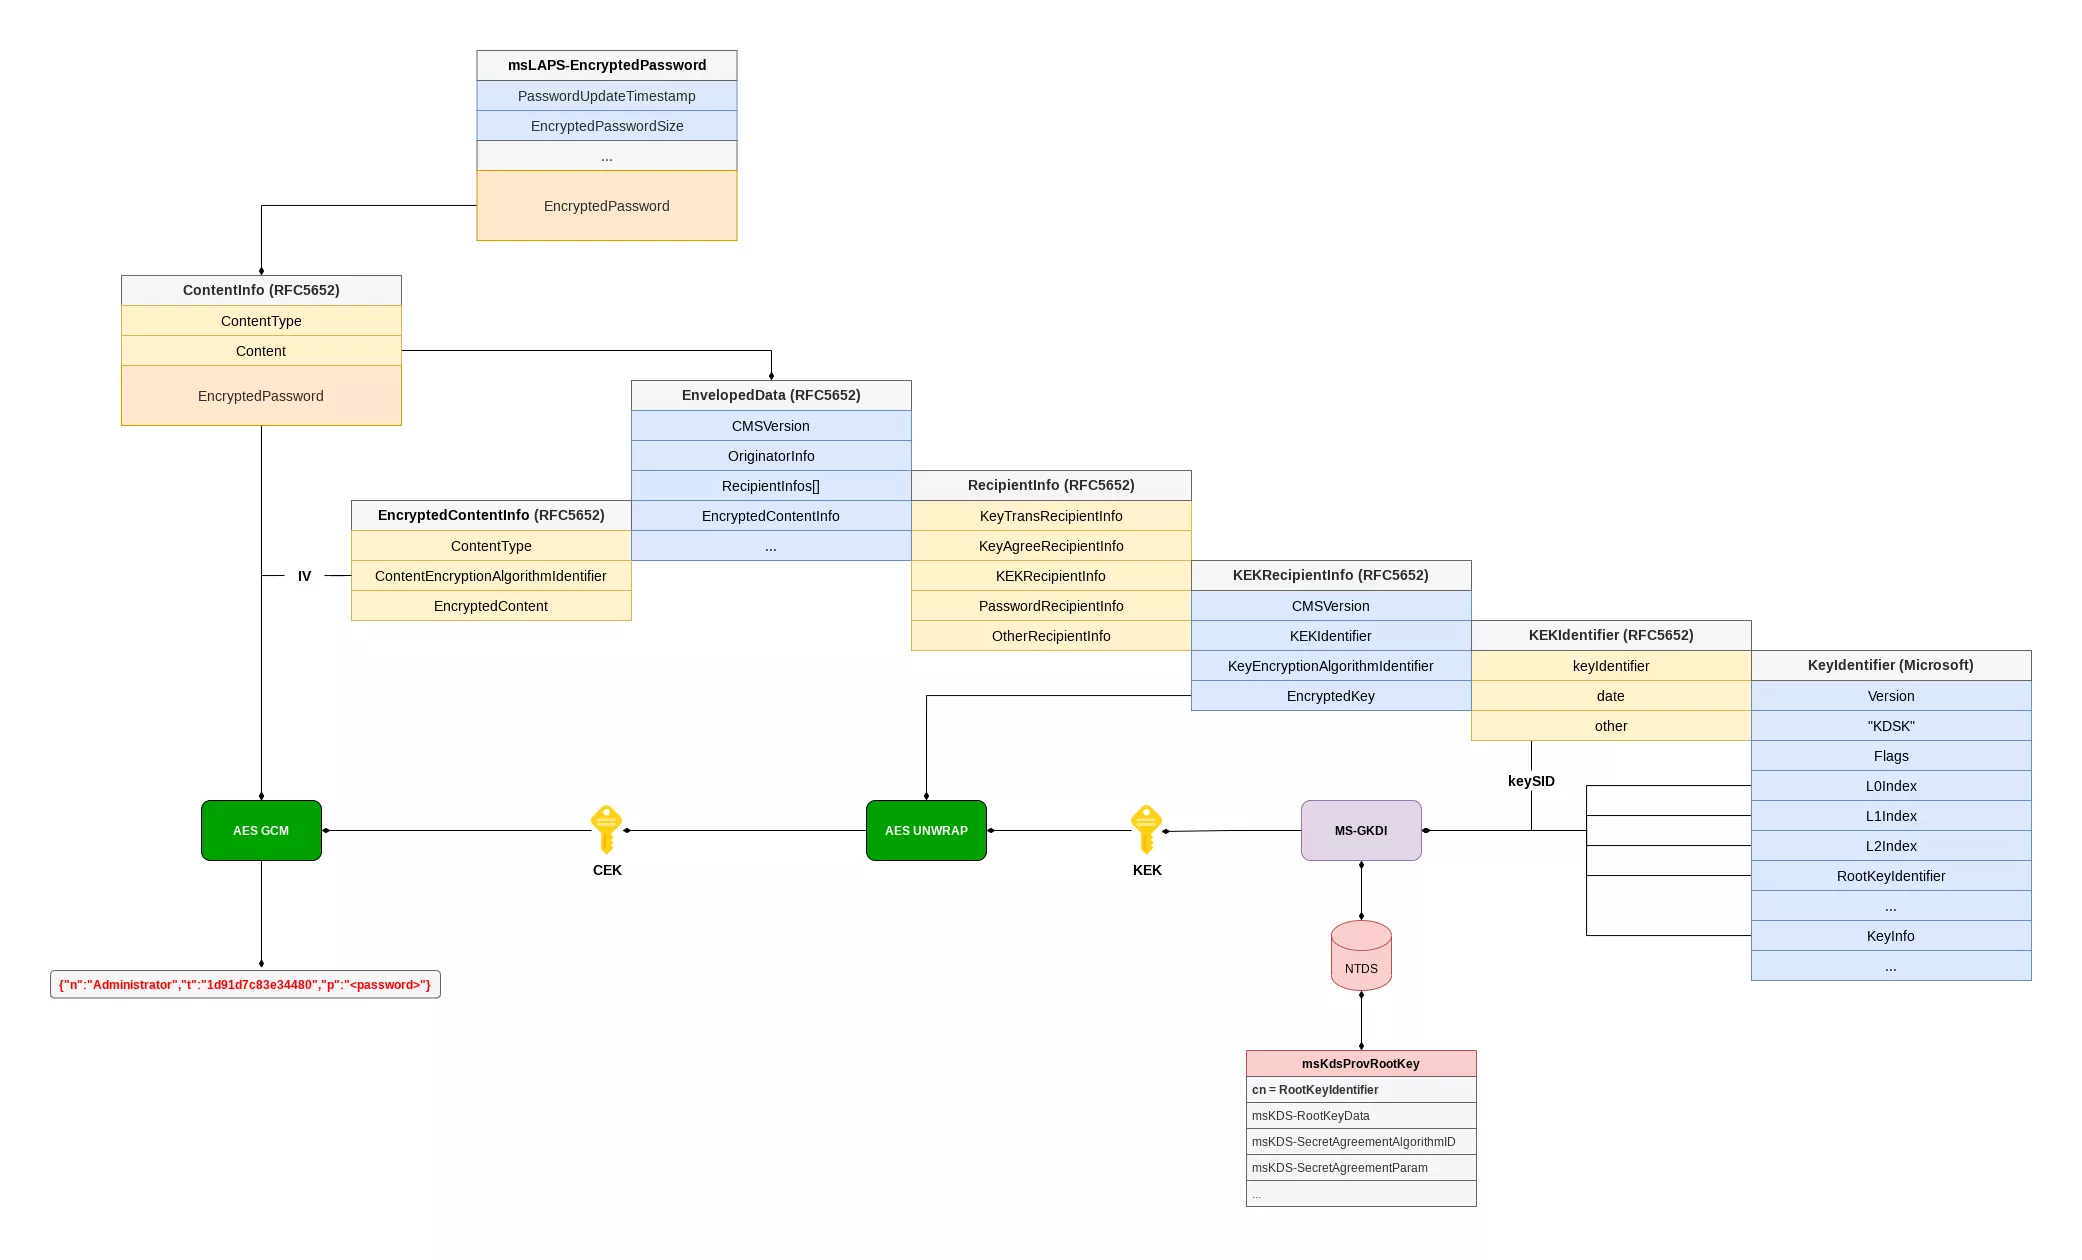
Otherwise, the content of the msLAPS-Encrypted* attributes is a blob which uses the structure format defined for ms-LAPS-EncryptedPassword. The latter contains the JSON described above encrypted with a Content Encryption Key (CEK) protected via the MS-GKDI protocol.
Indeed, the encrypted buffer is prepended with a CMS/PKCS#7 ContentInfo structure (RFC 5652). Nested inside, the encrypted CEK and its associated IV parameter are respectively stored in the KEKRecipientInfo and EncryptedContentInfo structures.
To obtain the Key Encryption Key (KEK), that decrypts the CEK, one has to use the MS-GKDI protocol to call the GetKey operation with the group key identifiers L{0,1,2}Index and RootKeyIdentifier contained in the KeyIdentifier structure, and a security descriptor for the keySID referenced in the KEKIdentifier structure.
The Domain Controller, referred by the protocol as the ISDKey Server, uses the received RootKeyIdentifier to select the right Key Distribution Services (KDS) Root Key from the Active Directory in order to derive the group keys.
Finally, the ISDKey Server computes the KEK with the L2 group key and the secret agreement algorithm (DH or ECDH) configuration stored in the KDS Root Key object.
To decrypt the LAPS password, the CEK should be unwrapped with the obtained KEK, then used along the IV with the AES-GCM algorithm.
Since the KDS objects are stored in the NTDS database, we implemented in ntdissector an offline version of the MS-GKDI protocol as a way to mimic the ISDKey Server to compute the KEK for a given LAPS encrypted password.
To do so, the tool caches objects of the msKds-ProvRootKey class, then selects the right one depending on the identifier referenced in the LAPS blob. The group keys and the KEK are then computed accordingly.
$ jq -S ''  ./out/321f980d81b6572e1f113c34b781182a/msKds-ProvRootKey.json
{
  "cn": "0ff68468-a6bf-086c-5c23-2b42fcecb555",
[...]
  "msKds-KDFAlgorithmID": "SP800_108_CTR_HMAC",
  "msKds-KDFParam": "<HEX>",
  "msKds-PrivateKeyLength": 512,
  "msKds-PublicKeyLength": 2048,
  "msKds-RootKeyData": "<HEX>",
  "msKds-SecretAgreementAlgorithmID": "DH",
  "msKds-SecretAgreementParam": "<HEX>",
[...]
  "objectCategory": "CN=ms-Kds-Prov-RootKey,CN=Schema,CN=Configuration,DC=DEV,DC=LOCAL",
  "objectClass": [
    "msKds-ProvRootKey",
    "top"
  ],
On successful decryption, a new attribute appended with _ is created and populated with the clear text values.
$ jq -S ''  ./out/321f980d81b6572e1f113c34b781182a/computer.json
[...]
  "msLAPS-EncryptedPassword": "ede7d90143390bf9dc0400000000000030820****",
  "msLAPS-EncryptedPasswordHistory": [
    "4ae6d901f5d3d9bcdc040000000000003082044606***",
    "4ae6d901270352bedc040000000000003082044606***"
  ],
  "msLAPS-EncryptedPasswordHistory_": [
    {
      "n": "Administrator",
      "p": "password1",
      "t": "2023-09-13T14:01:05.450085+00:00"
    },
    {
      "n": "Administrator",
      "p": "password2",
      "t": "2023-09-13T14:01:07.915447+00:00"
    }
  ],
  "msLAPS-EncryptedPassword_": {
    "n": "Administrator",
    "p": "password3",
    "t": "2023-09-15T16:02:05.566803+00:00"
  },
  "msLAPS-PasswordExpirationTime": "2023-10-15T16:02:05.566803+00:00",
Conclusion
Working on ntdissector has been quite an adventure, and we are glad to publicly release it.
In the next article, we will explain how ntdissector helped a coworker extract secrets from ADAM NTDS files.
Finally, we would like to publish an ad-hoc script in the upcoming months to transform the ntdissector output files to a format ready to be imported into Bloodhound. Stay tuned if you are interested :)