Kubernetes forensics 1/3: what the container ?
In 2025, Synacktiv CSIRT observed a significant rise in attacks and compromises targeting Kubernetes environments. The consensus is that these attacks are bound to keep expanding as much as the technology itself. To better understand how a Kubernetes cluster works and how to investigate one during a security incident, we decided to work on a series of articles about Kubernetes forensics. This one is the first of the series, focusing on the underlying container technology.
Looking to improve your skills? Discover our trainings sessions! Learn more.
Introduction
Kubernetes has established itself as the orchestration solution for modern cloud-native infrastructures, managing the deployment and scaling of applications at large scale. Companies of all sizes board the Kubernetes ship, seeking the promises of infinite scalability and optimized compute costs.
In reality, this matter is a little more complex. It is true that Kubernetes has a lot to offer in terms of deploying large amounts of applications in an (often) fully managed environment. Being able to focus on productivity tasks instead of managing a dozen servers is critical for a young structure with a limited amount of time and manpower.
Kubernetes clusters are not perfect, they are complex and hard to manage. What they offer in features and ease of use trades for a complex technical layer that is, more often than not, still abstract and obscure for the people who use it.
In an everlasting quest for ease of use, the biggest cloud providers tend to provide an even simpler interface to deploy and use Kubernetes resources through their online consoles. This way, it is possible to create a new account then use one of the many managed Kubernetes offers: AKS for Azure, EKS for AWS or GKE for Google Cloud and deploy containerized applications.
From a forensics point of view, the platform’s distributed architecture, the variety of its components, and the volatile nature of its workloads significantly complicates the collection and preservation of digital artifacts. But that will be for another time.
In this article, we will go back to the roots of how Kubernetes operates. What are the technical layers, what is a container, how does it work, all the questions we will give answer to in this article.
What is a container?
Let’s go back in time.
You just woke up, it is February 2009, you get to work. The new monolithic Enterprise Resource Planning software needs to be deployed to use in production. It has 524 dependencies, 5 databases, 2 reverse proxies (??). It takes 5 hours to install, crashes midway half the time with no recovery options. Each time, you need to reinstall the server because for an unknown reason, the dependencies keep messing up OpenSSH. After two weeks of hell, you finally succeed, the software is production ready.
Now, let’s move forward, it is 2026, imagine that you could package your software in a small shell, that would include all dependencies, all side services. This container could embed everything you need to run the new ERP in production, on any server, at any time. You can execute the container on any server and restart all services with a single command. If the installation failed, you could delete it and restart a new one with a fix. The host would stay the same, everything would be contained. Each container would be isolated from any other boxes running on the same server.
Containers bring a layer of abstraction to the base systems on which they run. They allow applications, of all kind, to be constrained with a set of limits, without the overhead that comes with traditional virtual machines.
Container vs. Virtual Machines
A common misconception is that these two tools, containers and virtual machines (VMs) are the same. This is not the case.
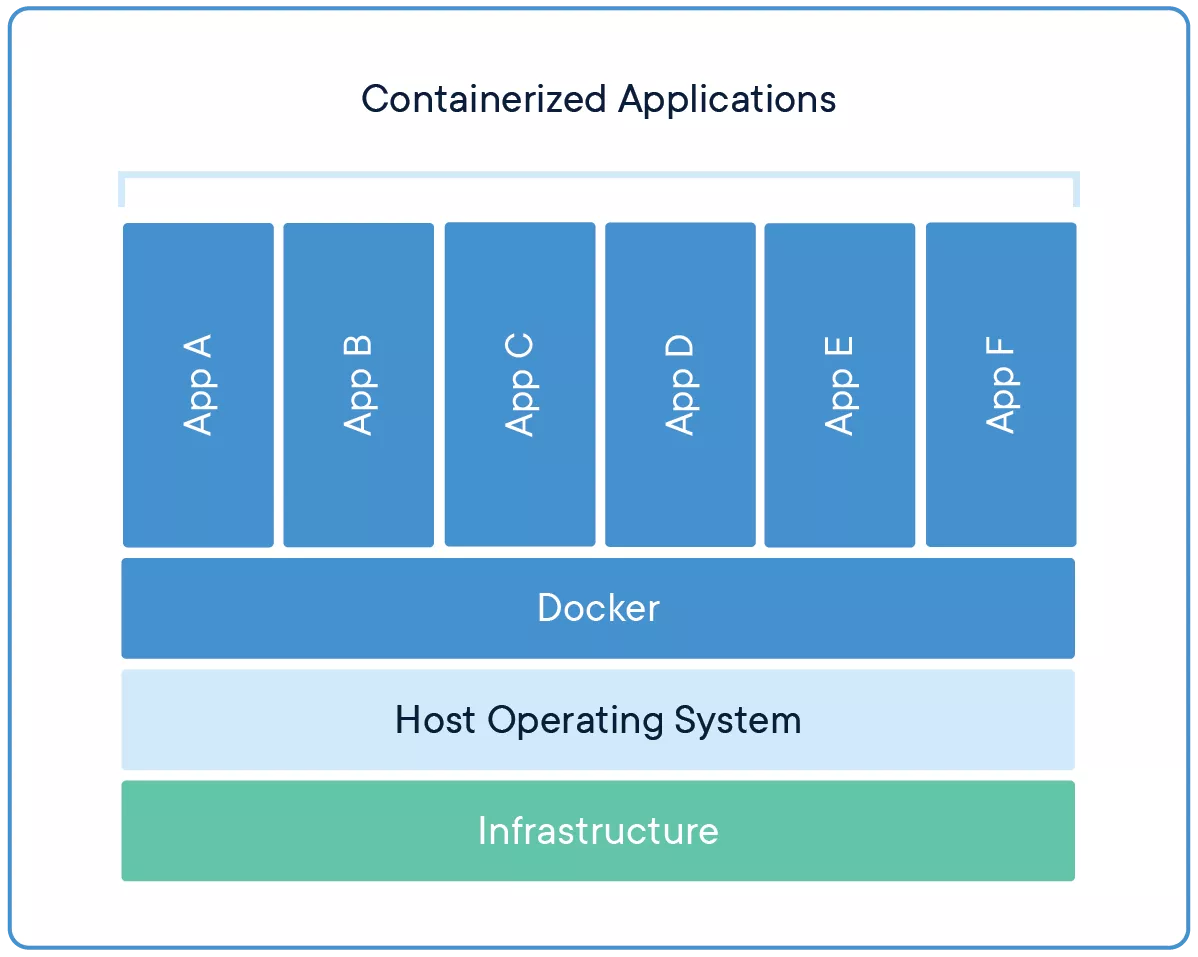
A virtual machine can be represented as a box, same as a container. But where a container only contains the application we need and its dependencies, a virtual machine contains the whole operating system. A container runs on the host using a container engine (Docker, Podman), the virtual machine runs on a hypervisor (Hyper-V, VMware vSphere, libvirt, etc.).
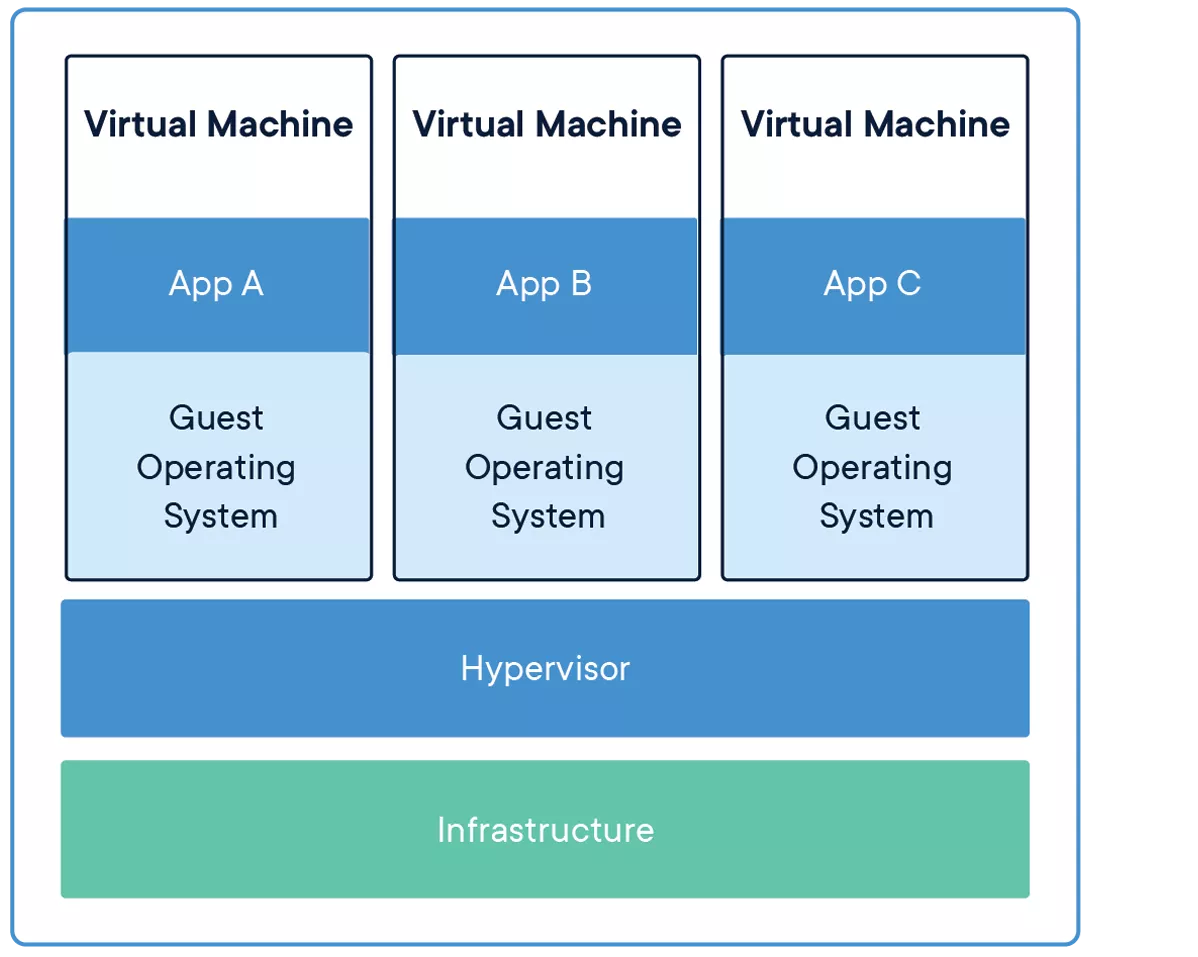
The virtual machine provides a better isolation but is most often bigger, slower to run, and imposes more overhead. A container is lighter, easier to deploy, start and stop at will, easy to recreate if necessary.
Containers specifications
Containers can be used on a broad array of operating systems and hardware. Almost all application released as containers can be run anywhere. This is due to the OCI specification.
OCI stands for Open Container Initiative. It is a governance structure under the Linux Foundation that maintains open standards for containers. It was created in 2015, largely because Docker had become the de facto standard and the industry wanted container formats and runtimes not to be controlled by a single company.
OCI maintains three specifications:
- Runtime specification: defines how to run a container. It describes what a container runtime should expect as input and how it should behave (create, start, kill, delete). If the runtime follows this specification, it can run any OCI-compliant container.
- Image specification: defines what a container image looks like. An OCI image is essentially a manifest (metadata about the image), a set of file system layers (tarballs), and a configuration (what command to run, what environment variables to set, etc.). This is why it is possible to build an image with Docker and run it with Podman, or push it to any compliant registry. The format is the same.
- Distribution specification: defines how images are pushed to and pulled from registries. This standardizes the HTTP API that registries expose, so that any compliant client can talk to any compliant registry. Docker Hub, GitHub Container Registry, Quay, a self-hosted registry: they all speak the same protocol.
Before OCI, Docker’s image format and runtime behavior were the standard simply because Docker was everywhere. OCI took what Docker had built, formalized it, and made it vendor-neutral. That is why today it is possible to mix and match tools from different projects and everything still works together.
Containers are not magic
When you type in a terminal docker run debian /app, multiple events happen behind the scenes. First, the docker client, the CLI you just typed in, will interact with the docker daemon through a UNIX socket and HTTP requests, usually /var/run/docker.sock. This daemon listens on the socket and acts on the requests received.
The docker daemon uses containerd, a container runtime which can manage a complete container lifecycle:
- Push and pull images
- Image transfer and storage
- Container execution and supervision
- among others
In turn, containerd will also use runc to spawn and run containers.
runc is an open source application that implements the OCI runtime specification, meaning it is responsible for actually talking to the Linux kernel to set up the container’s environment.
runc takes a file system bundle (the container’s root file system) and a JSON config file, and uses a combination of Linux kernel features to isolate the process:
- Namespaces to give the process its own view of the system (PID, network, mount, user, etc.)
- cgroups to limit and account for resource usage (CPU, memory, IO)
- seccomp profiles to restrict which syscalls the process can make
- Capabilities to fine-tune what privileges the process has
In other words, a container is just a regular Linux process with a bunch of isolation slapped on top of it. runc is the tool that sets up all that isolation, starts the process, and then gets out of the way. If you want to know more about how runc operates, please read this excellent article from Quarkslab: https://blog.quarkslab.com/digging-into-runtimes-runc.html
Now, runc only handles a single container lifecycle: creates it, starts it, deletes it. It does not care about images, registries, or networking. That’s why we need containerd.
containerd sits between the high-level client (like Docker) and the low-level runtime (runc). It manages the necessary plumbing: pulling images from a registry, unpacking them into file system bundles that runc can understand, managing snapshots and storage, handling container logs, and supervising running containers.
It is actually possible to use containerd without Docker entirely, through its CLI tool ctr or its Go client library. Docker is really just one possible frontend.
The whale or the seal ?
Now that we know Docker relies on a daemon (dockerd) that listens on a socket and manages everything through containerd, let’s talk about Podman, because it takes a different approach.
In 2026, two major open source projects share the spotlight, Podman and Docker. Docker being the oldest and Podman, created by Red Hat, the newest.
The most notable difference is that Podman is daemonless. There is no long-running background process managing containers. When running podman run debian app, Podman directly interacts with the container runtime (it uses crun by default, a lightweight alternative to runc written in C) and the Linux kernel.
In a Podman environment, containers are a child of conmon a small lightweight process whose only job is to babysit the container. conmon holds the container’s terminal, forwards logs, keeps track of the exit code, and maintains the connection to the container runtime.
With Docker, every container is a child of the daemon. This means the daemon is a single point of failure, if dockerd crashes, all running containers become orphans. It also means the daemon typically runs as root, and every user interacting with the Docker socket effectively has root access on the host. This has been a well-known security concern for years.
Podman was designed with rootless containers in mind. But running containers without root is not trivial, a lot of functionalities containers rely on normally require privileges. Podman has to work around several of them.
User namespaces are the foundation. Podman creates a user namespace where an unprivileged user is mapped to UID 0 inside the container. The process thinks it is root, but from the host’s perspective, it is still a regular user. The mapping is configured through /etc/subuid and /etc/subgid, which define a range of subordinate UIDs/GIDs the user is allowed to claim.
❯ podman run -it --rm debian bash
root@ac3ad87f788f:/# ps -aux
USER         PID %CPU %MEM    VSZ   RSS TTY      STAT START   TIME COMMAND
root           1  0.0  0.0   4328  3740 pts/0    Ss   14:56   0:00 bash
root         127  0.0  0.0   6392  3872 pts/0    R+   14:57   0:00 ps -aux
root@ac3ad87f788f:/# id
uid=0(root) gid=0(root) groups=0(root)
Here, the container ID starts with ac3ad87f788f.
❯ ps
USER         PID        PPID        COMMAND
analyst      1922       1           /usr/lib/systemd/systemd --user
analyst      275235     1922        /usr/bin/pasta --config-net --dns-forward 169.254.1.1 -t none -u none[...]
analyst      275237     1922        /usr/bin/conmon --api-version 1 -c ac3ad87f788f[...]
analyst      275243     275237      bash
As we can see, we live under user 0 (root) in the container. But on the host, we only run the container as a regular analyst user. As a matter of fact, creating a file in the container via a bind mount as user 0 will create a file on the host file system as the user that started the container, here analyst.
❯ podman run -it -v /data:/data --rm debian touch /data/hello.txt
❯ ls -alh /data/hello.txt
-rw-r--r--  1 analyst analyst    0 Feb 25 16:18 hello.txt
Networking is where it gets interesting, because creating network interfaces and configuring iptables normally requires root privileges.
The original solution was slirp4netns. It creates a TAP device inside the container’s network namespace and routes traffic through an userspace TCP/IP stack. This solution, while working, isn’t great. Performances are way bellow its rootful counterpart.
The newer alternative is pasta (from the passt project). Instead of emulating a network stack, it translates between namespaces by passing socket file descriptors around, which gets you near-native performance. Since Podman 5.0, pasta is the default and slirp4netns is being phased out.
Storage also needs handling. Mounting overlay traditionally requires privileges, so rootless Podman used to rely on fuse-overlayfs, an userspace implementation through FUSE. On newer kernels (5.11+), unprivileged overlay mounts are supported natively inside user namespaces, so this is no longer required in most cases.
On the CLI side, Podman is largely a drop-in replacement. Most docker commands translate directly: podman build, podman pull, podman run. It is almost possible to alias docker to podman and call it a day.
One particularity that Podman introduces that Docker does not have natively is the concept of pods. A pod is a group of containers that share the same network namespace (and optionally other namespaces). If that sounds familiar, it is because the concept comes straight from Kubernetes. You can create a pod, throw a few containers in it, and they can talk to each other over localhost. Podman can even generate Kubernetes YAML from a running pod, which can be handy if you are prototyping locally before deploying to a cluster.
Under the hood, Podman uses different storage and image management too. It relies on containers/image and containers/storage libraries (from the broader containers ecosystem), while Docker goes through containerd for all of that. In practice, they both pull from the same OCI-compliant registries and produce OCI-compliant images.
Forensic analysis
Now that we know (almost) everything there is to know about containers we can dive into the forensics.
As we discussed earlier, analyzing Podman and Docker containers won’t be exactly the same, even if the OCI specification makes it easier. Several community-made tools can also help to analyze OCI images and process execution. There are a few ways to analyze containers and you can split them into two categories:
- Container
- Image
A container is the process that is currently running on your host. The image is an OCI blob that is stored on the registry and that you pull when you want to run the app. To make these concepts clearer, you can see the container as the process, and the image as the executable file, in regular OS semantics.
Analyzing the container looks a lot like analyzing a regular application on Linux. After all and as we discussed before, a container is simply a process in a namespace.
Analyzing an image on the other hand will require additional tools.
Containers file system
As any application, containers need access to the file system to work. They require their own libraries and configuration files pushed by the developer.
Docker, Podman and Kubernetes use the OverlayFS file system to work.
This OverlayFS is a technology that allows the engine to merge multiple layers of files into a definitive file system.
Let’s take for example two containers running the image ubuntu:latest, which is 50 MB. With OverlayFS, only one copy of the Ubuntu files are necessary for these two containers to run. This first, shared layer, is read-only. OverlayFS will create, on top of this layer, two independent and isolated layers for the containers A and B respectively. These two independent layers will be used by the containers for the runtime file storage.
OverlayFS has 4 types of layers:
- UpperDir: read-write layer, one per container, runtime file storage
- LowerDir: shared layers (Ubuntu image), read-only
- MergedDir: merged view of the UpperDir and LowerDir in a single directory
- WorkDir: internal directory used by OverlayFS to prepare MergedDir
For an individual container on Docker, finding the paths on the host is the command docker inspect container-id | jq .[0].GraphDriver.Data and the directory /var/lib/docker/overlay2/. Beware, the container ID is not the same as the storage ID.
The command for Podman is the same podman inspect container-id | jq .[0].GraphDriver.Data while paths are:
/home/user/.local/share/containers/storage/overlayfor rootless podman containers/var/lib/containers/storage/overlayfor rootful podman containers
$ docker run -it debian bash
root@1f02808c8b83:/#
$ docker inspect 1f02808c8b83 | jq .[0].GraphDriver.Data
{
  "ID": "1f02808c8b83418c9479ec7c82e11d5670b5a0877120d57f3fbcc291597e535a",
  "LowerDir": "/var/lib/docker/overlay2/6a3280[...]a8e1c4-init/diff:/var/lib/docker/overlay2/7929cc[...]042892/diff",
  "MergedDir": "/var/lib/docker/overlay2/6a3280[...]a8e1c4/merged",
  "UpperDir": "/var/lib/docker/overlay2/6a3280[...]a8e1c4/diff",
  "WorkDir": "/var/lib/docker/overlay2/6a3280[...]a8e1c4/work"
}
This is what the UpperDir holds when you create a new file at runtime.
$ docker run -it debian bash
root@1f02808c8b83:/# touch hello.txt
Before:
# sudo tree /var/lib/docker/overlay2/6a3280d[...]/diff
/var/lib/docker/overlay2/6a3280d[...]/diff
After:
# sudo tree /var/lib/docker/overlay2/6a3280d[...]/diff
/var/lib/docker/overlay2/6a3280d[...]/diff
└── hello.txt

1 directory, 1 file
And in the MergedDir there is:
# ls -alh /var/lib/docker/overlay2/6a3280d[...]/merged
total 68K
drwxr-xr-x  1 root root 4.0K Aug  5 17:35 .
drwx--x---  5 root root 4.0K Aug  5 17:29 ..
lrwxrwxrwx  1 root root    7 Jul 21 02:00 bin -> usr/bin
drwxr-xr-x  2 root root 4.0K May  9 16:50 boot
drwxr-xr-x  1 root root 4.0K Aug  5 17:29 dev
-rwxr-xr-x  1 root root    0 Aug  5 17:29 .dockerenv
drwxr-xr-x  1 root root 4.0K Aug  5 17:29 etc
-rw-r--r--  1 root root    0 Aug  5 17:35 hello.txt
drwxr-xr-x  2 root root 4.0K May  9 16:50 home
lrwxrwxrwx  1 root root    7 Jul 21 02:00 lib -> usr/lib
lrwxrwxrwx  1 root root    9 Jul 21 02:00 lib64 -> usr/lib64
drwxr-xr-x  2 root root 4.0K Jul 21 02:00 media
drwxr-xr-x  2 root root 4.0K Jul 21 02:00 mnt
drwxr-xr-x  2 root root 4.0K Jul 21 02:00 opt
drwxr-xr-x  2 root root 4.0K May  9 16:50 proc
drwx------  2 root root 4.0K Jul 21 02:00 root
drwxr-xr-x  3 root root 4.0K Jul 21 02:00 run
lrwxrwxrwx  1 root root    8 Jul 21 02:00 sbin -> usr/sbin
drwxr-xr-x  2 root root 4.0K Jul 21 02:00 srv
drwxr-xr-x  2 root root 4.0K May  9 16:50 sys
drwxrwxrwt  2 root root 4.0K Jul 21 02:00 tmp
drwxr-xr-x 12 root root 4.0K Jul 21 02:00 usr
drwxr-xr-x 11 root root 4.0K Jul 21 02:00 var
Acquisition
When investigating a containerized host, knowing where artifacts live is the first step. Docker and Podman store them differently.
For Docker, the key locations are:
- OverlayFS layers:
/var/lib/docker/overlay2 - Container runtime logs:
/var/lib/docker/containers/<container_id>/<container_id>.log - Container runtime configuration:
/var/lib/docker/containers/<container_id>/config.v2.json
Podman organizes elements differently and relies on journald for logging by default:
- OverlayFS layers:
- Rootless:
/home/user/.local/share/containers/storage/overlay - Rootful:
/var/lib/containers/storage/overlay
- Rootless:
- Container runtime logs:
- Check the log driver with
podman info --format '{{.Host.LogDriver}}' journalddriver:journalctl -a CONTAINER_ID_FULL=containerIDjson-filedriver:/home/user/.local/share/containers/storage/overlay-containers/<id>/userdata/ctr.log
- Check the log driver with
- Container runtime configuration:
/home/user/.local/share/containers/storage/overlay-containers/<id>/userdata/config.json
❯ journalctl -a CONTAINER_ID_FULL=containerID
Feb 27 15:20:01 user container[2309114]: root@c5676c4f3baf:/#
Feb 27 15:20:03 user container[2309114]: root@c5676c4f3baf:/# echo pouet
Feb 27 15:20:03 user container[2309114]: pouet
One important caveat: all of these artifacts (except journald logs) are destroyed at container exit when the --rm flag is used.
Engine artifacts
Beyond individual containers, the engines themselves produce useful logs.
Docker’s daemon logs to journald or /var/log/syslog and can be queried with journalctl -xeu docker.service. With debug logging enabled, traces of API calls, image pulls, and container creation are recorded:
level=debug msg="handling POST request" method=POST module=api request-url="/v1.51/images/create?fromImage=docker.io%2Flibrary%2Fdebian&tag=latest" vars="map[version:1.51]"
level=debug msg="Trying to pull debian from https://registry-1.docker.io"
level=debug msg="Fetching manifest from remote" digest="sha256:b650[...]deba" error="<nil>" remote="debian:latest"
level=debug msg="Pulling ref from V2 registry: debian:latest" digest="sha256:b650[...]deba" remote="debian:latest"
level=debug msg="pulling blob \"sha256:ebed[...]749f\""
level=debug msg="Using /usr/bin/unpigz to decompress"
level=debug msg="handling POST request" form-data="[...]" method=POST module=api request-url=/v1.51/containers/create
vars="map[version:1.51]"
Podman has no daemon, so there are no daemon logs. Instead, it records events either through journald or in a file on disk. You can check which backend is in use with podman info | grep event.
On a live system, podman events streams events in real time. To review past activity, use podman events --since 2025:
2026-02-25 16:18:35 image pull a3624dd[...]2a74256 debian
2026-02-25 15:56:41 container init ac3ad87[...]17e7b12 (image=debian:latest, name=hopeful_meitner)
2026-02-25 15:56:41 container start ac3ad87[...]17e7b12 (image=debian:latest, name=hopeful_meitner)
2026-02-25 15:56:41 container attach ac3ad87[...]17e7b12 (image=debian:latest, name=hopeful_meitner)
2026-02-25 15:56:48 container kill ac3ad87[...]17e7b12 (image=debian:latest, name=hopeful_meitner)
2026-02-25 16:18:19 container died ac3ad87[...]17e7b12 (image=debian:latest, name=hopeful_meitner)
2026-02-25 16:18:19 container remove ac3ad87[...]17e7b12 (image=debian:latest, name=hopeful_meitner)
Live investigation
If you have access to a running system, the container engines provide commands that make triage straightforward:
- List running containers:
docker ps/podman ps - List images:
docker image ls/podman images - Export a running container for offline analysis:
docker export <containerID> --output container.tar - Export an image:
docker save <image> --output image.tar - List file system changes between a container and its base image:
docker diff <containerID> - Extract a suspicious file from a running container:
docker cp <containerID>:/path/to/file /host/path - Compare it with the original from a clean image:
docker run -d <original-image>docker cp <original-container>:/path/to/original-file original-filediff original-file suspicious-file
These commands work the same way with Podman (replace docker with podman).
Postmortem
The more common scenario: you are handed a disk image from a compromised host and need to figure out what happened inside the containers.
Three tools from the community are particularly useful here:
- wagoodman/dive: interactively explore each layer of a container image to identify added or modified files.
- reproducible-containers/diffoci: compare two images side by side to spot discrepancies.
- google/docker-explorer: mount a container’s file system from a Docker data directory (Docker only).
dive lets you step through an image layer by layer, revealing exactly what each build step introduced. This is how, in a previous investigation, we identified malicious activity hidden inside what appeared to be a standard Kali image:
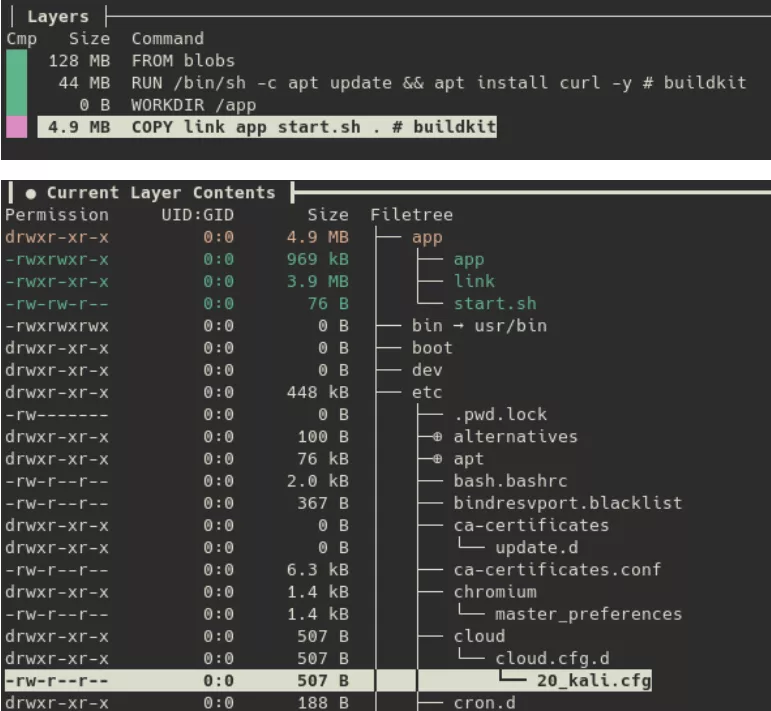
The threat actor had added an app directory containing a shell script and two malicious binaries, app and link.
diffoci takes a different approach: given two images, it reports every file that differs between them. This is especially useful when you suspect a legitimate image has been tampered with. For example, comparing an official Debian image against a suspicious local one:
❯ diffoci diff podman://docker.io/library/debian:latest podman://localhost/debian:latest
Layer    ctx:/layer           name "usr/" appears 1 times in input 0, 2 times in input 1
Layer    ctx:/layer           name "etc/" appears 1 times in input 0, 2 times in input 1
Layer    ctx:/layer           name "usr/bin/" appears 1 times in input 0, 2 times in input 1
Layer    ctx:/layer           name "etc/" appears 1 times in input 0, 2 times in input 1
Layer    ctx:/layer           name "etc/wg0.conf" only appears in input 1
Layer    ctx:/layer           name "usr/" appears 1 times in input 0, 2 times in input 1
Layer    ctx:/layer           name "usr/bin/wireguard" only appears in input 1
Layer    ctx:/layer           name "usr/bin/" appears 1 times in input 0, 2 times in input 1
Here, the local image contains a WireGuard configuration file and binary that have no business being in a Debian base image, likely to establish a covert tunnel. From there, running dive on the image lets you inspect the content of wg0.conf and maybe find additional IOCs.
Conclusion
As we saw, containers are not magic. They are regular Linux processes with namespaces giving them their own view of the system, cgroups keeping them in check, and an OverlayFS providing their file system. Once you understand that, forensics becomes a lot less intimidating — you are just looking at processes, files, and logs.
We went through how Docker and Podman take different approaches under the hood: a centralized daemon on one side, a daemonless architecture on the other. Those differences matter when it comes to forensics, because they change where the interesting artifacts end up and how we analyze them.
This is only the first step though. In production, containers rarely run on their own. They are orchestrated by Kubernetes, which adds complexity with distributed components, ephemeral workloads, and artifacts scattered across nodes.